
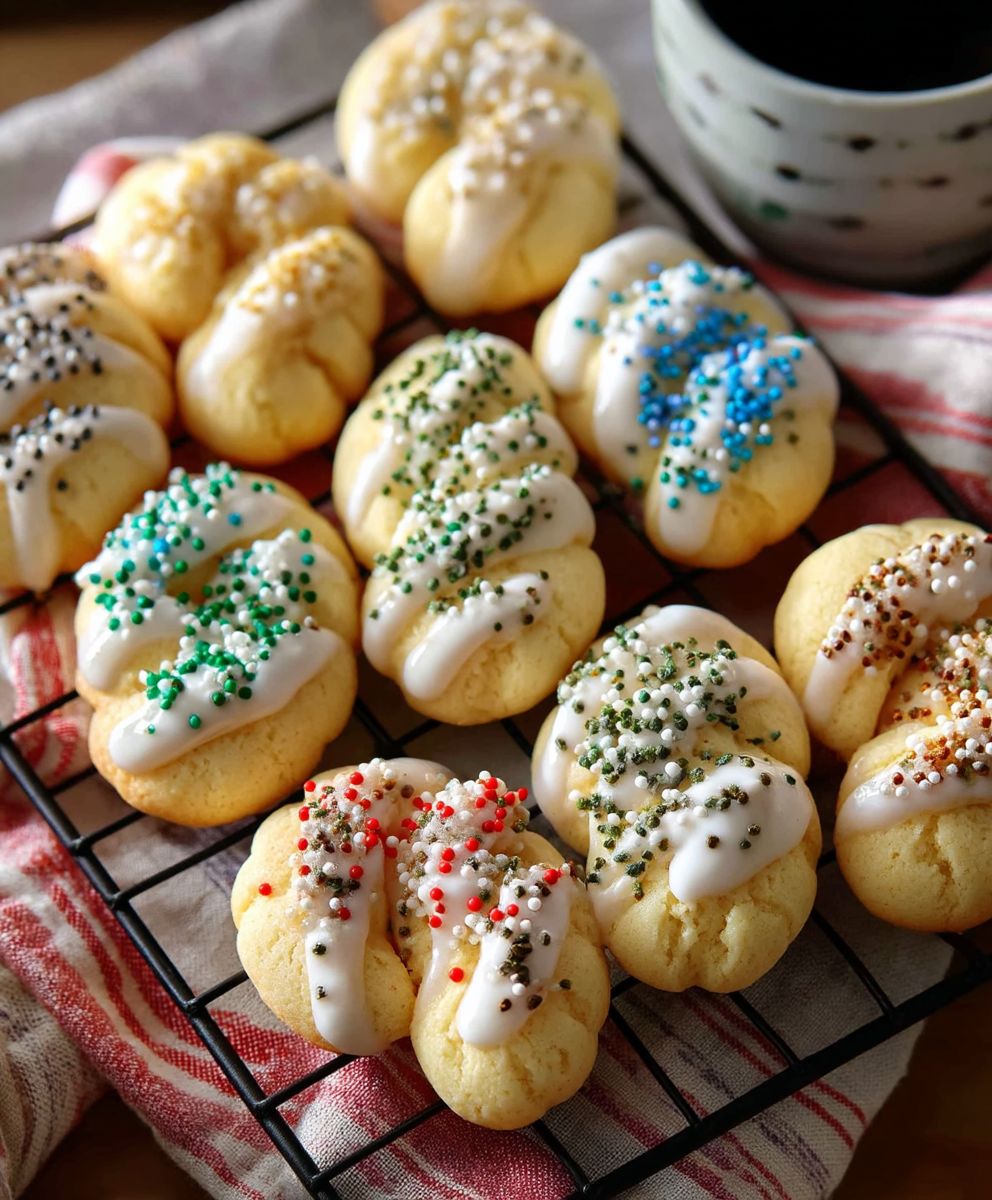
Italian Anise Cookies, those delightful little bites of sweet, licorice-flavored goodness, are more than just a treat; they’re a tradition. Imagine the aroma of anise filling your kitchen, transporting you back to cozy holiday gatherings and the warmth of family. These cookies, often dusted with a delicate sugar glaze, are a staple in Italian-American households, especially around Christmas and Easter. But honestly, why limit ourselves to just special occasions?
The history of anise-flavored baked goods stretches back centuries, with anise itself being prized for its medicinal and aromatic properties since ancient times. In Italy, anise seeds found their way into various sweets, eventually evolving into the beloved Italian Anise Cookies we know and love today. Their subtle sweetness, combined with the distinctive licorice flavor, creates a unique and satisfying taste experience.
What makes these cookies so irresistible? Perhaps it’s the slightly crisp exterior that gives way to a soft, chewy interior. Or maybe it’s the comforting familiarity of the anise flavor, a taste that evokes memories of cherished family recipes passed down through generations. Whatever the reason, these cookies are a crowd-pleaser, perfect for dunking in coffee, sharing with friends, or simply enjoying as a sweet little indulgence. And the best part? They’re surprisingly easy to make at home! So, let’s get baking and create some delicious memories of our own.

Ingredients:
- For the Cookies:
- 3 cups all-purpose flour, plus more for dusting
- 1 ½ teaspoons baking powder
- ½ teaspoon salt
- 1 cup (2 sticks) unsalted butter, softened
- 1 ½ cups granulated sugar
- 3 large eggs
- 2 tablespoons anise extract
- 1 teaspoon vanilla extract
- ½ cup milk
- For the Icing:
- 3 cups powdered sugar
- ¼ cup milk, plus more as needed
- 1 tablespoon anise extract
- Optional: Sprinkles for decoration
Preparing the Cookie Dough
- Combine Dry Ingredients: In a medium bowl, whisk together the flour, baking powder, and salt. This ensures that the baking powder is evenly distributed throughout the flour, which is crucial for a consistent rise. Set this mixture aside for now.
- Cream Butter and Sugar: In a large bowl (or the bowl of a stand mixer), cream together the softened butter and granulated sugar until light and fluffy. This usually takes about 3-5 minutes on medium speed. The mixture should become noticeably paler and increase in volume. Scraping down the sides of the bowl occasionally helps to ensure everything is evenly incorporated. This step is important because it incorporates air into the dough, which contributes to the cookies’ tender texture.
- Incorporate Eggs: Beat in the eggs one at a time, making sure each egg is fully incorporated before adding the next. After adding each egg, scrape down the sides of the bowl to ensure everything is evenly mixed. This prevents the mixture from curdling.
- Add Extracts: Stir in the anise extract and vanilla extract. The anise extract is the star of the show here, giving these cookies their signature flavor. The vanilla extract enhances the overall flavor profile.
- Alternate Wet and Dry Ingredients: Gradually add the dry ingredients to the wet ingredients, alternating with the milk. Begin and end with the dry ingredients. Add about one-third of the dry ingredients, then half of the milk, then another third of the dry ingredients, then the remaining milk, and finally the last of the dry ingredients. Mix until just combined. Be careful not to overmix the dough, as this can develop the gluten in the flour and result in tough cookies. Overmixing is a common mistake, so be gentle!
- Chill the Dough: Wrap the dough in plastic wrap and refrigerate for at least 2 hours, or preferably overnight. Chilling the dough allows the gluten to relax, which results in a more tender cookie. It also makes the dough easier to handle and prevents the cookies from spreading too much during baking. I usually chill mine overnight for the best results.
Baking the Cookies
- Preheat Oven: Preheat your oven to 350°F (175°C). Line baking sheets with parchment paper. Parchment paper prevents the cookies from sticking and makes cleanup a breeze.
- Roll and Cut Out Cookies: On a lightly floured surface, roll out the chilled dough to about ¼-inch thickness. Use cookie cutters to cut out desired shapes. I love using traditional shapes like stars and circles, but feel free to get creative!
- Place on Baking Sheets: Place the cut-out cookies onto the prepared baking sheets, leaving about 1 inch of space between each cookie. This allows for proper air circulation and ensures that the cookies bake evenly.
- Bake: Bake for 8-12 minutes, or until the edges are lightly golden brown. The baking time will vary depending on the size and thickness of your cookies, so keep a close eye on them.
- Cool: Let the cookies cool on the baking sheets for a few minutes before transferring them to a wire rack to cool completely. This prevents them from breaking while they are still warm and delicate.
Preparing the Anise Icing
- Combine Ingredients: In a medium bowl, whisk together the powdered sugar, milk, and anise extract until smooth. Start with the ¼ cup of milk and add more, one tablespoon at a time, until you reach your desired consistency. The icing should be thick enough to coat the cookies but thin enough to spread easily.
- Adjust Consistency: If the icing is too thick, add a little more milk, one teaspoon at a time. If it’s too thin, add a little more powdered sugar, one tablespoon at a time.
Icing and Decorating the Cookies
- Ice the Cookies: Once the cookies are completely cool, dip the tops of the cookies into the icing or spread the icing evenly over the tops using a knife or spatula.
- Add Sprinkles (Optional): If desired, immediately sprinkle the iced cookies with sprinkles. The sprinkles will adhere best if added while the icing is still wet.
- Let Icing Set: Allow the icing to set completely before serving or storing the cookies. This usually takes about 30-60 minutes.
Tips for Perfect Anise Cookies
- Don’t Overmix: Overmixing the dough develops the gluten and results in tough cookies. Mix until just combined.
- Chill the Dough: Chilling the dough is crucial for preventing the cookies from spreading too much during baking.
- Use Good Quality Anise Extract: The quality of the anise extract will greatly impact the flavor of the cookies. Use a good quality extract for the best results.
- Adjust Icing Consistency: The consistency of the icing is important. Adjust the amount of milk to achieve the desired thickness.
- Store Properly: Store the cookies in an airtight container at room temperature. They will stay fresh for several days.
Troubleshooting
- Cookies are too tough: You may have overmixed the dough. Be careful not to overmix in the future.
- Cookies spread too much: The dough may not have been chilled long enough, or the oven temperature may have been too low. Make sure to chill the dough for at least 2 hours and preheat the oven properly.
- Icing is too thin: Add more powdered sugar, one tablespoon at a time, until you reach the desired consistency.
- Icing is too thick: Add more milk, one teaspoon at a time, until you reach the desired consistency.
Variations
- Lemon Anise Cookies: Add 1 tablespoon of lemon zest to the cookie dough for a bright, citrusy twist.
- Chocolate Anise Cookies: Add ½ cup of unsweetened cocoa powder to the dry ingredients for a chocolatey version.
- Gluten-Free Anise Cookies: Use a gluten-free all-purpose flour blend in place of the regular flour. You may need to add a little more liquid to achieve the desired consistency.
Conclusion:
And there you have it! These Italian Anise Cookies are more than just a treat; they’re a little piece of Italian heritage, a burst of comforting flavor, and a guaranteed crowd-pleaser. I truly believe this recipe is a must-try for anyone who appreciates a good cookie, especially if you’re looking for something a little different from the usual chocolate chip or peanut butter fare. The delicate anise flavor, combined with the slightly crisp exterior and soft, chewy interior, creates a texture and taste sensation that’s simply irresistible.
But why is this recipe a must-try, you ask? Well, beyond the incredible flavor profile, it’s also surprisingly easy to make. I’ve broken down each step to ensure even beginner bakers can achieve perfect results. Plus, the ingredients are readily available at most grocery stores, so you won’t have to embark on a wild goose chase to find obscure items. And let’s be honest, the aroma that fills your kitchen while these cookies are baking is worth the effort alone! It’s a warm, inviting scent that instantly evokes feelings of comfort and nostalgia.
Now, let’s talk serving suggestions and variations. These cookies are absolutely divine on their own, enjoyed with a cup of strong coffee or a glass of sweet Vin Santo. They’re also fantastic dipped in melted white chocolate and sprinkled with festive sprinkles, making them perfect for holiday gatherings. For a more sophisticated touch, try pairing them with a scoop of vanilla bean ice cream or a dollop of mascarpone cheese.
If you’re feeling adventurous, there are plenty of ways to customize this recipe to your liking. For a stronger anise flavor, you can add a few drops of anise extract to the dough. If you prefer a softer cookie, reduce the baking time by a minute or two. You can also experiment with different glazes, such as a lemon glaze or a simple powdered sugar glaze. And for those who aren’t fans of anise (though I highly encourage you to give it a try!), you can substitute it with other extracts like almond or vanilla. You could even add a touch of lemon or orange zest for a brighter, citrusy flavor.
Another fun variation is to add a handful of chopped nuts, such as almonds or pistachios, to the dough for added texture and flavor. Or, you could incorporate some dried cranberries or cherries for a festive twist. The possibilities are endless!
I’m so confident that you’ll love these Italian Anise Cookies that I urge you to give this recipe a try. Don’t be intimidated by the name; it’s much simpler than it sounds. Follow the instructions carefully, and I promise you’ll be rewarded with a batch of delicious, authentic Italian cookies that will impress your family and friends.
Once you’ve made them, I’d absolutely love to hear about your experience! Did you make any variations? What did you think of the flavor? Share your photos and comments with me I’m always eager to see your creations and learn from your feedback. Happy baking, and Buon Appetito! I hope this recipe becomes a cherished tradition in your own home, just as it is in mine. Let me know if you have any questions, and I’ll do my best to help you bake the perfect batch of these delightful cookies.
Italian Anise Cookies: A Delicious & Easy Recipe
Classic anise-flavored cookies with a sweet anise icing. Perfect for holidays or any time you crave a unique and delicious treat!
Ingredients
- 3 cups all-purpose flour, plus more for dusting
- 1 ½ teaspoons baking powder
- ½ teaspoon salt
- 1 cup (2 sticks) unsalted butter, softened
- 1 ½ cups granulated sugar
- 3 large eggs
- 2 tablespoons anise extract
- 1 teaspoon vanilla extract
- ½ cup milk
- 3 cups powdered sugar
- ¼ cup milk, plus more as needed
- 1 tablespoon anise extract
- Optional: Sprinkles for decoration
Instructions
- In a medium bowl, whisk together the flour, baking powder, and salt. Set aside.
- In a large bowl (or stand mixer), cream together the softened butter and granulated sugar until light and fluffy (3-5 minutes). Scrape down the sides of the bowl occasionally.
- Beat in the eggs one at a time, ensuring each is fully incorporated before adding the next. Scrape down the sides of the bowl after each addition.
- Stir in the anise extract and vanilla extract.
- Gradually add the dry ingredients to the wet ingredients, alternating with the milk. Begin and end with the dry ingredients. Mix until just combined. Be careful not to overmix.
- Wrap the dough in plastic wrap and refrigerate for at least 2 hours, or preferably overnight.
- Preheat your oven to 350°F (175°C). Line baking sheets with parchment paper.
- On a lightly floured surface, roll out the chilled dough to about ¼-inch thickness. Use cookie cutters to cut out desired shapes.
- Place the cut-out cookies onto the prepared baking sheets, leaving about 1 inch of space between each cookie.
- Bake for 8-12 minutes, or until the edges are lightly golden brown.
- Let the cookies cool on the baking sheets for a few minutes before transferring them to a wire rack to cool completely.
- In a medium bowl, whisk together the powdered sugar, milk, and anise extract until smooth. Start with the ¼ cup of milk and add more, one tablespoon at a time, until you reach your desired consistency.
- If the icing is too thick, add a little more milk, one teaspoon at a time. If it’s too thin, add a little more powdered sugar, one tablespoon at a time.
- Once the cookies are completely cool, dip the tops of the cookies into the icing or spread the icing evenly over the tops using a knife or spatula.
- If desired, immediately sprinkle the iced cookies with sprinkles.
- Allow the icing to set completely before serving or storing the cookies. This usually takes about 30-60 minutes.
Notes
- Don’t overmix the dough.
- Chilling the dough is crucial.
- Use good quality anise extract.
- Adjust icing consistency to your preference.
- Store in an airtight container at room temperature.

Leave a Comment