
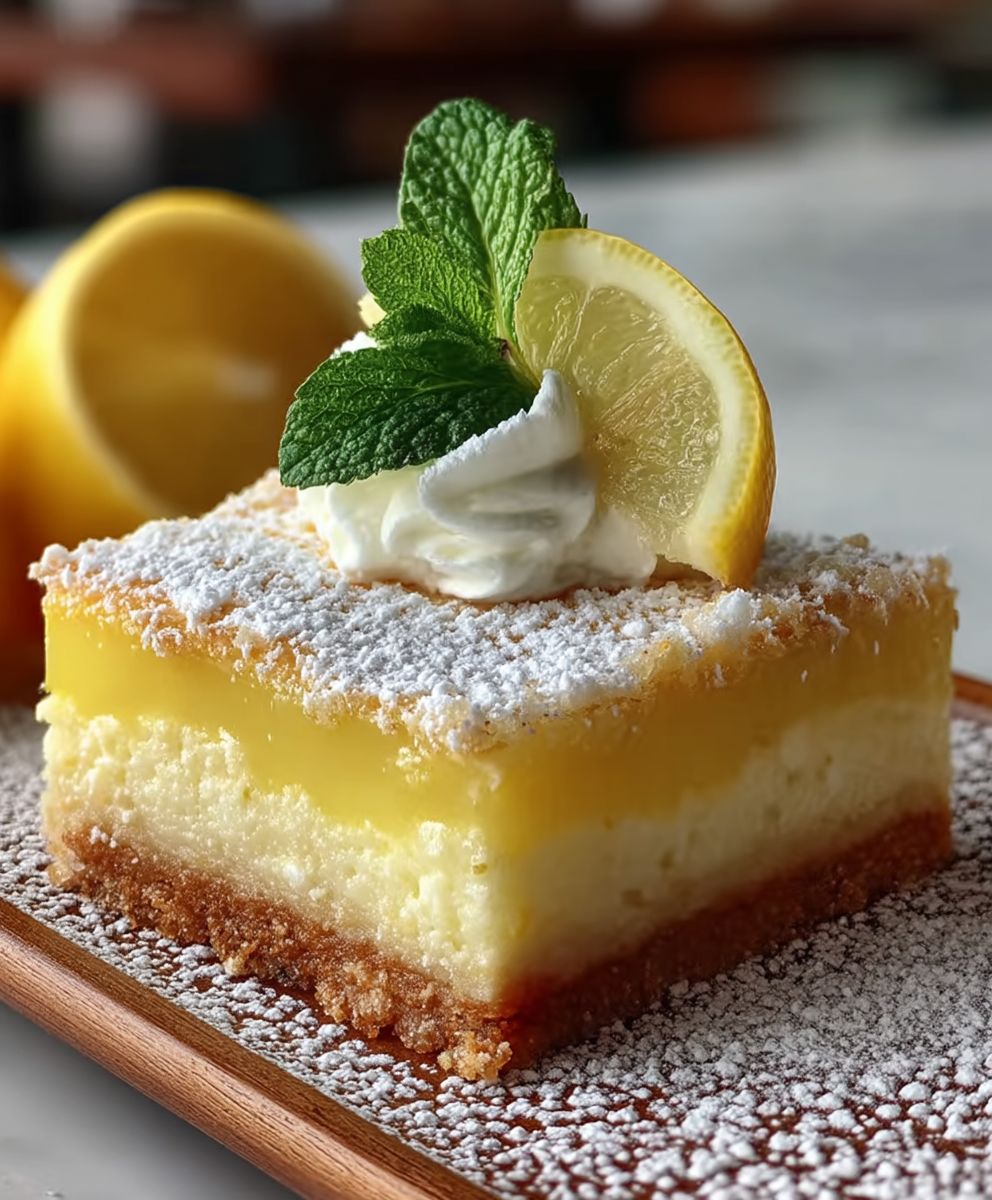
Lemon Bars: sunshine on a plate! Are you ready to experience a burst of citrusy bliss that will brighten even the cloudiest day? These aren’t just any dessert; they’re a delightful combination of sweet and tart, guaranteed to tantalize your taste buds and leave you craving more. I’m so excited to share my foolproof recipe with you!
The history of lemon bars is a bit hazy, but they gained popularity in the mid-20th century, becoming a staple at bake sales and family gatherings across America. Their simple elegance and refreshing flavor made them an instant classic. They represent a time of comfort and homemade goodness, a tradition I’m thrilled to continue with you.
What makes these bars so irresistible? It’s the perfect balance of a buttery, crumbly shortbread crust and a smooth, tangy lemon filling. The contrasting textures and flavors create a symphony in your mouth. Plus, they’re incredibly easy to make, requiring minimal ingredients and effort. Whether you’re a seasoned baker or a kitchen novice, you can whip up a batch of these delightful treats in no time. They are perfect for potlucks, afternoon tea, or simply a sweet treat to brighten your day. Get ready to bake the perfect batch of lemon bars!

Ingredients:
- For the Crust:
- 1 ½ cups (180g) all-purpose flour
- ½ cup (100g) unsalted butter, cold and cubed
- ¼ cup (50g) granulated sugar
- ¼ teaspoon salt
- For the Filling:
- 4 large eggs
- 1 ½ cups (300g) granulated sugar
- ? cup (40g) all-purpose flour
- ½ teaspoon baking powder
- ½ cup (120ml) fresh lemon juice (from about 3-4 lemons)
- 2 tablespoons lemon zest (from about 3-4 lemons)
- Powdered sugar, for dusting (optional)
Preparing the Crust:
- Combine Dry Ingredients: In a large bowl, whisk together the flour, sugar, and salt. This ensures the salt is evenly distributed, which is crucial for flavor.
- Cut in the Butter: Add the cold, cubed butter to the flour mixture. Using a pastry blender or your fingertips, cut the butter into the flour until the mixture resembles coarse crumbs. The key here is to work quickly so the butter stays cold. If the butter gets too warm, the crust will be tough. You can also use a food processor for this step. Pulse until the mixture resembles coarse crumbs.
- Press into Pan: Press the mixture firmly and evenly into the bottom of an ungreased 9×13 inch baking pan. I like to use the bottom of a measuring cup to really pack it down. This creates a solid base for the lemon filling.
- Pre-bake the Crust: Bake the crust in a preheated oven at 350°F (175°C) for 18-20 minutes, or until lightly golden brown. Keep a close eye on it, as ovens can vary. You want it to be set but not overly browned, as it will bake again with the filling.
Making the Lemon Filling:
- Whisk Eggs and Sugar: While the crust is baking, prepare the lemon filling. In a large bowl, whisk together the eggs and sugar until light and slightly thickened. This usually takes about 2-3 minutes.
- Add Dry Ingredients: Whisk in the flour and baking powder until just combined. Be careful not to overmix, as this can develop the gluten in the flour and make the filling tough.
- Incorporate Lemon Juice and Zest: Stir in the lemon juice and lemon zest until everything is well combined. The mixture will be quite liquid, which is perfectly normal. The lemon juice is what gives these bars their signature tangy flavor, and the zest adds an extra layer of lemon aroma and flavor.
Baking the Lemon Bars:
- Pour Filling over Crust: Once the crust is pre-baked, remove it from the oven and immediately pour the lemon filling evenly over the hot crust. The heat from the crust will help the filling set properly.
- Bake Again: Return the pan to the oven and bake for another 20-25 minutes, or until the filling is set and no longer jiggly in the center. The edges should be lightly golden brown. Again, keep a close watch, as baking times can vary. A slight jiggle is okay, as the filling will continue to set as it cools.
- Cool Completely: Remove the lemon bars from the oven and let them cool completely in the pan on a wire rack. This is crucial! If you try to cut them while they’re still warm, they will be too soft and messy. Cooling allows the filling to firm up properly. I usually let them cool for at least 2-3 hours, or even overnight in the refrigerator.
Cutting and Serving:
- Dust with Powdered Sugar (Optional): Once the lemon bars are completely cool, dust them generously with powdered sugar. This adds a touch of sweetness and makes them look extra pretty.
- Cut into Squares: Using a sharp knife, cut the lemon bars into squares. I find it helpful to wipe the knife clean between each cut to get clean, even slices. You can cut them into any size you like, but I usually go for about 2-inch squares.
- Serve and Enjoy: Serve the lemon bars and enjoy! They are best served chilled or at room temperature. They can be stored in an airtight container in the refrigerator for up to 3-4 days.
Tips for Perfect Lemon Bars:
- Use Fresh Lemon Juice: Bottled lemon juice just doesn’t compare to the flavor of fresh lemon juice. It’s worth the extra effort to squeeze your own.
- Don’t Overbake: Overbaked lemon bars will be dry and cracked. You want the filling to be set but still slightly soft in the center.
- Let Them Cool Completely: I can’t stress this enough! Cooling is essential for the filling to set properly.
- Use Cold Butter: Cold butter is key to a flaky crust. Make sure your butter is very cold before you start.
- Zest the Lemons First: It’s much easier to zest the lemons before you juice them.
- Line the Pan with Parchment Paper: For easy removal, line the baking pan with parchment paper, leaving an overhang on the sides. This will allow you to lift the entire slab of lemon bars out of the pan at once.
- Adjust Sweetness to Taste: If you prefer a less tart lemon bar, you can increase the amount of sugar in the filling.
- Add a Glaze: For an extra touch of sweetness and shine, you can drizzle a simple glaze over the cooled lemon bars. To make a glaze, whisk together powdered sugar with a little bit of lemon juice or milk until you reach your desired consistency.
- Experiment with Flavors: While classic lemon bars are delicious on their own, you can also experiment with other flavors. Try adding a teaspoon of vanilla extract to the filling, or substituting some of the lemon juice with lime juice for a lime bar variation. You could even add a layer of raspberry jam between the crust and the filling for a raspberry lemon bar.
Troubleshooting:
- Crust is Too Hard: This is usually caused by overmixing the dough or using too much flour. Be careful not to overwork the dough, and make sure you’re measuring the flour correctly.
- Filling is Too Runny: This could be due to not baking the bars long enough, or using too much lemon juice. Make sure you bake the bars until the filling is set, and measure the lemon juice accurately.
- Filling is Cracked: This is usually caused by overbaking the bars. Keep a close eye on them and remove them from the oven as soon as the filling is set.
- Bars are Difficult to Cut: Make sure the bars are completely cool before cutting them. Use a sharp knife and wipe it clean between each cut.
Variations:
- Lime Bars: Substitute the lemon juice and zest with lime juice and zest for a tangy lime bar.
- Orange Bars: Substitute the lemon juice and zest with orange juice and zest for a citrusy orange bar.
- Raspberry Lemon Bars: Spread a thin layer of raspberry jam over the pre-baked crust before pouring the lemon filling on top.
- Coconut Lemon Bars: Add ½ cup of shredded coconut to the filling for a tropical twist.
- Lavender Lemon Bars: Infuse the sugar with dried lavender for a floral and aromatic lemon bar. To do this, combine the sugar with 1-2 tablespoons of dried lavender in a jar and let it sit for a few days, shaking occasionally. Then, use the lavender-infused sugar in the recipe as directed.
Storage Instructions:
Lemon bars are best stored in an airtight container in the refrigerator. They will keep for up to 3-4 days. You can also freeze lemon bars for longer storage. Wrap them tightly in plastic wrap and then place them in a freezer-safe bag or container. They can be frozen for up to 2-3 months. Thaw them in the refrigerator overnight before serving.
Nutritional Information (Approximate):
Please note that the nutritional information is an estimate and may vary depending on the specific ingredients and portion sizes used.
- Calories: Approximately 250-300 per bar
- Fat: 12-15g
- Saturated Fat: 7-9g
- Cholesterol: 70-
Conclusion:
These aren’t just any lemon bars; they’re sunshine on a plate! The perfect balance of tart and sweet, coupled with that buttery, melt-in-your-mouth shortbread crust, makes this lemon bars recipe an absolute must-try. Seriously, if you’re looking for a dessert that’s both comforting and refreshing, look no further. I’ve made countless batches, and they disappear faster than I can say “lemon!”
But the best part? This recipe is incredibly versatile. While I adore them just as they are, dusted with a generous layer of powdered sugar, there are so many ways to customize them to your liking. Feeling adventurous? Try adding a hint of lavender to the shortbread crust for a floral twist. Or, for a more tropical vibe, incorporate a tablespoon of lime zest into the lemon filling. Trust me, the possibilities are endless!
For serving, these lemon bars are fantastic on their own, but they also pair beautifully with a scoop of vanilla ice cream or a dollop of freshly whipped cream. Imagine: a warm lemon bar, the cool creaminess of the ice cream, and a sprinkle of fresh berries on top. Pure bliss! They’re also perfect for afternoon tea, potlucks, or even a sophisticated dessert for a dinner party. Cut them into smaller squares for bite-sized treats, or keep them larger for a more substantial indulgence.
And don’t be intimidated by the thought of making them from scratch. This recipe is surprisingly simple, even for beginner bakers. The key is to follow the instructions carefully and use high-quality ingredients. Freshly squeezed lemon juice is a must it makes all the difference in the flavor! And don’t overbake the bars; you want the filling to be set but still slightly jiggly in the center.
I truly believe that everyone should have a go-to lemon bar recipe, and I’m confident that this one will become yours. It’s a crowd-pleaser, a mood-booster, and a guaranteed success. Plus, the bright, citrusy aroma that fills your kitchen while they’re baking is simply divine.
So, what are you waiting for? Gather your ingredients, preheat your oven, and get ready to experience the joy of homemade lemon bars. I promise you won’t regret it! And once you’ve tried them, I’d absolutely love to hear about your experience. Did you make any variations? What did you think of the texture? Did you share them with friends and family?
Please, come back and leave a comment below, sharing your thoughts and any tips or tricks you discovered along the way. Your feedback is invaluable, and it helps other bakers create their own perfect batch of these delightful lemon bars. Happy baking, and enjoy every single bite! I can’t wait to hear all about your lemon bar adventures!
Lemon Bars: The Ultimate Guide to Baking Perfect Treats
Tangy and sweet lemon bars with a buttery shortbread crust and a bright, citrusy filling. Perfect for a refreshing dessert or afternoon treat.
Ingredients
- 1 ½ cups (180g) all-purpose flour
- ½ cup (100g) unsalted butter, cold and cubed
- ¼ cup (50g) granulated sugar
- ¼ teaspoon salt
- 4 large eggs
- 1 ½ cups (300g) granulated sugar
- ? cup (40g) all-purpose flour
- ½ teaspoon baking powder
- ½ cup (120ml) fresh lemon juice (from about 3-4 lemons)
- 2 tablespoons lemon zest (from about 3-4 lemons)
- Powdered sugar, for dusting (optional)
Instructions
- In a large bowl, whisk together the flour, sugar, and salt.
- Add the cold, cubed butter to the flour mixture. Using a pastry blender or your fingertips, cut the butter into the flour until the mixture resembles coarse crumbs. Work quickly to keep the butter cold. Alternatively, use a food processor and pulse until the mixture resembles coarse crumbs.
- Press the mixture firmly and evenly into the bottom of an ungreased 9×13 inch baking pan. Use the bottom of a measuring cup to pack it down.
- Bake the crust in a preheated oven at 350°F (175°C) for 18-20 minutes, or until lightly golden brown.
- While the crust is baking, prepare the lemon filling. In a large bowl, whisk together the eggs and sugar until light and slightly thickened (about 2-3 minutes).
- Whisk in the flour and baking powder until just combined. Be careful not to overmix.
- Stir in the lemon juice and lemon zest until everything is well combined.
- Once the crust is pre-baked, remove it from the oven and immediately pour the lemon filling evenly over the hot crust.
- Return the pan to the oven and bake for another 20-25 minutes, or until the filling is set and no longer jiggly in the center. The edges should be lightly golden brown.
- Remove the lemon bars from the oven and let them cool completely in the pan on a wire rack (at least 2-3 hours, or overnight in the refrigerator).
- Once the lemon bars are completely cool, dust them generously with powdered sugar.
- Using a sharp knife, cut the lemon bars into squares. Wipe the knife clean between each cut.
- Serve the lemon bars chilled or at room temperature. Store in an airtight container in the refrigerator for up to 3-4 days.
Notes
- Use fresh lemon juice for the best flavor.
- Don’t overbake the lemon bars.
- Cool the bars completely before cutting.
- Use cold butter for a flaky crust.
- Zest the lemons before juicing them.
- For easy removal, line the baking pan with parchment paper, leaving an overhang on the sides.
- Adjust sweetness to taste by increasing the amount of sugar in the filling.
- Add a glaze by whisking together powdered sugar with a little bit of lemon juice or milk.
- Experiment with flavors by adding vanilla extract, lime juice, raspberry jam, shredded coconut, or lavender.
Leave a Comment