
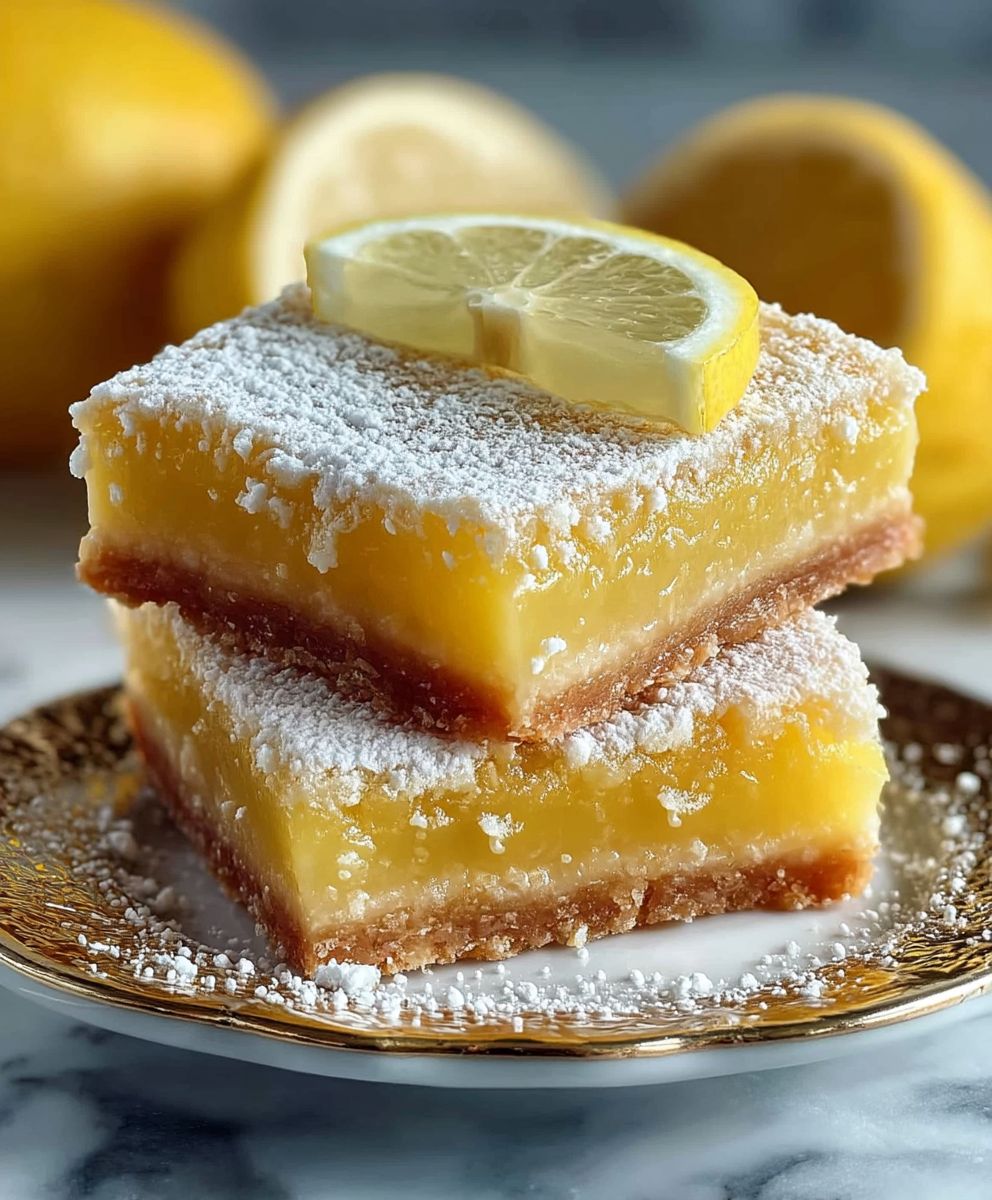
Lemon Bars: Prepare to pucker up and fall in love! Imagine sinking your teeth into a buttery, crumbly shortbread crust, topped with a vibrant, tangy, and perfectly sweet lemon custard. This isn’t just dessert; it’s a sunshine-filled experience in every single bite. Have you ever wondered about the origins of this delightful treat? While the exact history is a bit hazy, similar custard-based desserts have been enjoyed for centuries. The modern lemon bars we know and love likely gained popularity in the early 20th century, quickly becoming a staple at bake sales, potlucks, and family gatherings.
What makes these citrusy squares so irresistible? It’s the perfect balance of textures and flavors. The rich, buttery crust provides a comforting foundation for the bright, zesty lemon filling. People adore them because they’re relatively easy to make, incredibly satisfying, and offer a refreshing contrast to heavier desserts. Plus, they’re portable and perfect for sharing (or not!). Get ready to discover the secrets to baking the most amazing lemon bars you’ve ever tasted!

Ingredients:
- For the Crust:
- 1 ½ cups (180g) all-purpose flour
- ½ cup (100g) unsalted butter, cold and cubed
- ¼ cup (50g) granulated sugar
- ¼ teaspoon salt
- For the Lemon Filling:
- 4 large eggs
- 1 ½ cups (300g) granulated sugar
- 6 tablespoons (90ml) lemon juice, freshly squeezed (from about 3-4 lemons)
- ¼ cup (30g) all-purpose flour
- ¼ teaspoon baking powder
- Pinch of salt
- 2 tablespoons (30ml) heavy cream (optional, for extra richness)
- 1 tablespoon lemon zest (from about 1-2 lemons)
- For Dusting:
- Powdered sugar, for dusting
Preparing the Crust
Okay, let’s get started with the crust! This is the foundation of our delicious lemon bars, so we want to make sure it’s nice and sturdy.
- Combine Dry Ingredients: In a medium bowl, whisk together the flour, sugar, and salt. This ensures that the salt is evenly distributed throughout the crust, which is super important for flavor balance.
- Cut in the Butter: Add the cold, cubed butter to the flour mixture. Now, you have a few options here. You can use a pastry blender, which is my personal favorite for getting that perfect crumbly texture. If you don’t have one, you can use two forks or even your fingertips. The goal is to break the butter down into small pieces, about the size of peas. You want to work quickly so the butter doesn’t melt too much. If you’re using your fingertips, try to keep them cool!
- Create a Crumbly Mixture: Continue cutting in the butter until the mixture resembles coarse crumbs. It should look like sand with little bits of butter scattered throughout. Don’t overmix! Overmixing will develop the gluten in the flour, resulting in a tough crust. We want a tender, melt-in-your-mouth crust.
- Press into the Pan: Preheat your oven to 350°F (175°C). Lightly grease and flour an 8×8 inch baking pan. You can also line the pan with parchment paper, leaving an overhang on the sides. This makes it super easy to lift the lemon bars out of the pan later. Press the crumbly mixture evenly into the bottom of the prepared pan. I like to use the bottom of a measuring cup to really pack it down and create a smooth, even surface.
- Pre-bake the Crust: Bake the crust for 18-20 minutes, or until it’s lightly golden brown. Keep a close eye on it, as ovens can vary. You want it to be set but not overly browned. This pre-baking step is crucial because it ensures that the crust is fully cooked and can support the lemon filling.
- Let Cool Slightly: Remove the crust from the oven and let it cool slightly while you prepare the lemon filling. Don’t turn off the oven! We’ll need it again soon.
Preparing the Lemon Filling
Now for the star of the show the lemon filling! This is where all that bright, tangy flavor comes from. Freshly squeezed lemon juice is key here; it makes a huge difference in the overall taste.
- Whisk Eggs and Sugar: In a large bowl, whisk together the eggs and sugar until light and slightly thickened. This usually takes about 2-3 minutes. The mixture should be pale yellow and have a slightly ribbon-like consistency. This step helps to incorporate air into the filling, which will give it a nice, light texture.
- Add Lemon Juice and Zest: Stir in the freshly squeezed lemon juice and lemon zest. The zest adds a ton of lemon flavor, so don’t skip it! Make sure you only zest the yellow part of the lemon, avoiding the white pith, which can be bitter.
- Incorporate Dry Ingredients: In a separate small bowl, whisk together the flour, baking powder, and salt. This ensures that the baking powder is evenly distributed, which will help the filling rise slightly and create a nice, even texture. Gradually add the dry ingredients to the wet ingredients, whisking until just combined. Be careful not to overmix, as this can develop the gluten in the flour and result in a tough filling.
- Add Heavy Cream (Optional): If you’re using heavy cream, stir it in now. The heavy cream adds a touch of richness and creaminess to the filling, but it’s totally optional. If you prefer a slightly tangier filling, you can skip it.
Baking the Lemon Bars
Almost there! Now it’s time to bake our lemon bars to golden, tangy perfection.
- Pour Filling over Crust: Pour the lemon filling evenly over the pre-baked crust. Make sure the filling is spread evenly so that the bars bake uniformly.
- Bake: Bake in the preheated oven for 25-30 minutes, or until the filling is set but still slightly jiggly in the center. The edges should be lightly golden brown. The filling will continue to set as it cools, so don’t overbake it. Overbaking can result in a dry, cracked filling.
- Cool Completely: Remove the lemon bars from the oven and let them cool completely in the pan. This is crucial! The filling needs time to set properly. If you try to cut them while they’re still warm, they’ll be a gooey mess. I usually let them cool at room temperature for about an hour, then transfer them to the refrigerator to chill for at least 2 hours, or even overnight.
Cutting and Serving
The final step cutting and serving! This is the best part, because you finally get to enjoy your hard work.
- Dust with Powdered Sugar: Once the lemon bars are completely cool, dust them generously with powdered sugar. This adds a touch of sweetness and makes them look extra pretty.
- Cut into Squares: Use a sharp knife to cut the lemon bars into squares. I usually cut them into 16 squares, but you can cut them into smaller or larger pieces depending on your preference. For clean cuts, wipe the knife clean between each cut.
- Serve and Enjoy: Serve the lemon bars chilled or at room temperature. They’re delicious on their own, but you can also serve them with a dollop of whipped cream or a scoop of vanilla ice cream.
Tips for Perfect Lemon Bars:
- Use Freshly Squeezed Lemon Juice: Bottled lemon juice just doesn’t compare to the bright, tangy flavor of freshly squeezed lemon juice.
- Don’t Overmix the Filling: Overmixing can develop the gluten in the flour and result in a tough filling.
- Let the Bars Cool Completely: This is crucial for the filling to set properly.
- Use Cold Butter for the Crust: Cold butter is essential for creating a flaky, tender crust.
- Adjust Sweetness to Taste: If you prefer a less sweet lemon bar, you can reduce the amount of sugar in the filling slightly.
Variations:
- Lime Bars: Substitute lime juice for lemon juice for a zesty lime bar.
- Orange Bars: Substitute orange juice for lemon juice for a sweet and citrusy orange bar.
- Coconut Lemon Bars: Add ½ cup of shredded coconut to the filling for a tropical twist.
- Raspberry Lemon Bars: Swirl raspberry jam into the filling before baking for a fruity and colorful treat.
Storage:
Lemon bars can be stored in an airtight container in the refrigerator for up to 5 days. They can also be frozen for up to 2 months. To freeze, wrap the lemon bars individually in plastic wrap and then place them in a freezer-safe bag or container. Thaw in the refrigerator before serving.
Conclusion:
And there you have it! These Lemon Bars are truly a ray of sunshine on a plate, and I wholeheartedly believe they’re a must-try for anyone who appreciates a bright, tangy, and utterly irresistible dessert. The perfect balance of sweet and tart, coupled with that buttery, melt-in-your-mouth crust, makes them utterly addictive. Seriously, try to eat just one I dare you!
But what makes these Lemon Bars so special? It’s the simplicity, really. We’re not talking about a complicated, multi-layered confection. This is a recipe that celebrates the pure, unadulterated flavor of lemons, allowing them to shine in all their glory. Plus, the straightforward instructions mean even beginner bakers can achieve lemon bar perfection. No fancy equipment or advanced techniques required!
Why are these Lemon Bars a must-try? Because they’re:
- Incredibly easy to make.
- Bursting with fresh, vibrant lemon flavor.
- Perfect for any occasion, from casual gatherings to elegant parties.
- A guaranteed crowd-pleaser.
Now, let’s talk serving suggestions and variations. While these Lemon Bars are divine all on their own, a few simple additions can elevate them even further. A light dusting of powdered sugar is a classic touch, adding a touch of sweetness and visual appeal. For a more decadent treat, try serving them with a dollop of freshly whipped cream or a scoop of vanilla ice cream. The cool creaminess perfectly complements the tangy lemon flavor.
Looking to experiment? Consider adding a hint of other citrus fruits to the filling. A little lime or orange zest can add a subtle complexity to the flavor profile. You could also incorporate a handful of blueberries or raspberries into the filling for a burst of fruity sweetness. For a more sophisticated twist, try adding a splash of limoncello to the batter.
Another fun variation is to play around with the crust. Instead of a traditional shortbread crust, you could use a graham cracker crust for a slightly different texture and flavor. Or, for a gluten-free option, try using almond flour or a gluten-free baking mix.
Serving Suggestions:
- Dust with powdered sugar.
- Serve with whipped cream or ice cream.
- Pair with fresh berries.
- Enjoy with a cup of tea or coffee.
Variations:
- Add lime or orange zest to the filling.
- Incorporate blueberries or raspberries.
- Use a graham cracker crust.
- Make a gluten-free version.
But no matter how you choose to serve or adapt them, I’m confident that these Lemon Bars will become a new favorite in your household. They’re the perfect treat to brighten up a gloomy day, satisfy a sweet craving, or impress your friends and family.
So, what are you waiting for? Grab your lemons, preheat your oven, and get baking! I promise you won’t regret it. And when you do, please, please, please share your experience with me! I’d love to hear how they turned out, what variations you tried, and what your friends and family thought. Leave a comment below, tag me in your photos on social media, or send me an email. I can’t wait to see your Lemon Bar creations! Happy baking! I hope you enjoy this lemon bar recipe as much as I do!
Lemon Bars: The Ultimate Guide to Baking Perfect Treats
Tangy and sweet lemon bars with a buttery shortbread crust and a bright, citrusy filling. A classic dessert perfect for any occasion.
Ingredients
- 1 ½ cups (180g) all-purpose flour
- ½ cup (100g) unsalted butter, cold and cubed
- ¼ cup (50g) granulated sugar
- ¼ teaspoon salt
- 4 large eggs
- 1 ½ cups (300g) granulated sugar
- 6 tablespoons (90ml) lemon juice, freshly squeezed (from about 3-4 lemons)
- ¼ cup (30g) all-purpose flour
- ¼ teaspoon baking powder
- Pinch of salt
- 2 tablespoons (30ml) heavy cream (optional, for extra richness)
- 1 tablespoon lemon zest (from about 1-2 lemons)
- Powdered sugar, for dusting
Instructions
- Combine Dry Ingredients: In a medium bowl, whisk together the flour, sugar, and salt.
- Cut in the Butter: Add the cold, cubed butter to the flour mixture. Use a pastry blender, two forks, or your fingertips to cut the butter into small pieces (pea-sized). Work quickly to prevent the butter from melting.
- Create a Crumbly Mixture: Continue cutting in the butter until the mixture resembles coarse crumbs. Don’t overmix.
- Press into the Pan: Preheat oven to 350°F (175°C). Lightly grease and flour an 8×8 inch baking pan (or line with parchment paper with overhang). Press the crumbly mixture evenly into the bottom of the prepared pan.
- Pre-bake the Crust: Bake the crust for 18-20 minutes, or until lightly golden brown.
- Let Cool Slightly: Remove the crust from the oven and let it cool slightly while you prepare the lemon filling. Don’t turn off the oven.
- Whisk Eggs and Sugar: In a large bowl, whisk together the eggs and sugar until light and slightly thickened (2-3 minutes).
- Add Lemon Juice and Zest: Stir in the freshly squeezed lemon juice and lemon zest.
- Incorporate Dry Ingredients: In a separate small bowl, whisk together the flour, baking powder, and salt. Gradually add the dry ingredients to the wet ingredients, whisking until just combined. Be careful not to overmix.
- Add Heavy Cream (Optional): If using, stir in the heavy cream.
- Pour Filling over Crust: Pour the lemon filling evenly over the pre-baked crust.
- Bake: Bake in the preheated oven for 25-30 minutes, or until the filling is set but still slightly jiggly in the center. The edges should be lightly golden brown.
- Cool Completely: Remove the lemon bars from the oven and let them cool completely in the pan. Cool at room temperature for about an hour, then transfer to the refrigerator to chill for at least 2 hours, or even overnight.
- Dust with Powdered Sugar: Once the lemon bars are completely cool, dust them generously with powdered sugar.
- Cut into Squares: Use a sharp knife to cut the lemon bars into squares. Wipe the knife clean between each cut.
- Serve and Enjoy: Serve the lemon bars chilled or at room temperature.
Notes
- Use freshly squeezed lemon juice for the best flavor.
- Don’t overmix the filling to avoid a tough texture.
- Let the bars cool completely for the filling to set properly.
- Cold butter is essential for a flaky, tender crust.
- Adjust sweetness to taste by reducing the sugar slightly.

Leave a Comment