
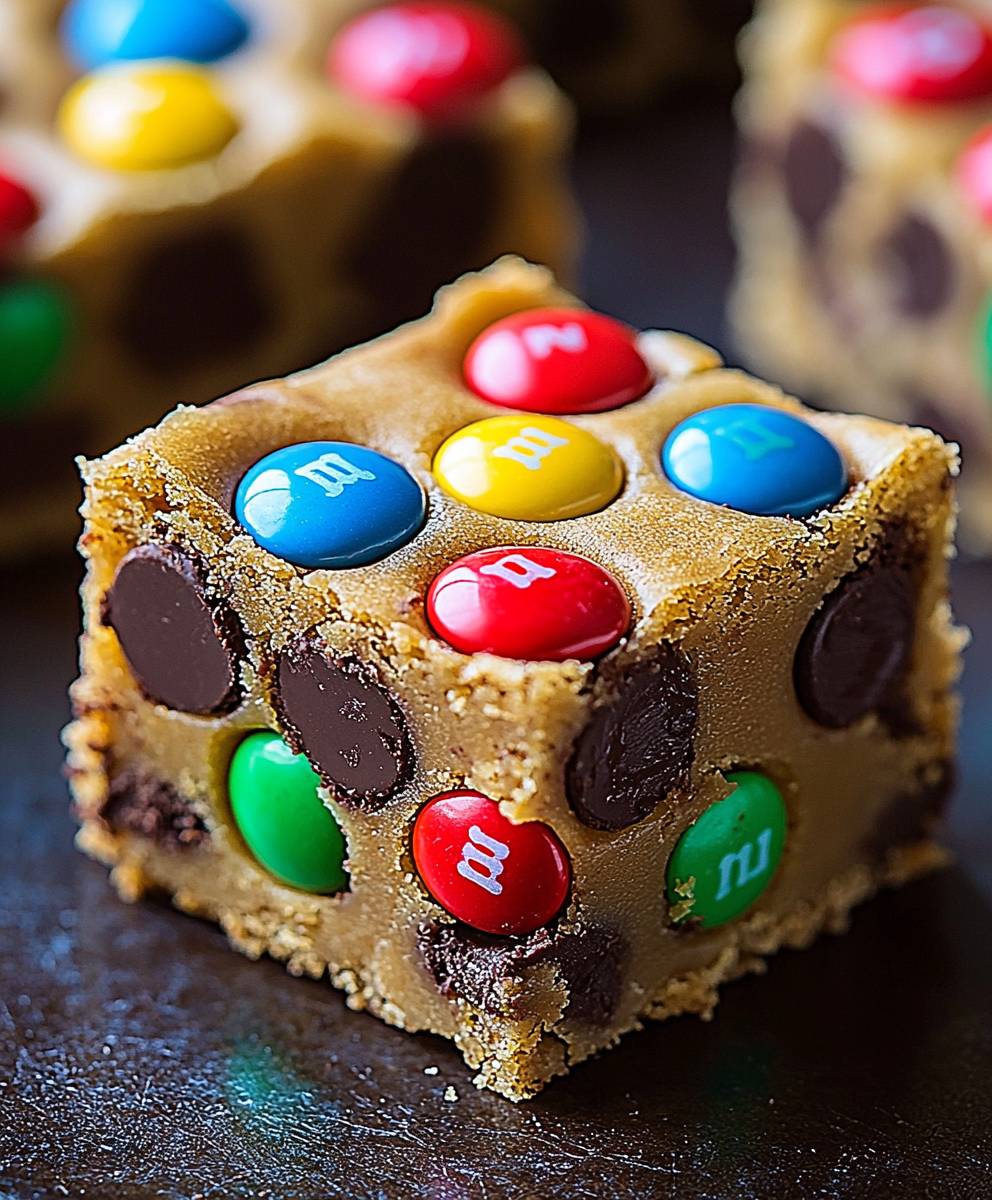
M and M cookie bars: Prepare to unleash a symphony of color and flavor with this irresistible treat! Imagine sinking your teeth into a chewy, buttery cookie base, studded with the iconic, melt-in-your-mouth goodness of M&Ms. These aren’t just cookies; they’re a celebration in every bite, a nostalgic trip back to childhood, and a guaranteed crowd-pleaser for any occasion.
While the exact origins of cookie bars are somewhat hazy, their popularity exploded in the latter half of the 20th century, offering a convenient and customizable alternative to individual cookies. The beauty of a cookie bar lies in its simplicity and versatility. It’s the perfect canvas for adding your favorite mix-ins, and what’s more universally loved than the vibrant, chocolatey crunch of M&Ms?
People adore M and M cookie bars for a multitude of reasons. The combination of a soft, chewy cookie and the satisfying snap of the candy shell creates a textural masterpiece. The rich, buttery flavor is perfectly balanced by the sweet chocolate, making it an irresistible indulgence. Plus, let’s be honest, the colorful M&Ms just make them so much fun! Whether you’re baking for a bake sale, a birthday party, or simply a cozy night in, these cookie bars are sure to bring smiles to everyone’s faces. Get ready to experience cookie perfection!

Ingredients:
- 1 cup (2 sticks) unsalted butter, softened
- ¾ cup granulated sugar
- ¾ cup packed brown sugar
- 2 large eggs
- 1 teaspoon vanilla extract
- 2 ¼ cups all-purpose flour
- 1 teaspoon baking soda
- 1 teaspoon salt
- 2 cups M&M’s (plus extra for topping, optional)
- 1 cup semi-sweet chocolate chips (optional, for extra chocolatey goodness)
Preparing the Dough:
- Cream the Butter and Sugars: In a large bowl, or the bowl of your stand mixer, cream together the softened butter, granulated sugar, and brown sugar until light and fluffy. This usually takes about 3-5 minutes. Make sure to scrape down the sides of the bowl occasionally to ensure everything is evenly mixed. The mixture should be pale and airy.
- Add the Eggs and Vanilla: Beat in the eggs one at a time, mixing well after each addition. Then, stir in the vanilla extract. Don’t overmix at this stage, just combine until the eggs are fully incorporated. Overmixing can lead to tough cookie bars.
- Combine Dry Ingredients: In a separate medium bowl, whisk together the all-purpose flour, baking soda, and salt. Whisking ensures that the baking soda and salt are evenly distributed throughout the flour, which is crucial for proper leavening and flavor.
- Gradually Add Dry Ingredients to Wet Ingredients: Gradually add the dry ingredients to the wet ingredients, mixing on low speed until just combined. Be careful not to overmix. Overmixing develops the gluten in the flour, resulting in tough cookie bars. Mix until you see the flour disappear, then stop.
- Fold in the M&M’s and Chocolate Chips: Gently fold in the M&M’s and chocolate chips (if using) until they are evenly distributed throughout the dough. I like to reserve a handful of M&M’s to press into the top of the bars before baking for a prettier presentation.
Baking the Cookie Bars:
- Prepare the Baking Pan: Preheat your oven to 375°F (190°C). Grease a 9×13 inch baking pan or line it with parchment paper, leaving an overhang on the sides. The parchment paper makes it super easy to lift the bars out of the pan after baking. If you grease the pan, make sure to grease it well to prevent sticking.
- Press the Dough into the Pan: Press the cookie dough evenly into the prepared baking pan. You can use your hands or the back of a spoon to spread the dough. If the dough is sticky, try lightly flouring your hands or the spoon.
- Add Extra M&M’s (Optional): If desired, sprinkle extra M&M’s over the top of the dough. This makes the bars look even more festive and appealing. Gently press the M&M’s into the dough so they don’t fall off during baking.
- Bake the Cookie Bars: Bake for 20-25 minutes, or until the edges are golden brown and the center is set. The baking time may vary depending on your oven, so keep a close eye on the bars. A toothpick inserted into the center should come out with moist crumbs attached, not wet batter.
- Cool Completely: Let the cookie bars cool completely in the pan before cutting into squares. This is important because the bars will continue to set as they cool. If you try to cut them while they are still warm, they will be crumbly and difficult to handle. Cooling them completely also helps the flavors meld together.
Cutting and Serving:
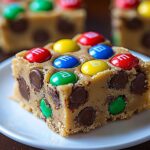
- Cut into Squares: Once the cookie bars are completely cool, cut them into squares. The size of the squares is up to you, but I usually cut them into about 24 squares. If you lined the pan with parchment paper, you can simply lift the bars out of the pan using the overhang and then cut them on a cutting board.
- Serve and Enjoy: Serve the M&M cookie bars and enjoy! These bars are perfect for parties, potlucks, or just a sweet treat any time of day. They are also great for packing in lunchboxes or taking on road trips.
Tips and Variations:
- Use Different Types of M&M’s: Get creative with the M&M’s! You can use peanut M&M’s, pretzel M&M’s, or even seasonal M&M’s for a festive twist.
- Add Nuts: For extra crunch and flavor, add chopped nuts to the dough. Walnuts, pecans, or almonds would all be delicious. About 1 cup of chopped nuts should be perfect.
- Substitute Chocolate Chips: If you’re not a fan of semi-sweet chocolate chips, you can use milk chocolate chips, dark chocolate chips, or even white chocolate chips.
- Make it Gluten-Free: To make these cookie bars gluten-free, simply substitute the all-purpose flour with a gluten-free all-purpose flour blend. Make sure the blend contains xanthan gum for best results.
- Store Properly: Store the cookie bars in an airtight container at room temperature for up to 3 days. They can also be frozen for longer storage. To freeze, wrap the bars individually in plastic wrap and then place them in a freezer-safe bag or container. They can be frozen for up to 2 months.
- Don’t Overbake: Overbaking will result in dry, crumbly cookie bars. It’s better to slightly underbake them than to overbake them. The bars will continue to set as they cool.
- Softened Butter is Key: Make sure your butter is softened to room temperature before creaming it with the sugars. This will ensure that the butter and sugars cream together properly, resulting in light and fluffy cookie bars. If your butter is too cold, it will be difficult to cream, and if it’s too melted, the bars will be greasy.
- Measure Flour Accurately: Measuring flour accurately is important for the texture of the cookie bars. The best way to measure flour is to use a kitchen scale. If you don’t have a kitchen scale, you can use the spoon and level method. Spoon the flour into a measuring cup and then level it off with a knife. Don’t pack the flour into the measuring cup, as this will result in too much flour and dry cookie bars.
- Chill the Dough (Optional): If you have time, chilling the dough for 30 minutes before baking can help prevent the bars from spreading too much in the oven. This will result in thicker, chewier cookie bars.
Troubleshooting:
- Cookie Bars are Too Dry: This could be due to overbaking or using too much flour. Make sure to measure the flour accurately and don’t overbake the bars.
- Cookie Bars are Too Crumbly: This could be due to overmixing the dough or not using enough butter. Be careful not to overmix the dough and make sure your butter is softened to room temperature.
- Cookie Bars are Too Flat: This could be due to using melted butter or not chilling the dough. Make sure your butter is softened, not melted, and chill the dough for 30 minutes before baking.
- Cookie Bars are Too Hard: This could be due to overbaking or using too much sugar. Don’t overbake the bars and make sure to measure the sugar accurately.
Enjoy your delicious homemade M&M cookie bars! I hope these tips and tricks help you bake the perfect batch every time.
Conclusion:
So there you have it! These M and M cookie bars are truly a must-try for anyone who loves a sweet treat that’s both easy to make and incredibly satisfying. From the chewy, buttery base to the colorful explosion of M&Ms, every bite is a burst of pure joy. I know I’ll be making these again and again! But why are these bars so special? It’s the perfect combination of textures and flavors. The cookie dough is rich and decadent, providing a solid foundation for the star of the show: those delightful M&Ms. They add a satisfying crunch and a pop of chocolatey goodness that elevates these bars from ordinary to extraordinary. Plus, the recipe is so straightforward, even a novice baker can whip up a batch in no time. No complicated techniques or hard-to-find ingredients here! And the best part? These M and M cookie bars are incredibly versatile. Serve them warm with a scoop of vanilla ice cream for an extra indulgent dessert. Or, let them cool completely and cut them into squares for a perfect lunchbox treat or afternoon snack. They’re also fantastic for parties and gatherings everyone will rave about them! Looking for some variations? Get creative! Try using different flavors of M&Ms, like peanut butter or pretzel, to add a unique twist. You could also mix in some chopped nuts, like walnuts or pecans, for added texture and flavor. For a truly decadent experience, drizzle melted chocolate over the top of the cooled bars. Or, if you’re feeling adventurous, add a layer of caramel between the cookie dough and the M&Ms. The possibilities are endless! Here are a few more serving suggestions to get your creative juices flowing: * Warm and Gooey: Serve the bars warm, straight from the oven, with a scoop of vanilla ice cream and a drizzle of chocolate sauce. * Party Perfect: Cut the cooled bars into small squares and arrange them on a platter for a colorful and festive dessert. * Lunchbox Treat: Wrap individual bars in plastic wrap for a convenient and delicious lunchbox snack. * Gift Giving: Package the bars in a decorative tin or box for a thoughtful and homemade gift. * Breakfast (Shhh!): Okay, maybe not *every* day, but a small square with your morning coffee is a delightful indulgence. I truly believe that these M and M cookie bars will become a new family favorite. They’re simple, delicious, and guaranteed to bring a smile to everyone’s face. So, what are you waiting for? Head to your kitchen, gather your ingredients, and get baking! I promise you won’t regret it. And when you do, I’d love to hear about your experience. Did you try any variations? Did you serve them with ice cream? Did your family devour them in minutes? Please, share your photos and stories in the comments below. I can’t wait to see your creations and hear how much you enjoyed making these delightful M and M cookie bars. Happy baking! I hope you enjoy this recipe as much as I do. Let me know what you think! PrintM and M Cookie Bars: The Ultimate Recipe for Delicious Treats
Chewy and delicious M&M cookie bars packed with colorful candies and optional chocolate chips. Easy to make and perfect for any occasion!
- Prep Time: 15 minutes
- Cook Time: 20
- Total Time: 40 minutes
- Yield: 24 squares 1x
Ingredients
- 1 cup (2 sticks) unsalted butter, softened
- ¾ cup granulated sugar
- ¾ cup packed brown sugar
- 2 large eggs
- 1 teaspoon vanilla extract
- 2 ¼ cups all-purpose flour
- 1 teaspoon baking soda
- 1 teaspoon salt
- 2 cups M&M’s (plus extra for topping, optional)
- 1 cup semi-sweet chocolate chips (optional, for extra chocolatey goodness)
Instructions
- Cream the Butter and Sugars: In a large bowl, or the bowl of your stand mixer, cream together the softened butter, granulated sugar, and brown sugar until light and fluffy (3-5 minutes). Scrape down the sides of the bowl occasionally.
- Add the Eggs and Vanilla: Beat in the eggs one at a time, mixing well after each addition. Stir in the vanilla extract. Don’t overmix.
- Combine Dry Ingredients: In a separate medium bowl, whisk together the all-purpose flour, baking soda, and salt.
- Gradually Add Dry Ingredients to Wet Ingredients: Gradually add the dry ingredients to the wet ingredients, mixing on low speed until just combined. Be careful not to overmix.
- Fold in the M&M’s and Chocolate Chips: Gently fold in the M&M’s and chocolate chips (if using) until evenly distributed. Reserve a handful of M&M’s to press into the top of the bars before baking (optional).
- Prepare the Baking Pan: Preheat your oven to 375°F (190°C). Grease a 9×13 inch baking pan or line it with parchment paper.
- Press the Dough into the Pan: Press the cookie dough evenly into the prepared baking pan.
- Add Extra M&M’s (Optional): Sprinkle extra M&M’s over the top of the dough and gently press them in.
- Bake the Cookie Bars: Bake for 20-25 minutes, or until the edges are golden brown and the center is set. A toothpick inserted into the center should come out with moist crumbs attached.
- Cool Completely: Let the cookie bars cool completely in the pan before cutting into squares.
- Cut into Squares: Once the cookie bars are completely cool, cut them into squares.
- Serve and Enjoy: Serve the M&M cookie bars and enjoy!
Notes
- Use Different Types of M&M’s: Get creative with the M&M’s! You can use peanut M&M’s, pretzel M&M’s, or even seasonal M&M’s for a festive twist.
- Add Nuts: For extra crunch and flavor, add chopped nuts to the dough. Walnuts, pecans, or almonds would all be delicious. About 1 cup of chopped nuts should be perfect.
- Substitute Chocolate Chips: If you’re not a fan of semi-sweet chocolate chips, you can use milk chocolate chips, dark chocolate chips, or even white chocolate chips.
- Make it Gluten-Free: To make these cookie bars gluten-free, simply substitute the all-purpose flour with a gluten-free all-purpose flour blend. Make sure the blend contains xanthan gum for best results.
- Store Properly: Store the cookie bars in an airtight container at room temperature for up to 3 days. They can also be frozen for longer storage. To freeze, wrap the bars individually in plastic wrap and then place them in a freezer-safe bag or container. They can be frozen for up to 2 months.
- Don’t Overbake: Overbaking will result in dry, crumbly cookie bars. It’s better to slightly underbake them than to overbake them. The bars will continue to set as they cool.
- Softened Butter is Key: Make sure your butter is softened to room temperature before creaming it with the sugars. This will ensure that the butter and sugars cream together properly, resulting in light and fluffy cookie bars. If your butter is too cold, it will be difficult to cream, and if it’s too melted, the bars will be greasy.
- Measure Flour Accurately: Measuring flour accurately is important for the texture of the cookie bars. The best way to measure flour is to use a kitchen scale. If you don’t have a kitchen scale, you can use the spoon and level method. Spoon the flour into a measuring cup and then level it off with a knife. Don’t pack the flour into the measuring cup, as this will result in too much flour and dry cookie bars.
- Chill the Dough (Optional): If you have time, chilling the dough for 30 minutes before baking can help prevent the bars from spreading too much in the oven. This will result in thicker, chewier cookie bars.
Leave a Comment