
Mexican Mazapan is more than just a sweet confection; it’s a beloved symbol of Mexican culinary heritage, a treat that instantly transports you to festive celebrations and childhood memories. Have you ever experienced a candy that, with the gentlest pressure, dissolves into a delightful, crumbly texture on your tongue, releasing a rich, sweet, and intensely nutty flavor? That distinct sensation is precisely what makes this iconic peanut candy so incredibly special. While its almond-based ancestors journeyed from the Middle East to Spain, it was in Mexico that mazapan truly found its unique identity, ingeniously crafted from finely ground peanuts, giving it a flavor profile and texture all its own.
I find that people absolutely adore Mexican Mazapan for its unparalleled simplicity and its profound ability to deliver pure, unadulterated peanut bliss. Its delicate, melt-in-your-mouth consistency, combined with that perfectly balanced sweetness, makes it an irresistible indulgence. Whether enjoyed as a quick pick-me-up or savored slowly, it evokes a powerful sense of nostalgia and comfort for many. Join me as we explore the magic behind making this quintessential Mexican dulce right in your own kitchen.

Ingredients:
- Unsalted Roasted Peanuts: 2 cups (approximately 280 grams or 10 ounces). I always opt for good quality, freshly roasted peanuts. If you only have raw peanuts, don’t worry, I’ll walk you through roasting them yourself!
- Powdered Sugar (Confectioners’ Sugar): 1 ½ cups (approximately 180 grams or 6.3 ounces), plus extra for dusting your workspace and adjusting consistency if needed. This is where the magic sweetness comes from, and it’s crucial for the texture.
- A Tiny Pinch of Fine Sea Salt: ¼ teaspoon. Don’t skip this! It truly enhances the peanut flavor and balances the sweetness without making the mazapan taste salty.
- Optional: Vanilla Extract: ½ teaspoon. While not traditional in every mazapan recipe, I find a touch of good quality vanilla extract adds a lovely depth of flavor that complements the peanuts beautifully.
- Optional: Peanut Oil or Neutral Vegetable Oil: 1-2 teaspoons, only if absolutely necessary to achieve the desired consistency. I try to avoid this by processing correctly, but sometimes a little help is needed!
Preparing the Peanuts: The Heart of Your Mexican Mazapan
My friends, the quality of your peanuts will directly impact the deliciousness of your homemade Mexican Mazapan. So let’s get this step just right!
If Starting with Raw Peanuts:
If you’ve got raw, unsalted peanuts, we’ll need to roast them first to bring out their incredible flavor. Preheat your oven to 350°F (175°C). Spread your raw peanuts in a single layer on a baking sheet. Roast them for about 10-15 minutes, stirring once or twice, until they are lightly golden brown and smell wonderfully fragrant. Keep a very close eye on them, as they can go from perfectly roasted to burnt very quickly! Once roasted, take them out of the oven and let them cool completely on the baking sheet. Cooling is essential; hot peanuts will release too much oil when processed.
Removing the Skins: A Labor of Love (or a Quick Trick!)
Even if you started with pre-roasted peanuts, most varieties come with their thin, papery skins still on. For the smoothest, most authentic Mexican Mazapan, we absolutely want to remove these skins. Trust me, it makes a huge difference in both texture and appearance.
There are a couple of ways to do this:
- The Rubbing Method: Once your roasted peanuts are completely cool, place them in a clean kitchen towel. Fold the towel over the peanuts and gently but firmly rub them together. The friction will cause the skins to loosen and flake off. You can also place them in a large bowl and rub them between your hands.
- The Sifting Method: After rubbing, you’ll have a mix of skinned peanuts and detached skins. Transfer the contents to a colander or a large-holed sieve. Gently shake and toss the peanuts; the lighter skins will fall through, leaving you with mostly clean peanuts. You might need to pick out a few stubborn skins by hand, but it’s quite satisfying!
Aim to remove as many skins as possible. A few stray skins won’t ruin your mazapan, but a cleaner batch results in a superior product. I usually spend a good 5-10 minutes on this step, putting on some music and enjoying the process.
Grinding the Peanuts: The Key to Mazapan’s Unique Texture
This is arguably the most critical step for achieving that signature crumbly-yet-compact texture of Mexican Mazapan, distinct from a smooth peanut butter. We’re looking for a fine peanut flour, not peanut butter!
- Use a Food Processor: Place your peeled, roasted, and completely cooled peanuts into the bowl of a food processor fitted with the blade attachment. I cannot stress enough the importance of the peanuts being cool; warmth encourages oil release.
- Pulse, Don’t Process Continuously: This is where most people go wrong when attempting homemade mazapan. If you just turn on the food processor and let it run, you’ll end up with peanut butter – delicious, but not what we want! Instead, use short, quick pulses. Think of it like a series of on-off taps rather than a continuous grind.
- Achieving the Right Consistency:
- Start with about 10-15 short pulses, then stop and scrape down the sides of the bowl with a spatula. The peanuts will look coarsely chopped.
- Continue pulsing, 5-7 pulses at a time, scraping down the sides frequently. You’ll notice the peanuts getting finer and finer.
- After a few rounds, the peanuts will resemble a coarse meal, then a finer flour. Keep going until the mixture looks like very fine, slightly damp sand or a coarse flour.
- Look for signs of oil release: The mixture will start to clump together slightly, and you might see a slight sheen. This is your cue to be extra careful. The goal is to reach a stage where if you press a small amount between your fingers, it holds its shape, but it’s still crumbly and not pasty or oily.
- Avoid Over-Processing: If you see the mixture starting to form a ball or becoming wet and glossy, you’ve gone too far. Unfortunately, it’s hard to reverse this once the oils are fully released, so err on the side of slightly less processed rather than over-processed. It’s better to have it a tiny bit crumbly than oily. This whole process usually takes me about 2-3 minutes of active pulsing, depending on the power of my food processor.
Once you’ve achieved the desired fine, crumbly peanut texture, transfer the ground peanuts to a large mixing bowl. Give your food processor a quick wipe if you plan to use it for mixing, or grab a clean bowl.
Combining and Mixing: The Mazapan Dough
Now for the sweet magic! This step brings everything together, transforming our peanut flour into the distinctive mazapan dough.
- Add Dry Ingredients: To your bowl of finely ground peanuts, add the 1 ½ cups of powdered sugar and the ¼ teaspoon of fine sea salt. If you’re using the optional vanilla extract, add it now as well.
- Initial Mixing (Food Processor or Hand):
- Food Processor Method: If your food processor bowl is large enough and clean, you can add the powdered sugar and salt directly to the ground peanuts in the processor. Pulse a few more times (about 5-10 short pulses) until the sugar is evenly distributed and the mixture looks uniformly pale. This is quicker and ensures a very even mix.
- Hand Mixing Method: If mixing by hand (my preferred method for a more tactile experience!), use a spatula or your clean hands to gently fold and combine the ingredients. The goal is to distribute the powdered sugar thoroughly throughout the peanut mixture. At this stage, it will still look quite dry and crumbly.
- Testing the Consistency: The “Squeeze Test”
- Take a small handful of the mixture and firmly squeeze it together in your palm. It should compact and hold its shape relatively well when you open your hand, perhaps with a slight crumble. It shouldn’t fall apart completely, nor should it feel greasy or sticky.
- If it’s too dry and crumbly: This means your peanuts might have been a bit drier, or you need a tiny bit more binding. Add ½ teaspoon of peanut oil or a neutral vegetable oil (like grapeseed or canola) to the mixture. Mix well and repeat the squeeze test. Add another ½ teaspoon if needed, but do so sparingly, as too much oil will make it greasy and harder to form. I rarely need more than 1 teaspoon total.
- If it’s too wet or oily (less common): This usually indicates the peanuts were over-processed. You can try adding another tablespoon or two of powdered sugar to absorb some of the excess oil. Mix thoroughly and re-test.
- Kneading for Homogeneity: Once you’ve achieved the desired consistency where the mixture holds together when squeezed, I like to turn it out onto a clean, lightly powdered sugar-dusted surface (or a large piece of parchment paper) and gently knead it for a minute or two. This isn’t like bread dough kneading; it’s more about pressing and folding the mixture to ensure everything is perfectly incorporated and the natural oils from the peanuts, combined with the sugar, create a cohesive “dough.” You’ll feel it come together into a soft, slightly pliable mass.
Congratulations! You’ve made Mazapan dough! It should smell absolutely divine – a perfect blend of sweet peanuts.
Forming the Mexican Mazapan: Creating Those Iconic Discs
The traditional shape of Mexican Mazapan is a round, flat disc, often with a decorative edge. While you can certainly free-form them, using a mold makes the process much easier and gives you that classic look.
Choosing Your Mold or Method:
- Traditional Mazapan Molds: If you’re lucky enough to have these (they’re often made of plastic or metal, sometimes with a fluted edge), they are perfect!
- Cookie Cutters: A round cookie cutter (about 2-3 inches in diameter) works beautifully.
- Small Tart Tins or Muffin Tins: These can also be repurposed for molding.
- Free-Forming by Hand: Perfectly acceptable and still delicious!
Forming Steps:
- Prepare Your Surface/Molds:
- If using molds or cookie cutters, I recommend lining them with a small square of plastic wrap. This makes it incredibly easy to remove the finished mazapan without breakage. Just press the plastic wrap into the mold, leaving some overhang on the sides.
- If free-forming, lightly dust your clean work surface with a tiny bit of powdered sugar to prevent sticking.
- Portioning the Dough: Take a small amount of the mazapan mixture. The size will depend on your desired finished mazapan size. For a standard 2-inch disc, I usually grab about 1 ½ – 2 tablespoons of the mixture.
- Pressing into Molds (Recommended):
- Place your portion of mazapan mixture into the prepared mold (lined with plastic wrap).
- Now, this is crucial: Press down very, very firmly. Use the back of a spoon, your thumb, or a flat-bottomed glass to compact the mixture as tightly as possible into the mold. The more firmly you press, the less likely your mazapan will crumble when removed. Pay attention to the edges to ensure they are well-formed.
- Once firmly pressed, use the overhanging plastic wrap to gently lift the mazapan disc out of the mold. Peel off the plastic wrap carefully.
- Free-Forming by Hand:
- Roll your portion of mazapan mixture into a neat ball between your palms.
- Place the ball on your lightly dusted work surface.
- Gently but firmly press down on the ball with the palm of your hand or a flat-bottomed glass to flatten it into a disc of your desired thickness (usually about ¼ to ½ inch thick).
- You can smooth the edges with your fingers if desired.
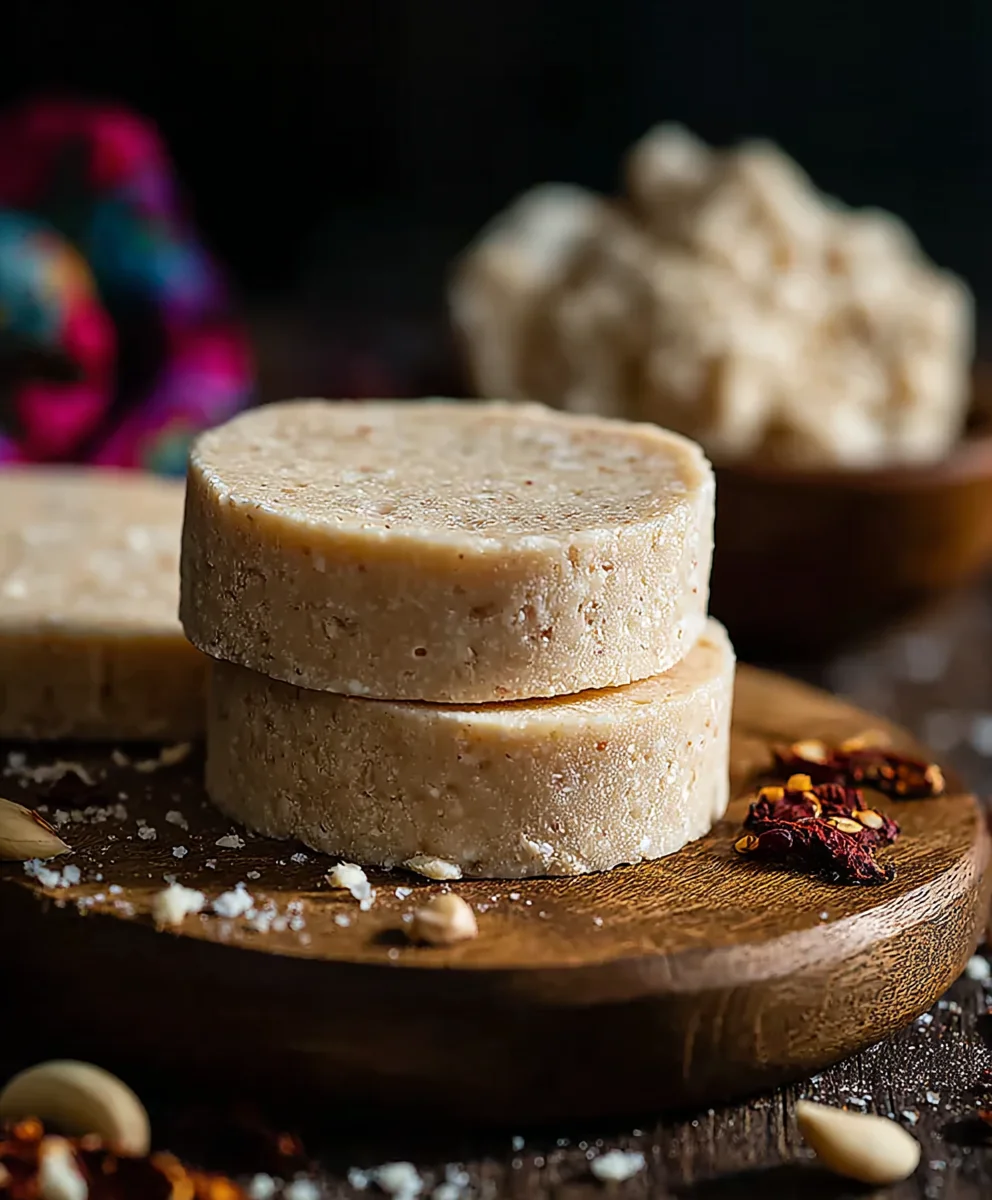
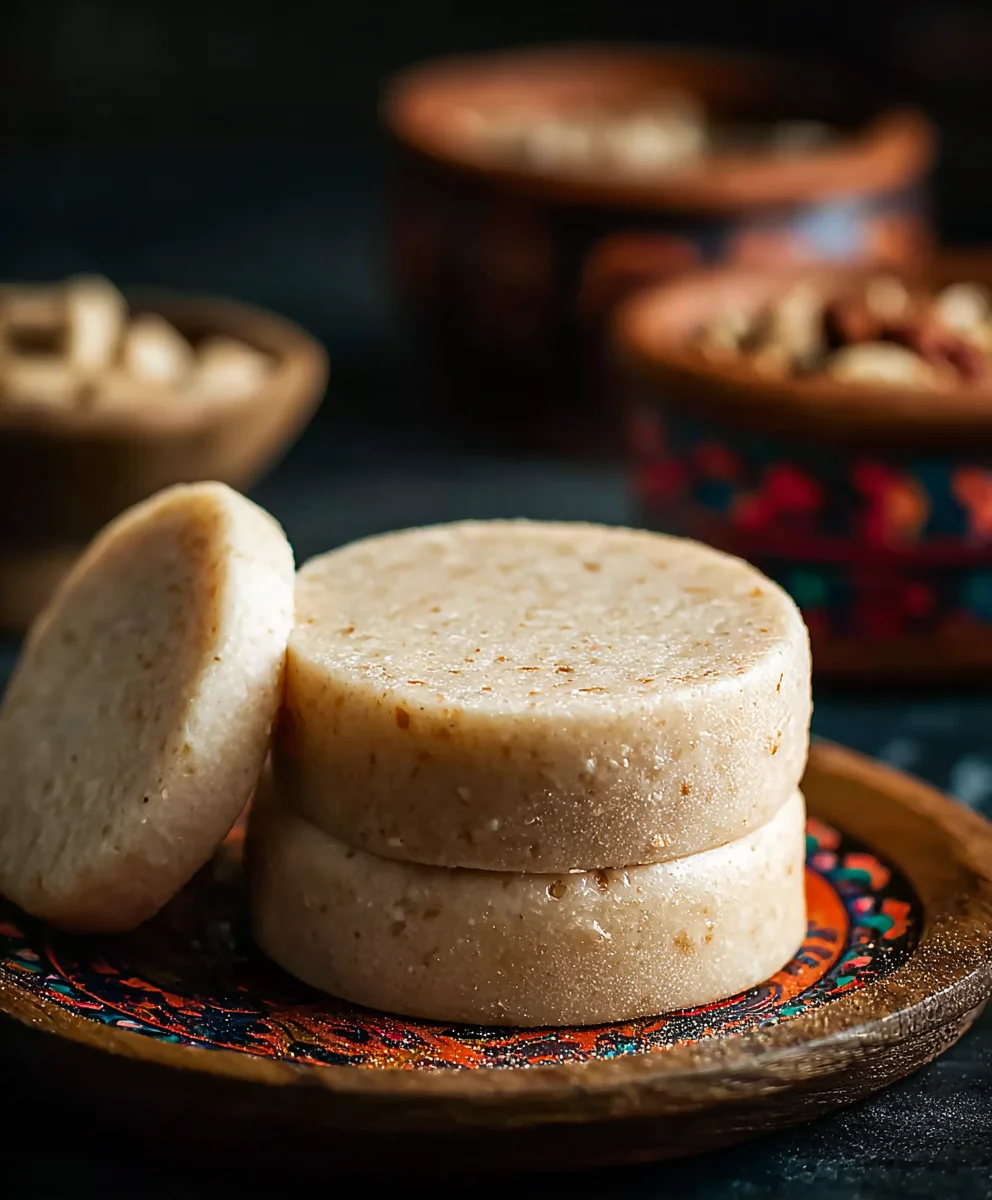
- Repeat: Continue this process until you’ve used all of your mazapan mixture. I typically yield about 18-24 mazapan discs from this recipe, depending on their size and thickness.
Chilling and Setting: The Final Touch
Once all your beautiful Mexican Mazapan discs are formed, they need a little time to set and firm up. This step is non-negotiable for that perfect texture and structural integrity.
- Arrange on a Tray: Carefully place your formed mazapan discs in a single layer on a plate or a baking sheet lined with parchment paper.
- Chill in the Refrigerator: Transfer the tray to the refrigerator and let them chill for at least 30 minutes. An hour is even better. This cooling period allows the natural oils in the peanuts to solidify slightly, along with the sugar, making the mazapan much firmer and less prone to crumbling when handled.
- The Unwrapping Experience: If you’ve ever bought traditional Mexican Mazapan, you know that moment of carefully peeling back the thin paper wrapper. That delicate, crumbly texture is what we’re aiming for! Chilling helps achieve this.
After chilling, your homemade Mexican Mazapan is ready to be enjoyed! They are wonderful as a treat, a light dessert, or even a thoughtful homemade gift.
Storage and Enjoyment: Keeping Your Mazapan Fresh
You’ve put in the effort, now let’s make sure your delicious creations stay fresh and enjoyable for as long as possible.
- Airtight Container: Store your mazapan in an airtight container at room temperature. This is crucial to prevent them from drying out or absorbing unwanted odors.
- Separation (Optional but Recommended): If stacking them, you might want to place small squares of parchment paper or waxed paper between each mazapan to prevent them from sticking together. While not as prone to sticking as some other candies, it’s a good practice, especially in warmer climates.
- Shelf Life: Properly stored, your homemade Mexican Mazapan should stay fresh and delicious for up to 2-3 weeks. However, in my house, they rarely last more than a few days because everyone loves them so much!
- Gifting: Mexican Mazapan makes a truly unique and heartfelt homemade gift. You can wrap each disc individually in small squares of colorful wax paper or cellophane for a charming presentation.
And there you have it, my friends! Your very own, incredibly authentic, and utterly delicious Mexican Mazapan. The experience of making them is as rewarding as eating them. Enjoy every crumbly, sweet, peanut-packed bite!
Conclusion:
Well, my friends, we’ve reached the sweet finale of our culinary journey, and I genuinely hope you’re feeling as inspired and excited as I am about this incredible recipe. If there’s one thing I want you to take away from this entire experience, it’s that some of the most profound joys in life come from creating something with your own two hands, especially when that something is as uniquely delightful as what we’ve just explored. This isn’t just a recipe; it’s an invitation to rediscover a bit of magic, to infuse your kitchen with delightful aromas, and to share a truly special treat with those you care about.
Why is this recipe an absolute must-try? I can tell you, from my heart, it’s because it perfectly balances simplicity with an astonishing depth of flavor and texture. We’re talking about a creation that will utterly surprise you with how easy it is to bring to life, yet it delivers a sophisticated, comforting, and utterly unforgettable taste. The delicate, crumbly texture, the rich, nutty aroma that fills your home as you prepare it, and that distinctive sweet, earthy flavor – it all culminates in an experience that transcends a mere dessert. It’s a sensory delight that reminds us of the power of simple, high-quality ingredients transformed into something extraordinary. This is the kind of recipe that will earn you admiring glances and requests for the secret, and you’ll beam knowing you crafted it yourself. It’s a wonderful way to connect with a vibrant culinary tradition, bringing an authentic taste directly into your home. Seriously, there’s nothing quite like the satisfaction of presenting a homemade treat that everyone adores, and this recipe absolutely guarantees that feeling.
Embrace the Art of Serving and Sharing!
Now that you’ve mastered the art of creating this deliciousness, let’s talk about making it truly shine. While it’s absolutely divine on its own, a perfect little bite to enjoy with your afternoon coffee or a calming cup of tea, I have a few suggestions to elevate your experience. Imagine serving these delicate morsels alongside a scoop of vanilla bean ice cream, allowing the creamy coldness to contrast beautifully with its unique texture. Or, for a truly decadent treat, crumble a piece over a bowl of fresh fruit, perhaps sliced mango or berries, adding an unexpected, delightful crunch and flavor dimension. For those seeking a more sophisticated presentation, consider arranging them on a decorative platter as part of a dessert spread for a special gathering; they truly make for an elegant and intriguing addition. They also make an incredibly thoughtful and personal gift! Package a few pieces in a charming box tied with a ribbon, and you have a heartfelt present that speaks volumes about your care and effort. Trust me, a homemade gift is always cherished, and this one will be particularly appreciated for its unique character. My personal favorite way to enjoy them is simply with a strong, dark cup of Mexican coffee, allowing the robust bitterness to perfectly complement the sweet, nutty notes of the treat. It’s a match made in culinary heaven, a small moment of pure bliss that I always look forward to.
Unleash Your Inner Culinary Explorer: Variations!
And for my adventurous chefs out there, don’t be afraid to experiment! This recipe, while perfect as is, also offers a wonderful canvas for your creativity. Feel free to introduce a tiny pinch of chili powder to the mix for a subtle, intriguing kick, or perhaps a dash of cinnamon to enhance its warmth. You could even dip half of each piece in melted dark chocolate once cooled for an extra layer of indulgence and a stunning visual contrast. Imagine drizzling a little cajeta (goat’s milk caramel) over the top just before serving – pure bliss! For a slightly different texture, you could try pressing the mixture into small, cookie-cutter shapes before chilling, creating fun, bite-sized variations perfect for parties. You could even incorporate a tiny bit of finely chopped toasted coconut into the mixture for an exotic twist. The beauty of this recipe lies in its adaptability, allowing you to truly make it your own and stamp it with your unique culinary signature. The core delightful flavor of homemade Mexican Mazapan is so robust and inviting, it stands up beautifully to playful experimentation.
So, what are you waiting for? This is your sign, your gentle nudge, to clear some space in your kitchen, gather your ingredients, and embark on this truly rewarding cooking adventure. I wholeheartedly encourage you to give this recipe a try; I promise you won’t be disappointed. There’s an immense joy in the process, a genuine satisfaction in tasting the fruits of your labor, and an even greater delight in sharing that joy with others. When you do try it, please, please come back and share your experience with me! I absolutely love hearing about your successes, your personal twists, and the smiles this recipe brings to your faces. Your stories inspire me, and they help build this wonderful community of home cooks who share a passion for delicious, soulful food. Until next time, happy cooking, and may your kitchen always be filled with warmth and wonderful aromas!
Mexican Mazapan: Easy, Sweet & Authentic Peanut Candy
Mexican Mazapan is more than just a sweet confection; it’s a beloved symbol of Mexican culinary heritage, a treat that instantly transports you to festive celebrations and childhood memories. Have you ever experienced a candy that, with the gentlest pressure, dissolves into a delightful, crumbly texture on your tongue, releasing a rich, sweet, and intensely nutty flavor? That distinct sensation is precisely what makes this iconic peanut candy so incredibly special. While its almond-based ancestors journeyed from the Middle East to Spain, it was in Mexico that mazapan truly found its unique identity, ingeniously crafted from finely ground peanuts, giving it a flavor profile and texture all its own.
Ingredients
-
Unsalted Roasted Peanuts: 2 cups (280g)
-
Powdered Sugar: 1 ½ cups (180g), plus extra for dusting
-
Fine Sea Salt: ¼ tsp
-
Vanilla Extract (optional): ½ tsp
-
Peanut Oil or Neutral Vegetable Oil (optional): 1-2 tsp
Instructions
-
Step 1
If starting with raw peanuts, roast 2 cups (280g) at 350°F (175°C) for 10-15 minutes until lightly golden and fragrant; cool completely. Remove thin, papery skins by rubbing them in a clean kitchen towel or between your hands, then sifting to separate from peanuts. -
Step 2
Place cooled, peeled peanuts in a food processor. Pulse in short bursts, scraping down sides frequently, until a very fine, crumbly flour forms. Avoid over-processing to prevent making peanut butter; the mixture should hold its shape when pressed but remain crumbly. Transfer ground peanuts to a large mixing bowl. -
Step 3
To the ground peanuts, add 1 ½ cups (180g) powdered sugar and ¼ tsp fine sea salt. Add ½ tsp vanilla extract if using. Mix ingredients thoroughly until evenly combined. Perform a “squeeze test”: if the mixture is too dry to hold shape, add ½-1 tsp peanut or neutral oil sparingly, mixing well after each addition. Knead the mixture gently on a lightly powdered sugar-dusted surface for 1-2 minutes until it forms a soft, cohesive mass. -
Step 4
Line round molds (approx. 2-3 inches diameter) or cookie cutters with a small square of plastic wrap, leaving overhang. Scoop about 2½ tablespoons of mazapan mixture into each prepared mold and press down very, very firmly to compact it into a disc. Use the plastic wrap overhang to gently lift the formed mazapan disc out of the mold. Alternatively, roll mixture into balls and flatten by hand. Repeat until all mixture is used, yielding 18-24 discs. -
Step 5
Carefully place the formed mazapan discs in a single layer on a plate or baking sheet lined with parchment paper. Transfer to the refrigerator and chill for at least 30-60 minutes to firm up and allow oils to solidify for better texture. -
Step 6
Enjoy your homemade Mexican Mazapan chilled. Store in an airtight container at room temperature. For stacking, place small squares of parchment or waxed paper between discs to prevent sticking. Properly stored, mazapan should remain fresh for up to 2-3 weeks. Nothing beats enjoying these with a steaming cup of café de olla or rich Mexican hot chocolate, and during the holidays, alongside creamy rompope.
Important Information
Nutrition Facts (Per Serving)
It is important to consider this information as approximate and not to use it as definitive health advice.
Allergy Information
Please check ingredients for potential allergens and consult a health professional if in doubt.

Leave a Comment