
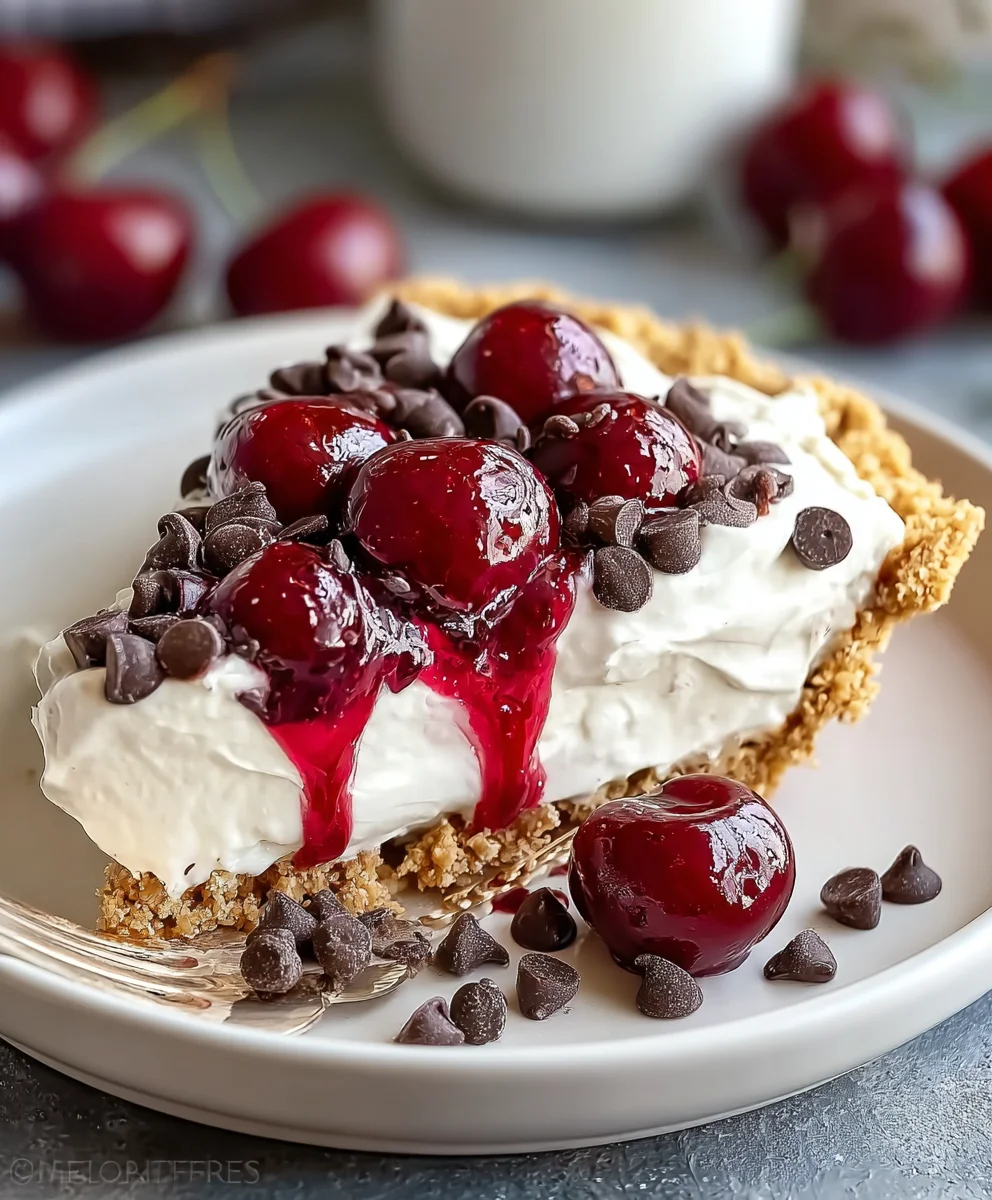
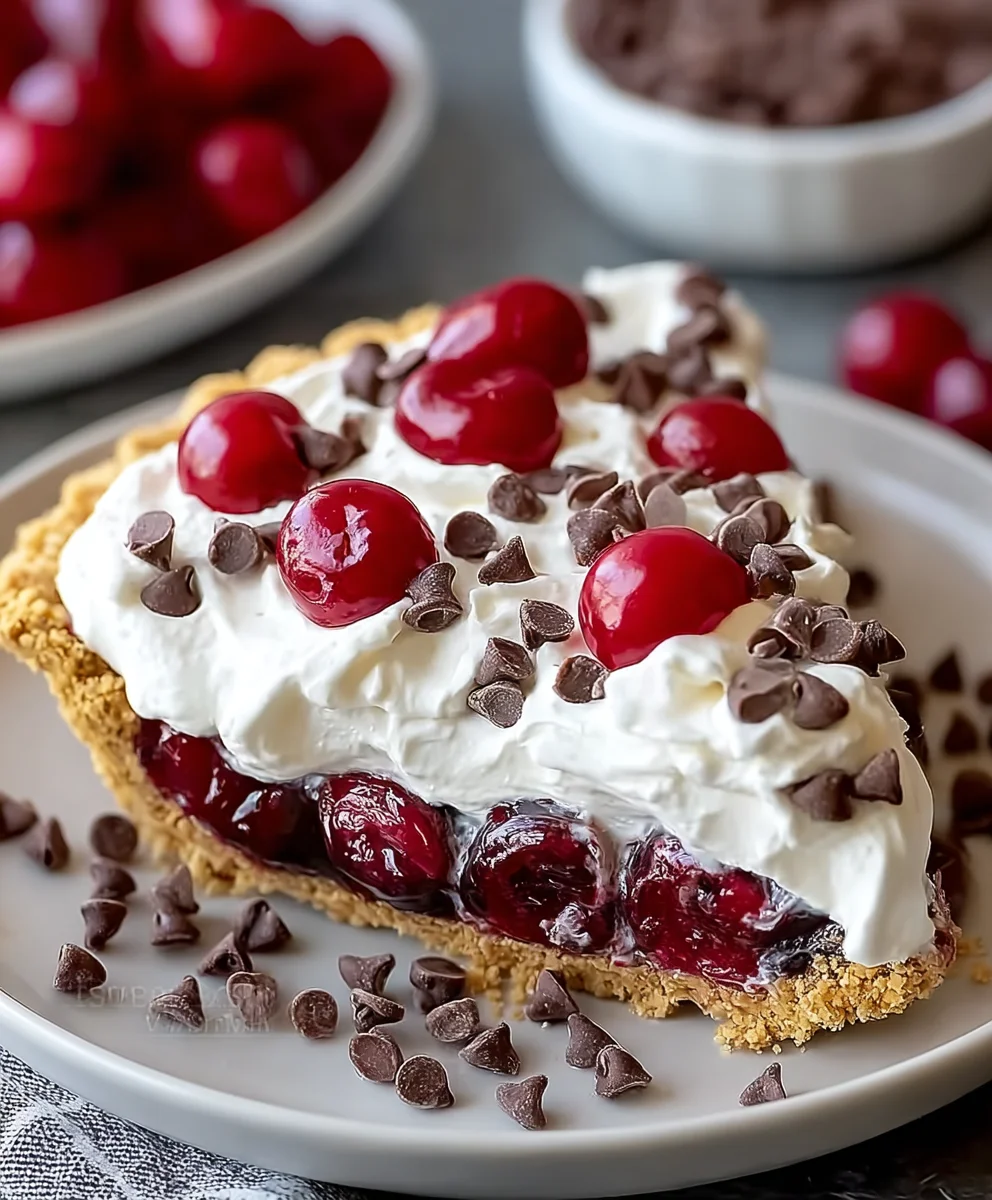
No Bake Cherry Chocolate Chip Pie Recipe isn’t just a dessert; it’s a delightful solution to your sweet cravings, especially when I find myself wanting something truly special without the hassle of turning on the oven. Imagine with me a luscious, creamy filling bursting with the sweet-tart goodness of cherries, perfectly punctuated by delightful bites of rich, melting chocolate chips, all nestled in a crisp, buttery graham cracker crust. This pie, for me, offers pure indulgence without the fuss, and it’s a recipe I always reach for when I need to impress with minimal effort.
While the concept of fruit and chocolate pies has graced tables and delighted palates for centuries, our modern No Bake Cherry Chocolate Chip Pie Recipe is, in my opinion, a testament to culinary ingenuity. It was born from a desire for convenience and cooling comfort without ever compromising on spectacular flavor. I feel it echoes the comforting nostalgia of grandmother’s kitchen, yet it’s perfectly suited for today’s fast-paced lifestyle. People, myself included, adore this dish for its incredible ease of preparation – no baking required! – making it an ideal choice for summer gatherings, impromptu potlucks, or simply a spontaneous weeknight treat when I need something quick, delicious, and undeniably satisfying.
The harmonious blend of vibrant, juicy cherries and rich, decadent chocolate creates a symphony of flavors and textures that I find truly irresistible. Each spoonful delivers a cool, refreshing sensation, a smooth, creamy filling, and just the right amount of satisfying crunch from the crust and chips. It’s a dessert that consistently brings smiles and requests for the recipe, proving that sometimes, the simplest methods yield the most profound and delicious results.

Ingredients:
-
For the Graham Cracker Crust:
- 1 ½ cups graham cracker crumbs (about 10-12 full sheets)
- ¼ cup granulated sugar
- ½ cup (1 stick) unsalted butter, melted
-
For the No Bake Cherry Chocolate Chip Pie Filling:
- 1 (8-ounce) package cream cheese, softened to room temperature
- 1 cup powdered sugar, sifted
- 1 teaspoon pure vanilla extract
- 1 (8-ounce) container frozen whipped topping (like Cool Whip), thawed in the refrigerator
- 1 (21-ounce) can cherry pie filling, chilled
- ¾ cup mini semi-sweet chocolate chips, plus extra for garnish
-
Optional Garnish:
- Fresh whipped cream
- Additional mini chocolate chips
- Fresh cherries, pitted
Preparing the Graham Cracker Crust
Let’s kick things off with the foundation of our incredible No Bake Cherry Chocolate Chip Pie Recipe – the graham cracker crust! A good crust sets the stage for all the deliciousness to come.
- Prepare Your Graham Cracker Crumbs: First things first, gather your graham crackers. If you’re starting with whole graham cracker sheets, you’ll need to transform them into fine crumbs. My favorite method for this is using a food processor. Simply break about 10-12 full graham cracker sheets into rough pieces and pulse them in the food processor until they’re finely ground, resembling fine sand. If you don’t have a food processor, no worries! You can place the graham crackers in a large, sturdy Ziploc bag, seal it, and then use a rolling pin or the bottom of a heavy pan to crush them. This can be a fun, stress-relieving step! Aim for about 1 ½ cups of fine crumbs. The consistency is important here; you want them fine enough to pack well, but not so pulverized that they turn into a paste.
- Combine Crumbs with Sugar: Once your graham cracker crumbs are ready, transfer them to a medium-sized mixing bowl. Add the ¼ cup of granulated sugar to the bowl. Give it a good stir with a spoon or whisk to ensure the sugar is evenly distributed throughout the crumbs. The sugar not only adds a touch of sweetness but also plays a role in helping the crust bind together when it sets.
- Melt the Butter: Now, it’s time for the butter. Take your ½ cup (one stick) of unsalted butter and melt it down. You can do this in a microwave-safe bowl, heating it in 20-30 second intervals and stirring until it’s completely liquid. Alternatively, a small saucepan over low heat works perfectly. Just be careful not to brown the butter, we want it perfectly clear and melted.
- Mix and Moisten the Crumbs: Pour the melted butter directly over your graham cracker and sugar mixture. Using a fork or a spatula, stir everything together thoroughly. You want every single crumb to be moistened by the butter. Keep mixing until the crumbs resemble wet sand and no dry spots remain. This step is crucial because the melted butter acts as the binding agent that will hold your crust together once it chills.
- Press into the Pie Plate: Grab your 9-inch pie plate. Carefully transfer the buttered graham cracker mixture into the pie plate. Now, it’s time to get pressing! Using the back of a spoon, the bottom of a flat-bottomed glass, or a measuring cup, firmly press the crumbs into an even layer on the bottom and up the sides of the pie plate. Pay special attention to the edges, making sure they are well-formed and sturdy. The firmer you press, the better your crust will hold its shape when you slice into your delicious No Bake Cherry Chocolate Chip Pie. Take your time with this step; a well-formed crust is a beautiful thing.
- Chill the Crust: Once pressed, place the pie plate into the refrigerator. Let it chill for at least 30 minutes, or even longer if you have the time. This chilling period allows the butter to solidify and sets the crust, making it firm and ready to receive our luscious filling without crumbling. A properly chilled crust is the secret to a perfect no-bake pie.
Creating the Silky Cream Cheese Base
With our crust chilling, we can move on to the heart of our No Bake Cherry Chocolate Chip Pie Recipe – the incredibly creamy and delicious filling! This part is so simple but yields such a luxurious texture.
- Soften the Cream Cheese: It’s absolutely essential that your 1 (8-ounce) package of cream cheese is softened to room temperature. If it’s too cold, you’ll end up with lumps in your filling, and nobody wants lumpy pie! To soften it quickly, you can unwrap it and microwave it on low power for 15-30 seconds, or just let it sit on your counter for at least an hour before you plan to bake. Place the softened cream cheese into a large mixing bowl.
- Whip the Cream Cheese: Using an electric mixer (either a hand mixer or a stand mixer with the paddle attachment), beat the softened cream cheese on medium speed until it’s light, fluffy, and completely smooth. This usually takes about 2-3 minutes. Scrape down the sides of the bowl occasionally to ensure everything is evenly incorporated. We’re aiming for a cloud-like texture here.
- Add Powdered Sugar: Gradually add the 1 cup of sifted powdered sugar to the whipped cream cheese. I always recommend sifting powdered sugar because it tends to clump, and sifting prevents those little lumps from making their way into your smooth filling. Start your mixer on low speed to avoid a cloud of sugar dust, then increase to medium speed. Beat until the sugar is fully incorporated and the mixture is even smoother and creamier. The powdered sugar not only sweetens but also helps to stabilize the filling.
- Stir in Vanilla Extract: Add the 1 teaspoon of pure vanilla extract to the cream cheese mixture. Give it another quick beat on low speed, just until the vanilla is fully mixed in. Vanilla adds that beautiful, comforting aroma and flavor that really rounds out the cream cheese base.
- Gently Fold in Whipped Topping: Now for the whipped topping. Make sure your 1 (8-ounce) container of frozen whipped topping has been thawed in the refrigerator overnight or for several hours. Gently fold the thawed whipped topping into the cream cheese mixture using a rubber spatula. The key here is to fold, not to beat or vigorously stir. You want to maintain the light, airy texture of the whipped topping. Fold until no streaks of cream cheese or whipped topping remain, and the mixture is uniformly light and smooth. This step makes the filling incredibly light and fluffy, truly perfecting our No Bake Cherry Chocolate Chip Pie Recipe.
Folding in the Cherries and Chocolate Chips
This is where our No Bake Cherry Chocolate Chip Pie Recipe gets its signature name! The combination of sweet cherries and rich chocolate chips is truly irresistible.
- Prepare the Cherry Pie Filling: Take your 1 (21-ounce) can of cherry pie filling, ensuring it’s well-chilled. Give it a gentle stir in its can or a separate bowl to distribute the cherries and the thick sauce evenly. If you prefer smaller pieces of cherries, you can roughly chop some of the larger cherry halves, but I usually leave them as is for a nice burst of flavor and texture.
- Gently Fold in Cherry Pie Filling: Carefully add the entire can of cherry pie filling to your cream cheese mixture. Using your rubber spatula, gently fold the cherry pie filling into the cream cheese base. You can choose how much to mix it. For a marbled effect, fold just enough to swirl the cherries through the white base. For a more uniform pink pie, you can fold a bit more until the cherries and their sauce are well distributed throughout the filling. I personally love seeing distinct swirls of bright red cherry against the creamy white, so I tend to fold just until combined without overmixing.
- Add the Mini Chocolate Chips: Next, pour in ¾ cup of mini semi-sweet chocolate chips. The mini size is perfect for this pie as it allows for an even distribution of chocolatey goodness in every bite without being too overwhelming. Again, gently fold them into the cherry cream cheese mixture. You want them distributed throughout the pie, so make sure they aren’t all sinking to the bottom. The chocolate and cherry combination is a classic for a reason, and it shines brilliantly in this No Bake Cherry Chocolate Chip Pie Recipe.
Assembling and Chilling Your No Bake Cherry Chocolate Chip Pie
We’re nearing the finish line! The assembly is quick, but the chilling is crucial for the perfect slice of our magnificent No Bake Cherry Chocolate Chip Pie Recipe.
- Fill the Chilled Crust: Retrieve your chilled graham cracker crust from the refrigerator. Spoon the glorious cherry and chocolate chip filling directly into the prepared crust. Use your rubber spatula to gently spread the filling evenly across the bottom and up to the edges of the pie shell. You want a smooth, inviting surface that promises deliciousness. Don’t press down too hard; keep that fluffy texture intact.
- The All-Important Chill Time: This is arguably the most critical step for any no-bake pie! Once the filling is evenly spread, cover the pie loosely with plastic wrap or aluminum foil. Place the entire pie plate back into the refrigerator to chill for a minimum of 4 hours. I honestly recommend chilling it for at least 6 hours, or even better, overnight. The longer it chills, the firmer it will set, and the easier it will be to slice cleanly. This allows the cream cheese mixture to fully firm up and ensures that your slices of No Bake Cherry Chocolate Chip Pie will hold their shape beautifully. Patience is a virtue, especially when it comes to dessert!
Serving and Storing Your Delicious Pie
After all your hard work and patient waiting, it’s finally time to enjoy your homemade No Bake Cherry Chocolate Chip Pie Recipe!
- Garnish (Optional, but Recommended!): Just before serving, you can add some beautiful garnishes. I love to sprinkle a few extra mini semi-sweet chocolate chips over the top for a little visual appeal and extra chocolate crunch. A dollop of fresh whipped cream on each slice, or even spread over the entire top, adds another layer of creaminess. If fresh cherries are in season and you have some on hand, pitting and placing a few on top adds a sophisticated touch and emphasizes the cherry flavor. These small touches really elevate the presentation of your No Bake Cherry Chocolate Chip Pie.
- Slice and Serve: Use a sharp knife that has been run under hot water and wiped clean between each slice. This will help you achieve clean, neat slices. Cut the pie into 8-10 generous slices. Serve immediately and watch as everyone enjoys this refreshing and decadent treat.
- Storing Leftovers: Any leftover slices of your delightful No Bake Cherry Chocolate Chip Pie should be stored in an airtight container in the refrigerator. It will keep well for up to 3-4 days. The flavors often deepen and meld even more on the second day, so don’t hesitate to enjoy it over a few days. Unfortunately, this pie does not freeze particularly well once assembled, as the whipped topping and cream cheese can change texture upon thawing. So, it’s best enjoyed fresh and chilled from the fridge!
I truly hope you enjoy making and sharing this fantastic No Bake Cherry Chocolate Chip Pie Recipe. It’s a perfect dessert for any occasion, especially when you need something delicious without turning on the oven!
Conclusion:
As we wrap up our delightful journey with this incredible dessert, I truly hope you’re feeling as excited as I am about what you’ve just discovered. This isn’t just another sweet treat; it’s a game-changer for anyone who loves dessert but dreads the oven or the complicated steps. What makes this recipe an absolute must-try, in my humble opinion, is its unparalleled blend of simplicity and sophisticated flavor. Imagine a dessert that comes together in mere minutes, chills to perfection, and delivers a stunning combination of tart cherry and rich chocolate with every single bite. It’s the kind of indulgence that feels gourmet, yet is entirely approachable for even the most novice of bakers (or, in this case, non-bakers!). The vibrant red cherries burst with flavor, perfectly complemented by the creamy, decadent chocolate chips, all nestled in a delightful, crunchy crust. It truly is the ultimate stress-free dessert solution, whether you’re hosting a dinner party, planning a potluck, or simply craving something extraordinary for yourself and your loved ones. Seriously, the ease combined with the sheer deliciousness makes the No Bake Cherry Chocolate Chip Pie Recipe an instant classic in any household.
But the fun doesn’t stop once you’ve perfected the basic recipe. One of the many joys of this pie is its incredible versatility. For a classic, elegant serving, I absolutely adore pairing a slice with a generous dollop of freshly whipped cream, perhaps with a whisper of vanilla extract, or a light dusting of cocoa powder for an extra touch of decadence. If you’re feeling a bit more indulgent, a scoop of premium vanilla bean ice cream melting slightly into the pie is an absolute dream, creating a delightful contrast in temperatures and textures. For a sophisticated garnish, consider a few fresh mint leaves or some delicate shaved dark chocolate curls scattered artistically over the top. These small additions can elevate the presentation, making it look even more impressive than it already is.
Creative Crust Variations:
While a classic graham cracker crust is fantastic, don’t hesitate to experiment! An Oreo cookie crust would introduce a deeper chocolate flavor, making it even more indulgent. Alternatively, a shortbread cookie crust could add a buttery, delicate base that beautifully complements the cherry and chocolate filling.
Flavor Boosters & Toppings:
Feeling adventurous? A tiny splash of almond extract in the filling can enhance the cherry notes beautifully. For a touch of zest, finely grated orange zest can add a bright, citrusy counterpoint to the richness. And when it comes to toppings, the sky’s the limit! A drizzle of warm chocolate fudge sauce or a swirl of caramel can take this pie to another level. Toasted slivered almonds or chopped pecans sprinkled on top before serving will add a wonderful crunch and nutty dimension. For those who love coconut, a sprinkle of toasted shredded coconut can provide an exotic twist that’s surprisingly delightful.
So, now it’s your turn! I genuinely encourage you to roll up your sleeves (or rather, just open your fridge and pantry!) and give this incredible recipe a try. You’ll be amazed at how quickly and effortlessly you can create a dessert that tastes like it came straight from a gourmet bakery. Imagine the smiles, the compliments, and the pure joy of sharing something so utterly delicious that required so little effort. Don’t let another day go by without experiencing the magic of this no-bake wonder. Once you’ve made it, and believe me, you’ll want to make it again and again, I would absolutely love to hear about your experience. Did you try any of the variations? What were your favorite serving suggestions? Please, share your triumphs, your photos, and your delicious insights in the comments below or tag me on social media. Your culinary adventures inspire me, and I can’t wait to see your stunning creations. Happy no-baking, everyone!
No Bake Cherry Chocolate Chip Pie Recipe
An easy and delicious no-bake pie featuring a crisp graham cracker crust, a luscious cream cheese filling with sweet-tart cherries, and delightful mini chocolate chips. Perfect for summer gatherings, potlucks, or a spontaneous weeknight treat.
Ingredients
-
1 ½ cups graham cracker crumbs
-
¼ cup granulated sugar
-
½ cup unsalted butter, melted
-
1 (8-ounce) package cream cheese, softened
-
1 cup powdered sugar, sifted
-
1 teaspoon pure vanilla extract
-
1 (8-ounce) container frozen whipped topping, thawed
-
1 (21-ounce) can cherry pie filling, chilled
-
¾ cup mini semi-sweet chocolate chips
-
Extra mini chocolate chips (for garnish)
-
Fresh whipped cream (for garnish)
-
Fresh cherries, pitted (for garnish)
Instructions
-
Step 1
Make the Crust: Combine 1 ½ cups graham cracker crumbs, ¼ cup granulated sugar, and ½ cup melted unsalted butter. Press the mixture firmly into a 9-inch pie plate, covering the bottom and sides. Chill the crust in the refrigerator for at least 30 minutes. -
Step 2
Prepare Cream Cheese Base: In a large mixing bowl, beat 1 (8-ounce) package softened cream cheese until light, fluffy, and completely smooth (about 2-3 minutes). Gradually add 1 cup sifted powdered sugar and beat until fully incorporated and creamy. Stir in 1 teaspoon pure vanilla extract. -
Step 3
Fold in Whipped Topping: Gently fold 1 (8-ounce) container thawed frozen whipped topping into the cream cheese mixture using a rubber spatula until uniformly light and smooth. -
Step 4
Add Cherries and Chocolate Chips: Gently fold in 1 (21-ounce) can chilled cherry pie filling and ¾ cup mini semi-sweet chocolate chips into the cream cheese mixture until just combined. -
Step 5
Assemble and Chill: Retrieve the chilled graham cracker crust. Spoon the cherry and chocolate chip filling into the crust, spreading it evenly. Cover the pie loosely and refrigerate for a minimum of 4-6 hours, or preferably overnight, to allow the pie to set firmly. -
Step 6
Serve: Before serving, optionally garnish the pie with fresh whipped cream, additional mini semi-sweet chocolate chips, and fresh pitted cherries. Use a sharp knife (wiped clean between slices) to cut into 8-10 generous slices. Store any leftovers in an airtight container in the refrigerator for up to 3-4 days.
Important Information
Nutrition Facts (Per Serving)
It is important to consider this information as approximate and not to use it as definitive health advice.
Allergy Information
Please check ingredients for potential allergens and consult a health professional if in doubt.


Leave a Comment