
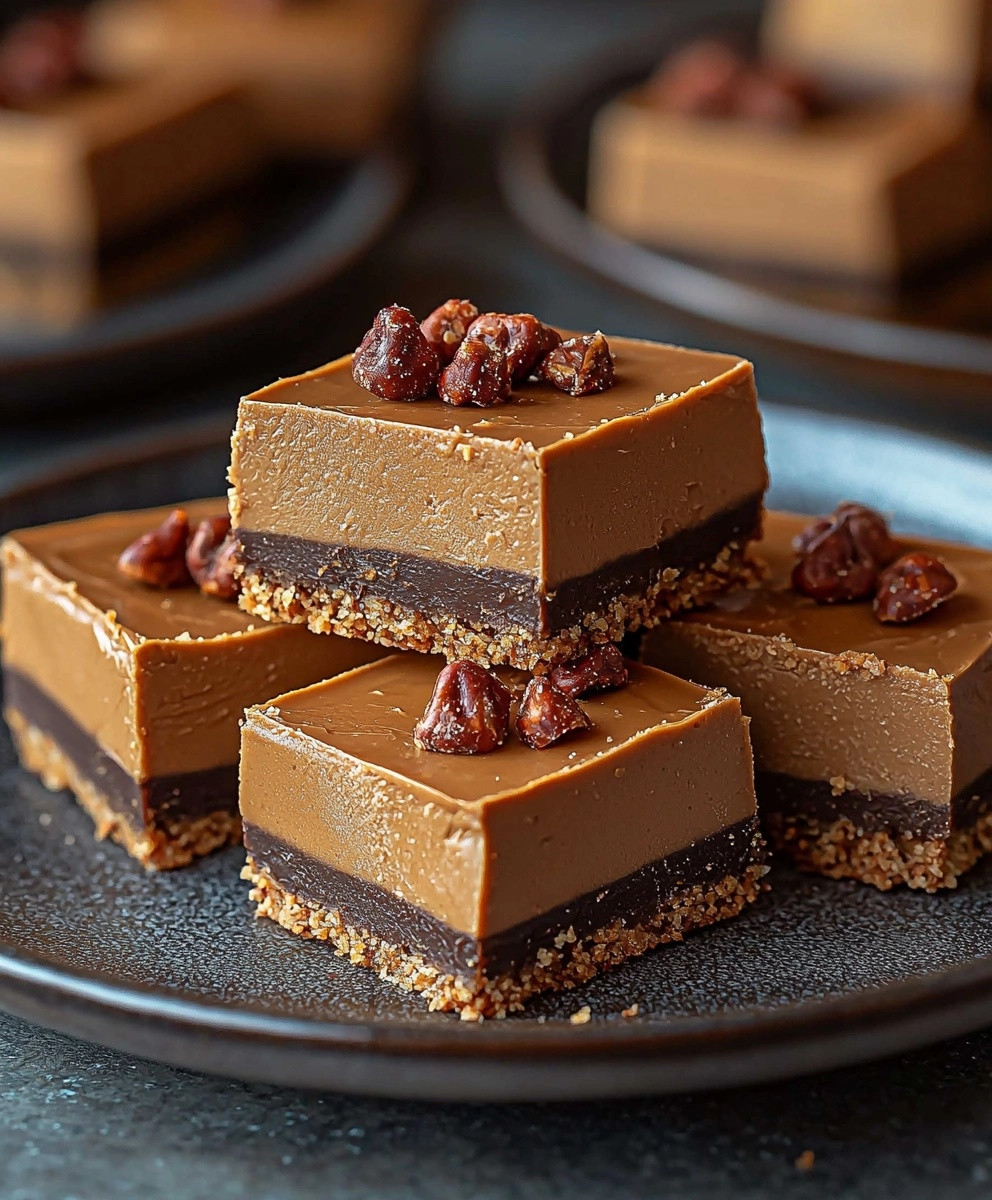
No-Bake Peanut Butter Treats are a delightful indulgence that brings together the rich, creamy flavor of peanut butter with the satisfying crunch of oats and chocolate. As someone who has always had a sweet tooth, I can confidently say that these treats are not only easy to make but also incredibly satisfying to eat. Originating from the classic no-bake dessert trend, these treats have become a staple in many households, especially for those who crave a quick and delicious snack without the hassle of baking.
People love No-Bake Peanut Butter Treats for their perfect balance of taste and texture. The combination of smooth peanut butter and chewy oats creates a mouthwatering experience that is hard to resist. Plus, they are incredibly convenientperfect for busy days when you want something sweet without spending hours in the kitchen. Whether youre preparing a snack for the kids or looking for a quick dessert to impress your friends, these No-Bake Peanut Butter Treats are sure to become a favorite in your recipe collection!

Ingredients:
- 1 cup creamy peanut butter
- 1/2 cup honey or maple syrup
- 2 cups rolled oats
- 1/2 cup chocolate chips (optional)
- 1/2 cup shredded coconut (optional)
- 1/2 cup chopped nuts (optional, such as almonds or walnuts)
- 1 teaspoon vanilla extract
- Pinch of salt
Preparing the Mixture
Lets get started on these delicious no-bake peanut butter treats! First, gather all your ingredients and make sure you have a large mixing bowl and a spatula or wooden spoon ready. I love to have everything prepped and organized before I dive in. It makes the process so much smoother!
- In a large mixing bowl, combine the creamy peanut butter and honey (or maple syrup). If youre using honey, make sure its at room temperature for easier mixing. I usually microwave it for about 10 seconds if its too thick.
- Add the vanilla extract and a pinch of salt to the peanut butter and honey mixture. This will enhance the flavors and balance the sweetness.
- Using a spatula or wooden spoon, mix the ingredients together until they are well combined and smooth. You want a creamy consistency thats easy to work with.
Incorporating the Dry Ingredients
Now that we have our wet ingredients ready, its time to add the dry ingredients. This is where you can get creative!
- Gradually add the rolled oats to the peanut butter mixture. Stir well to ensure that all the oats are coated with the peanut butter mixture. This is where the texture starts to come together!
- If youre using chocolate chips, shredded coconut, or chopped nuts, now is the time to fold them into the mixture. I love adding chocolate chips for that extra sweetness, but feel free to customize it to your taste!
- Continue mixing until everything is evenly distributed. The mixture should be thick and sticky, but still manageable.
Shaping the Treats
Once your mixture is ready, its time to shape these treats into bite-sized pieces. This part is super fun!
- Line an 8×8 inch baking dish or a similar-sized container with parchment paper. This will help with easy removal later on.
- Using your hands or a spatula, press the mixture firmly into the lined baking dish. Make sure to spread it evenly across the bottom and press down hard to compact it. This will help the treats hold their shape once theyre set.
- If you like, you can sprinkle a few extra chocolate chips or nuts on top for decoration. Just gently press them into the surface.
Chilling the Treats
Now that weve shaped our treats, its time to let them set. This is the hardest part because the anticipation is real!
- Cover the baking dish with plastic wrap or a lid to keep it airtight.
- Place the dish in the refrigerator for at least 1-2 hours. This will allow the treats to firm up and make them easier to cut into squares.
- If youre in a hurry, you can also place them in the freezer for about 30 minutes. Just keep an eye on them so they dont freeze solid!
Cutting and Serving
Once your treats have set, its time to cut them into squares and enjoy!
- Remove the treats from the baking dish by lifting the parchment paper. This makes it super easy to get them out without any mess.
- Using a sharp knife, cut the mixture into squares or bars, depending on your preference. I usually go for about 1-inch squares, but you can make them larger or smaller based on your liking.
- Place the cut treats on a serving plate or store them in an airtight container. They can be kept in the refrigerator for up to a week, or you can freeze them for longer storage.
Enjoying Your No-Bake Peanut Butter Treats
Now that youve made these delicious no
Conclusion:
In summary, these No-Bake Peanut Butter Treats are an absolute must-try for anyone who loves a quick, delicious, and satisfying snack. The combination of creamy peanut butter, sweet honey, and crunchy oats creates a delightful treat that not only satisfies your sweet tooth but also provides a boost of energy. Plus, the best part is that you dont even need to turn on the oven! For serving suggestions, I love to pair these treats with a glass of cold milk or a warm cup of tea for a cozy afternoon snack. You can also experiment with variations by adding in some chocolate chips, dried fruits, or even a sprinkle of sea salt on top for an extra flavor kick. If youre feeling adventurous, try swapping out the peanut butter for almond or cashew butter for a different twist! I encourage you to give this recipe a try and see how easy and delicious it is to whip up these No-Bake Peanut Butter Treats. Once youve made them, Id love to hear about your experience! Share your thoughts, any variations you tried, or even a photo of your creations. Lets spread the joy of these treats together! Happy snacking! PrintNo-Bake Peanut Butter Treats: Easy Recipes for Delicious Snacks

These no-bake peanut butter treats are a quick and easy snack made with creamy peanut butter, rolled oats, and optional mix-ins like chocolate chips and nuts. Perfect for satisfying your sweet cravings without the need for baking!
- Prep Time: 15 minutes
- Cook Time: 0 minutes
- Total Time: 75 minutes
- Yield: 16 squares 1x
Ingredients
- 1 cup creamy peanut butter
- 1/2 cup honey or maple syrup
- 2 cups rolled oats
- 1/2 cup chocolate chips (optional)
- 1/2 cup shredded coconut (optional)
- 1/2 cup chopped nuts (optional, such as almonds or walnuts)
- 1 teaspoon vanilla extract
- Pinch of salt
Instructions
- In a large mixing bowl, combine the creamy peanut butter and honey (or maple syrup). If using honey, ensure its at room temperature for easier mixing.
- Add the vanilla extract and a pinch of salt to the mixture. Mix until well combined and smooth.
- Gradually add the rolled oats to the peanut butter mixture, stirring well to coat all the oats.
- Fold in chocolate chips, shredded coconut, or chopped nuts if desired. Mix until evenly distributed.
- Line an 8×8 inch baking dish with parchment paper.
- Press the mixture firmly into the lined dish, spreading it evenly and compacting it well.
- Optionally, sprinkle extra chocolate chips or nuts on top and press them in gently.
- Cover the dish with plastic wrap or a lid to keep it airtight.
- Refrigerate for at least 1-2 hours to firm up. Alternatively, freeze for about 30 minutes.
- Lift the treats out of the baking dish using the parchment paper.
- Cut into squares or bars as desired.
- Store in an airtight container in the refrigerator for up to a week or freeze for longer storage.
Notes
- Feel free to customize the mix-ins based on your preferences. You can add dried fruits, seeds, or even protein powder for an extra boost.
- These treats are great for meal prep and can be made ahead of time for quick snacks throughout the week.

Leave a Comment