
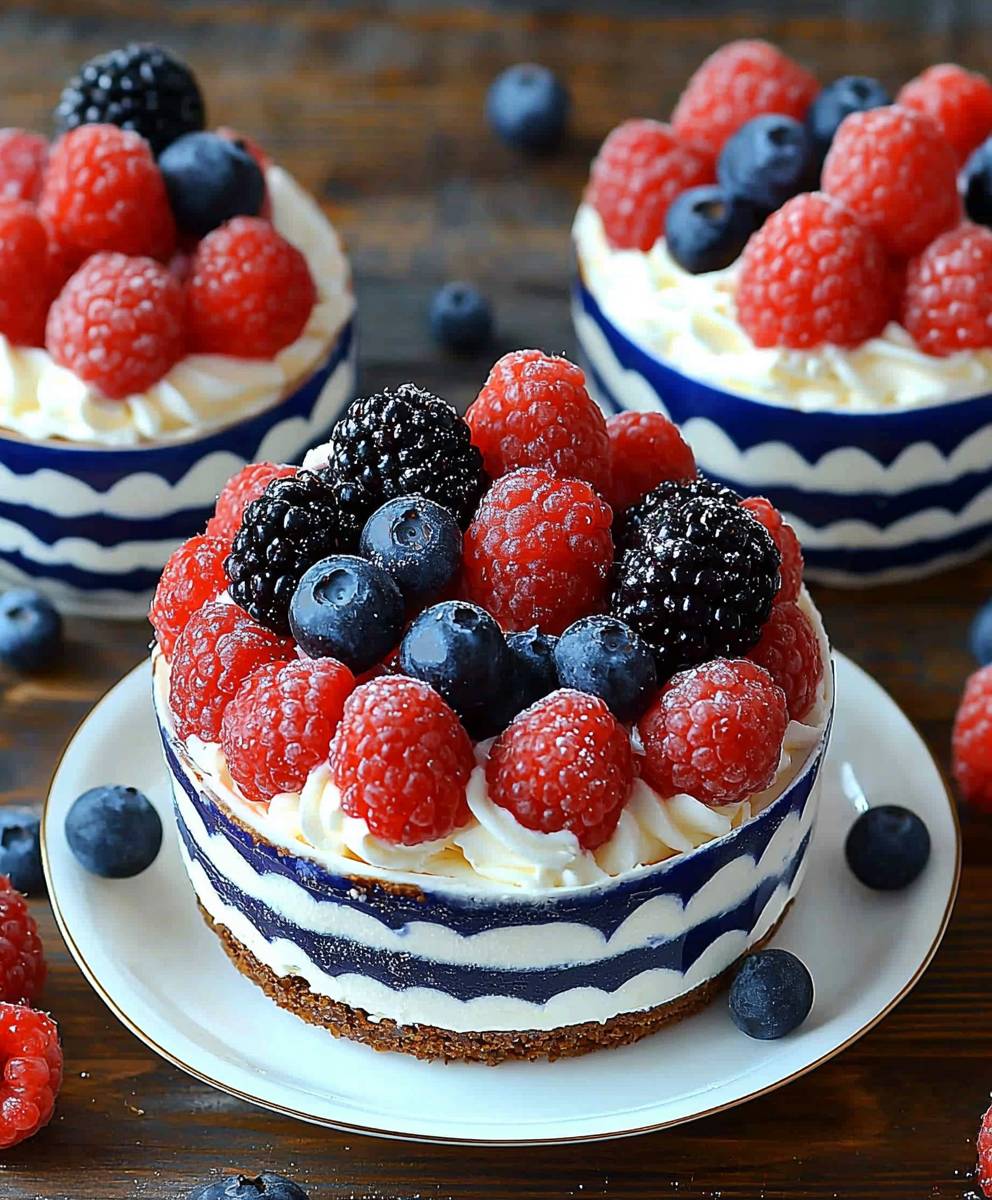
Patriotic Red White Blue Dessert, the star-spangled showstopper your summer celebrations have been waiting for! Imagine a dessert so vibrant, so delicious, and so easy to make that it becomes the highlight of your Fourth of July barbecue or Memorial Day picnic. This isn’t just a dessert; it’s a statement a delicious declaration of your love for all things Americana.
While the exact origins of layering red, white, and blue desserts for patriotic holidays are a bit hazy, the symbolism is crystal clear. These colors represent the American flag and the values it stands for: courage, purity, and justice. From simple fruit salads to elaborate trifles, bakers have been finding creative ways to express their patriotism through food for generations.
What makes a Patriotic Red White Blue Dessert so universally appealing? It’s the perfect combination of flavors and textures. Think juicy, ripe berries bursting with sweetness, creamy layers of whipped topping or yogurt providing a cool contrast, and maybe even a crunchy element like graham crackers or granola for added interest. Plus, let’s be honest, who can resist a dessert that looks this festive? It’s a guaranteed crowd-pleaser, and the best part is, you don’t need to be a master baker to create a stunning and delicious version. Get ready to impress your friends and family with this easy-to-make, visually stunning treat!

Ingredients:
- For the Red Velvet Cake Layers:
- 2 ½ cups all-purpose flour
- 1 teaspoon baking soda
- 1 teaspoon salt
- 2 tablespoons unsweetened cocoa powder
- 1 ½ cups granulated sugar
- 1 ½ cups vegetable oil
- 2 large eggs
- 1 cup buttermilk
- 2 tablespoons red food coloring (gel is recommended for vibrancy)
- 1 teaspoon white vinegar
- 1 teaspoon vanilla extract
- For the Vanilla Cake Layers:
- 2 ½ cups all-purpose flour
- 2 ½ teaspoons baking powder
- ½ teaspoon salt
- 1 cup (2 sticks) unsalted butter, softened
- 1 ¾ cups granulated sugar
- 2 large eggs
- 1 teaspoon vanilla extract
- 1 cup milk
- For the Blueberry Cake Layers:
- 2 ½ cups all-purpose flour
- 2 ½ teaspoons baking powder
- ½ teaspoon salt
- 1 cup (2 sticks) unsalted butter, softened
- 1 ¾ cups granulated sugar
- 2 large eggs
- 1 teaspoon vanilla extract
- 1 cup milk
- 1 cup fresh blueberries, lightly tossed in 1 tablespoon flour
- For the Cream Cheese Frosting:
- 16 ounces (2 packages) cream cheese, softened
- 1 cup (2 sticks) unsalted butter, softened
- 8 cups powdered sugar
- 2 teaspoons vanilla extract
- Pinch of salt
- For Decoration (Optional):
- Fresh blueberries
- Fresh raspberries
- Red, white, and blue sprinkles
Preparing the Red Velvet Cake Layers:
- Preheat and Prep: Preheat your oven to 350°F (175°C). Grease and flour three 8-inch round cake pans. You can also line the bottoms with parchment paper rounds for easy removal. This is crucial to prevent sticking!
- Dry Ingredients: In a large bowl, whisk together the flour, baking soda, salt, and cocoa powder. Make sure everything is evenly distributed.
- Wet Ingredients: In a separate large bowl, combine the sugar and vegetable oil. Beat with an electric mixer until well combined. Add the eggs one at a time, beating well after each addition.
- Combine Wet and Dry: Gradually add the dry ingredients to the wet ingredients, alternating with the buttermilk, beginning and ending with the dry ingredients. Beat until just combined. Be careful not to overmix!
- Red Color Magic: In a small bowl, whisk together the red food coloring, vinegar, and vanilla extract. Add this mixture to the batter and beat until evenly colored. The vinegar helps to activate the baking soda and create that classic red velvet tang.
- Bake: Divide the batter evenly among the prepared cake pans. Bake for 25-30 minutes, or until a wooden skewer inserted into the center comes out clean.
- Cool: Let the cakes cool in the pans for 10 minutes before inverting them onto a wire rack to cool completely.
Preparing the Vanilla Cake Layers:
- Preheat and Prep: Preheat your oven to 350°F (175°C). Grease and flour three 8-inch round cake pans. Again, parchment paper rounds are your friend!
- Dry Ingredients: In a medium bowl, whisk together the flour, baking powder, and salt.
- Cream Butter and Sugar: In a large bowl, cream together the softened butter and sugar until light and fluffy. This is a key step for a tender cake.
- Add Eggs and Vanilla: Beat in the eggs one at a time, then stir in the vanilla extract.
- Alternate Wet and Dry: Gradually add the dry ingredients to the creamed mixture, alternating with the milk, beginning and ending with the dry ingredients. Beat until just combined.
- Bake: Divide the batter evenly among the prepared cake pans. Bake for 25-30 minutes, or until a wooden skewer inserted into the center comes out clean.
- Cool: Let the cakes cool in the pans for 10 minutes before inverting them onto a wire rack to cool completely.
Preparing the Blueberry Cake Layers:
- Preheat and Prep: Preheat your oven to 350°F (175°C). Grease and flour three 8-inch round cake pans. Parchment paper, you know the drill!
- Prepare Blueberries: Gently toss the fresh blueberries with 1 tablespoon of flour. This helps prevent them from sinking to the bottom of the cake during baking.
- Dry Ingredients: In a medium bowl, whisk together the flour, baking powder, and salt.
- Cream Butter and Sugar: In a large bowl, cream together the softened butter and sugar until light and fluffy.
- Add Eggs and Vanilla: Beat in the eggs one at a time, then stir in the vanilla extract.
- Alternate Wet and Dry: Gradually add the dry ingredients to the creamed mixture, alternating with the milk, beginning and ending with the dry ingredients. Beat until just combined.
- Fold in Blueberries: Gently fold in the floured blueberries into the batter. Be careful not to overmix, as this can cause the blueberries to bleed and turn the batter blue.
- Bake: Divide the batter evenly among the prepared cake pans. Bake for 25-30 minutes, or until a wooden skewer inserted into the center comes out clean.
- Cool: Let the cakes cool in the pans for 10 minutes before inverting them onto a wire rack to cool completely.
Preparing the Cream Cheese Frosting:
- Cream Cheese and Butter: In a large bowl, beat the softened cream cheese and butter with an electric mixer until smooth and creamy. Make sure there are no lumps!
- Add Powdered Sugar: Gradually add the powdered sugar, one cup at a time, beating well after each addition. Start on low speed to prevent a powdered sugar cloud.
- Vanilla and Salt: Stir in the vanilla extract and salt.
- Whip: Beat the frosting on medium-high speed for 2-3 minutes, or until light and fluffy.
Assembling the Patriotic Cake:
- Level the Cakes: Once the cakes are completely cool, use a serrated knife to level the tops of each cake layer. This will ensure a stable and even cake.
- First Layer: Place one red velvet cake layer on a cake stand or serving plate.
- Frosting: Spread a generous layer of cream cheese frosting over the red velvet cake layer.
- Second Layer: Place one vanilla cake layer on top of the frosting.
- Frosting Again: Spread another generous layer of cream cheese frosting over the vanilla cake layer.
- Third Layer: Place one blueberry cake layer on top of the frosting.
- Repeat: Continue layering the cakes and frosting, alternating colors, until all the cake layers are used.
- Crumb Coat: Apply a thin layer of frosting over the entire cake to seal in any crumbs. This is called a crumb coat. Refrigerate the cake for 30 minutes to allow the crumb coat to set.
- Final Frosting: Apply a final, thicker layer of cream cheese frosting over the entire cake. Smooth the frosting with a spatula or cake smoother.
- Decorate: Decorate the cake with fresh blueberries, raspberries, and red, white, and blue sprinkles, if desired. Get creative and make it festive!
- Chill: Refrigerate the cake for at least 30 minutes before serving. This will allow the frosting to set and the flavors to meld together.
Conclusion:
This Patriotic Red White Blue Dessert isn’t just a treat; it’s a celebration on a plate! From the vibrant layers to the burst of fresh flavors, it’s guaranteed to be a showstopper at your next summer gathering. I know you might be thinking, “Another dessert recipe?” But trust me, this one is different. It’s incredibly easy to assemble, requires no baking (perfect for those hot days!), and is endlessly customizable to suit your taste. Why is this a must-try? Well, beyond the obvious patriotic appeal, it’s the perfect balance of textures and tastes. The creamy coolness of the yogurt or whipped topping against the juicy sweetness of the berries is simply divine. Plus, it’s a relatively healthy dessert option, packed with antioxidants from all those delicious berries. It’s a guilt-free indulgence that everyone will love, from the kids to the adults. But the best part? You can really make it your own!Serving Suggestions & Variations:
* Individual Parfaits: Layer the ingredients in individual glasses or mason jars for a beautiful and convenient presentation. This is great for parties or picnics. * Berry Swirl: Gently swirl some of the crushed berries into the yogurt or whipped topping for a marbled effect. * Add a Crunch: Sprinkle a layer of granola or crushed graham crackers between the layers for added texture and a hint of nutty flavor. * Boozy Berry Bliss: For an adult-only version, macerate the berries in a little bit of Grand Marnier or other fruit liqueur before layering. * Ice Cream Dream: Substitute the yogurt or whipped topping with vanilla ice cream or frozen yogurt for an even more decadent treat. * Cake Base: Use a sliced angel food cake or pound cake as the base for your dessert instead of just layering in a trifle bowl. This adds a lovely spongey texture. * Chocolate Chips: A sprinkle of mini chocolate chips never hurt anyone! Especially if you are catering to kids. * Different Berries: Feel free to experiment with other types of berries, such as blackberries, raspberries, or even sliced strawberries. * Sweetener Options: Adjust the sweetness to your liking by using different types of sweeteners, such as honey, maple syrup, or agave nectar. You can also use a sugar-free sweetener for a healthier option. * Vegan Version: Use a plant-based yogurt or whipped cream alternative to make this dessert vegan-friendly. I truly believe this Patriotic Red White Blue Dessert will become a new family favorite. It’s the kind of recipe that’s so simple, yet so impressive. It’s perfect for Fourth of July celebrations, Memorial Day barbecues, or any time you want to add a touch of festive flair to your dessert table. So, what are you waiting for? Gather your ingredients, put on some patriotic tunes, and get ready to create a dessert masterpiece! I’m confident you’ll love it as much as I do. And most importantly, I want to hear about your experience! Did you try any of the variations? Did you make it for a special occasion? Share your photos and stories in the comments below. I can’t wait to see your creations and hear how this recipe brought a little bit of red, white, and blue joy to your day. Happy baking (or rather, layering!) and happy celebrating! Let me know if you have any questions, and I’ll be happy to help. Enjoy! PrintPatriotic Red White Blue Dessert: Delicious Recipes for July 4th

Patriotic layer cake with red velvet, vanilla, and blueberry layers, frosted with creamy cream cheese frosting. Perfect for American holidays!
- Prep Time: 90 minutes
- Cook Time: 1 hour 15 minutes
- Total Time: 195 minutes
- Yield: 12–16 servings 1x
Ingredients
- 2 ½ cups all-purpose flour
- 1 teaspoon baking soda
- 1 teaspoon salt
- 2 tablespoons unsweetened cocoa powder
- 1 ½ cups granulated sugar
- 1 ½ cups vegetable oil
- 2 large eggs
- 1 cup buttermilk
- 2 tablespoons red food coloring (gel is recommended for vibrancy)
- 1 teaspoon white vinegar
- 1 teaspoon vanilla extract
- 2 ½ cups all-purpose flour
- 2 ½ teaspoons baking powder
- ½ teaspoon salt
- 1 cup (2 sticks) unsalted butter, softened
- 1 ¾ cups granulated sugar
- 2 large eggs
- 1 teaspoon vanilla extract
- 1 cup milk
- 2 ½ cups all-purpose flour
- 2 ½ teaspoons baking powder
- ½ teaspoon salt
- 1 cup (2 sticks) unsalted butter, softened
- 1 ¾ cups granulated sugar
- 2 large eggs
- 1 teaspoon vanilla extract
- 1 cup milk
- 1 cup fresh blueberries, lightly tossed in 1 tablespoon flour
- 16 ounces (2 packages) cream cheese, softened
- 1 cup (2 sticks) unsalted butter, softened
- 8 cups powdered sugar
- 2 teaspoons vanilla extract
- Pinch of salt
- Fresh blueberries
- Fresh raspberries
- Red, white, and blue sprinkles
Instructions
- Prepare Red Velvet Cake Layers:
- Preheat oven to 350°F (175°C). Grease and flour three 8-inch round cake pans (or line with parchment paper).
- Whisk together flour, baking soda, salt, and cocoa powder in a large bowl.
- In a separate bowl, combine sugar and vegetable oil. Beat with an electric mixer until well combined. Add eggs one at a time, beating well after each addition.
- Gradually add dry ingredients to wet ingredients, alternating with buttermilk, beginning and ending with dry ingredients. Beat until just combined.
- In a small bowl, whisk together red food coloring, vinegar, and vanilla extract. Add to batter and beat until evenly colored.
- Divide batter evenly among prepared pans. Bake for 25-30 minutes, or until a wooden skewer inserted into the center comes out clean.
- Cool in pans for 10 minutes before inverting onto a wire rack to cool completely.
- Prepare Vanilla Cake Layers:
- Preheat oven to 350°F (175°C). Grease and flour three 8-inch round cake pans (or line with parchment paper).
- Whisk together flour, baking powder, and salt in a medium bowl.
- Cream together softened butter and sugar until light and fluffy in a large bowl.
- Beat in eggs one at a time, then stir in vanilla extract.
- Gradually add dry ingredients to creamed mixture, alternating with milk, beginning and ending with dry ingredients. Beat until just combined.
- Divide batter evenly among prepared pans. Bake for 25-30 minutes, or until a wooden skewer inserted into the center comes out clean.
- Cool in pans for 10 minutes before inverting onto a wire rack to cool completely.
- Prepare Blueberry Cake Layers:
- Preheat oven to 350°F (175°C). Grease and flour three 8-inch round cake pans (or line with parchment paper).
- Gently toss blueberries with 1 tablespoon of flour.
- Whisk together flour, baking powder, and salt in a medium bowl.
- Cream together softened butter and sugar until light and fluffy in a large bowl.
- Beat in eggs one at a time, then stir in vanilla extract.
- Gradually add dry ingredients to creamed mixture, alternating with milk, beginning and ending with dry ingredients. Beat until just combined.
- Gently fold in floured blueberries into the batter.
- Divide batter evenly among prepared pans. Bake for 25-30 minutes, or until a wooden skewer inserted into the center comes out clean.
- Cool in pans for 10 minutes before inverting onto a wire rack to cool completely.
- Prepare Cream Cheese Frosting:
- Beat softened cream cheese and butter with an electric mixer until smooth and creamy in a large bowl.
- Gradually add powdered sugar, one cup at a time, beating well after each addition.
- Stir in vanilla extract and salt.
- Beat on medium-high speed for 2-3 minutes, or until light and fluffy.
- Assemble the Cake:
- Level the tops of each cake layer with a serrated knife.
- Place one red velvet cake layer on a cake stand or serving plate.
- Spread a generous layer of cream cheese frosting over the red velvet cake layer.
- Place one vanilla cake layer on top of the frosting.
- Spread another generous layer of cream cheese frosting over the vanilla cake layer.
- Place one blueberry cake layer on top of the frosting.
- Continue layering the cakes and frosting, alternating colors, until all the cake layers are used.
- Apply a thin layer of frosting over the entire cake to seal in any crumbs (crumb coat). Refrigerate for 30 minutes.
- Apply a final, thicker layer of cream cheese frosting over the entire cake. Smooth the frosting.
- Decorate with fresh blueberries, raspberries, and red, white, and blue sprinkles, if desired.
- Refrigerate for at least 30 minutes before serving.
Notes
- Using gel food coloring for the red velvet cake will give you the most vibrant color.
- Make sure your butter and cream cheese are properly softened for the frosting to be smooth and lump-free.
- Tossing the blueberries in flour helps prevent them from sinking to the bottom of the cake.
- Don’t overmix the cake batters, especially after adding the flour. Overmixing can lead to a tough cake.
- A crumb coat is essential for a professional-looking cake. It seals in the crumbs and prevents them from showing through the final layer of frosting.
- Refrigerating the cake before serving allows the frosting to set and the flavors to meld together.

Leave a Comment