
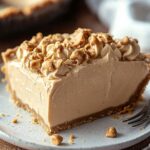
Peanut Butter Pie, oh, where do I even begin? Imagine sinking your fork into a cloud of creamy, peanut butter perfection, a dessert so decadent it feels like a forbidden indulgence, yet so simple to make you’ll wonder why you haven’t been enjoying it your whole life. This isn’t just any pie; it’s a symphony of sweet and salty, smooth and slightly crumbly, a textural masterpiece that will have everyone begging for seconds.
While the exact origins of Peanut Butter Pie are a bit hazy, its roots are firmly planted in American comfort food. Peanut butter itself gained popularity in the late 19th and early 20th centuries, and it wasn’t long before creative cooks started incorporating it into desserts. This pie embodies that spirit of ingenuity and resourcefulness, transforming a humble pantry staple into something truly extraordinary.
What makes this pie so irresistible? It’s the perfect balance of flavors, of course! The rich, nutty taste of peanut butter is beautifully complemented by the sweetness of sugar and the subtle tang of cream cheese (in some variations). The smooth, melt-in-your-mouth filling contrasts wonderfully with a crisp graham cracker crust, creating a delightful sensory experience. Plus, let’s be honest, who can resist the allure of peanut butter? It’s a flavor that evokes childhood memories and pure, unadulterated happiness. And the best part? It’s incredibly easy to make, requiring minimal baking and readily available ingredients. Get ready to experience peanut butter bliss!

Ingredients:
- For the Crust:
- 1 ½ cups graham cracker crumbs
- 5 tablespoons unsalted butter, melted
- ¼ cup granulated sugar
- For the Peanut Butter Filling:
- 8 ounces cream cheese, softened
- 1 cup creamy peanut butter (I prefer using a no-stir variety for consistency)
- 1 cup powdered sugar
- ½ cup heavy cream
- 1 teaspoon vanilla extract
- Pinch of salt
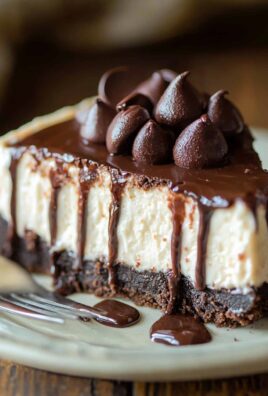
- For the Chocolate Ganache Topping:
- 4 ounces semi-sweet chocolate, finely chopped
- ½ cup heavy cream
- Optional Garnishes:
- Chopped peanuts
- Mini chocolate chips
- Peanut butter cups, halved or quartered
- Whipped cream
Preparing the Graham Cracker Crust:
- Combine the Ingredients: In a medium bowl, thoroughly mix together the graham cracker crumbs, melted butter, and granulated sugar. Make sure all the crumbs are evenly moistened with the butter. This is crucial for the crust to hold together properly. I like to use a fork to break up any clumps and ensure everything is well combined.
- Press into the Pie Plate: Press the mixture firmly and evenly into the bottom and up the sides of a 9-inch pie plate. You can use the bottom of a measuring cup or a flat-bottomed glass to help you achieve a smooth and even crust. Pay special attention to the edges, as they tend to be thinner and can crumble easily.
- Bake (Optional): For a sturdier crust, bake in a preheated oven at 350°F (175°C) for 8-10 minutes. This step helps to set the crust and prevent it from becoming soggy. However, you can skip this step if you prefer a no-bake crust. If you choose to bake, let the crust cool completely before adding the filling.
- Chill the Crust: Whether you baked it or not, place the crust in the refrigerator to chill while you prepare the peanut butter filling. This will help it firm up and make it easier to work with. I usually chill it for at least 30 minutes.
Making the Peanut Butter Filling:
- Cream the Cream Cheese and Peanut Butter: In a large bowl, using an electric mixer (either a stand mixer or a hand mixer), beat the softened cream cheese and peanut butter together until smooth and creamy. It’s important that the cream cheese is truly softened, otherwise you’ll end up with lumps in your filling. I usually let mine sit at room temperature for at least an hour before starting.
- Add the Powdered Sugar: Gradually add the powdered sugar, beating on low speed until fully incorporated. Be careful not to add it all at once, as it can create a cloud of powdered sugar. I usually add it in about ½ cup increments.
- Incorporate the Heavy Cream and Vanilla: Pour in the heavy cream and vanilla extract. Beat on medium speed until the filling is light and fluffy. Don’t overbeat, as this can cause the filling to become too thin.
- Add a Pinch of Salt: Add a pinch of salt to balance the sweetness and enhance the peanut butter flavor. You’d be surprised how much of a difference a little salt can make!
- Taste and Adjust: Give the filling a taste and adjust the sweetness or peanut butter flavor to your liking. If you want it sweeter, add a little more powdered sugar. If you want more peanut butter flavor, add a little more peanut butter.
- Pour into the Crust: Pour the peanut butter filling into the prepared graham cracker crust, spreading it evenly with a spatula.
- Chill the Pie: Cover the pie with plastic wrap and refrigerate for at least 4 hours, or preferably overnight, to allow the filling to set completely. This is a crucial step, so don’t rush it!
Preparing the Chocolate Ganache Topping:
- Heat the Heavy Cream: In a small saucepan, heat the heavy cream over medium heat until it just begins to simmer. Do not boil. Watch it carefully, as it can easily boil over.
- Pour over Chocolate: Place the finely chopped chocolate in a heatproof bowl. Pour the hot heavy cream over the chocolate and let it sit for about a minute to allow the chocolate to melt.
- Stir Until Smooth: Gently stir the mixture until the chocolate is completely melted and the ganache is smooth and glossy. If there are any stubborn pieces of chocolate that won’t melt, you can microwave the mixture in 15-second intervals, stirring in between, until smooth.
- Let Cool Slightly: Allow the ganache to cool slightly for about 10-15 minutes before pouring it over the peanut butter filling. This will prevent the ganache from melting the filling.
- Pour over Pie: Pour the slightly cooled chocolate ganache over the chilled peanut butter filling, spreading it evenly with a spatula.
- Chill Again: Return the pie to the refrigerator and chill for at least 30 minutes to allow the ganache to set.
Garnishing and Serving:
- Garnish (Optional): Before serving, garnish the pie with your favorite toppings. Some suggestions include chopped peanuts, mini chocolate chips, halved or quartered peanut butter cups, and whipped cream. Get creative and have fun with it!
- Slice and Serve: Slice the pie into wedges and serve chilled. I like to use a sharp knife dipped in warm water to get clean slices.
- Storage: Store any leftover pie in the refrigerator, covered, for up to 3 days. The crust may soften slightly over time, but the pie will still taste delicious.
Tips for Success:
- Use Room Temperature Ingredients: Make sure your cream cheese is softened to room temperature before starting. This will ensure a smooth and creamy filling.
- Don’t Overbeat the Filling: Overbeating the peanut butter filling can cause it to become too thin. Beat until just combined.
- Chill Thoroughly: Chilling the pie for the recommended amount of time is crucial for the filling and ganache to set properly.
- Use High-Quality Chocolate: Using high-quality chocolate will result in a richer and more flavorful ganache.
- Get Creative with Garnishes: Don’t be afraid to experiment with different garnishes to create a pie that is both delicious and visually appealing.
Variations:
- Chocolate Crust: Substitute chocolate graham crackers for regular graham crackers in the crust for a chocolatey twist.
- Peanut Butter Cup Filling: Chop up some peanut butter cups and fold them into the peanut butter filling for extra peanut butter flavor and texture.
- Salted Caramel Drizzle: Drizzle salted caramel sauce over the chocolate ganache for a sweet and salty combination.
- Oreo Crust: Use Oreo cookies instead of graham crackers for a chocolatey crust. Remove the cream filling before crushing the cookies.
- Vegan Peanut Butter Pie: Use vegan cream cheese, vegan butter, and vegan chocolate to make a vegan version of this pie.

Conclusion:
This Peanut Butter Pie isn’t just a dessert; it’s a creamy, dreamy escape from the ordinary. Seriously, if you’re a peanut butter lover (and who isn’t?), you absolutely *need* this recipe in your life. The combination of the rich, decadent filling and the perfectly balanced crust creates a symphony of flavors and textures that will have you reaching for seconds (and maybe thirds!). It’s the kind of pie that disappears quickly at gatherings, leaving everyone wanting more. But what makes this pie a true must-try? It’s the simplicity! You don’t need to be a master baker to whip up this masterpiece. The recipe is straightforward, uses readily available ingredients, and requires minimal baking time. That means you can satisfy your peanut butter cravings without spending hours in the kitchen. Plus, the results are consistently impressive, making it a reliable crowd-pleaser for any occasion. Beyond its deliciousness and ease, this Peanut Butter Pie is incredibly versatile. Looking for serving suggestions? A dollop of whipped cream and a sprinkle of chopped peanuts are classic choices that never disappoint. But don’t be afraid to get creative! Drizzle some melted chocolate over the top for an extra layer of indulgence, or add a swirl of caramel sauce for a salty-sweet sensation. For a truly decadent experience, try serving it with a scoop of vanilla ice cream. And the variations? The possibilities are endless! If you’re feeling adventurous, try adding a layer of chocolate ganache to the bottom of the crust before adding the peanut butter filling. Or, for a lighter version, use a reduced-fat cream cheese and a sugar substitute. You could even experiment with different types of peanut butter, such as crunchy or honey-roasted, to customize the flavor to your liking. Consider adding a hint of sea salt to the filling to enhance the peanut butter flavor even more. For a festive touch during the holidays, sprinkle crushed peanut brittle on top. I’m confident that this recipe will become a new favorite in your household. It’s the perfect dessert for potlucks, birthday parties, or simply a cozy night in. Its also a great way to impress your friends and family with your baking skills, even if you’re a beginner. The rich, creamy texture and intense peanut butter flavor are simply irresistible. So, what are you waiting for? Gather your ingredients, preheat your oven (or don’t, if you opt for a no-bake crust!), and get ready to experience the magic of this incredible Peanut Butter Pie. I promise you won’t regret it! Once you’ve tried it, I’d love to hear about your experience! Did you make any variations? What did your friends and family think? Share your photos and stories in the comments below. Let’s spread the peanut butter love and inspire others to try this amazing recipe. Happy baking (or no-baking!), and enjoy every delicious bite! I can’t wait to see your creations! PrintPeanut Butter Pie: The Ultimate Guide to a Perfect Dessert
No-bake peanut butter pie with graham cracker crust, creamy peanut butter filling, and chocolate ganache. Perfect for peanut butter lovers!
- Prep Time: 30 minutes
- Cook Time: 8 minutes
- Total Time: 278 minutes
- Yield: 8 servings 1x
Ingredients
- 1 ½ cups graham cracker crumbs
- 5 tablespoons unsalted butter, melted
- ¼ cup granulated sugar
- 8 ounces cream cheese, softened
- 1 cup creamy peanut butter (no-stir variety recommended)
- 1 cup powdered sugar
- ½ cup heavy cream
- 1 teaspoon vanilla extract
- Pinch of salt
- 4 ounces semi-sweet chocolate, finely chopped
- ½ cup heavy cream
- Chopped peanuts
- Mini chocolate chips
- Peanut butter cups, halved or quartered
- Whipped cream
Instructions
- In a medium bowl, combine graham cracker crumbs, melted butter, and granulated sugar. Mix well until evenly moistened.
- Press the mixture firmly and evenly into the bottom and up the sides of a 9-inch pie plate.
- *(Optional)* Bake in a preheated oven at 350°F (175°C) for 8-10 minutes for a sturdier crust. Let cool completely.
- Chill the crust in the refrigerator for at least 30 minutes.
- In a large bowl, beat softened cream cheese and peanut butter together until smooth and creamy.
- Gradually add powdered sugar, beating on low speed until fully incorporated.
- Pour in heavy cream and vanilla extract. Beat on medium speed until the filling is light and fluffy.
- Add a pinch of salt.
- Taste and adjust sweetness or peanut butter flavor as desired.
- Pour the peanut butter filling into the prepared graham cracker crust, spreading it evenly.
- Cover the pie with plastic wrap and refrigerate for at least 4 hours, or preferably overnight, to allow the filling to set completely.
- In a small saucepan, heat heavy cream over medium heat until it just begins to simmer. Do not boil.
- Place finely chopped chocolate in a heatproof bowl. Pour the hot heavy cream over the chocolate and let it sit for about a minute.
- Gently stir the mixture until the chocolate is completely melted and the ganache is smooth and glossy.
- Let the ganache cool slightly for about 10-15 minutes.
- Pour the slightly cooled chocolate ganache over the chilled peanut butter filling, spreading it evenly.
- Return the pie to the refrigerator and chill for at least 30 minutes to allow the ganache to set.
- *(Optional)* Garnish the pie with your favorite toppings, such as chopped peanuts, mini chocolate chips, peanut butter cups, and whipped cream.
- Slice the pie into wedges and serve chilled.
- Store any leftover pie in the refrigerator, covered, for up to 3 days.
Notes
- Use room temperature cream cheese for a smooth filling.
- Don’t overbeat the peanut butter filling.
- Chill the pie thoroughly for best results.
- Use high-quality chocolate for a richer ganache.
- Get creative with garnishes!
Leave a Comment