
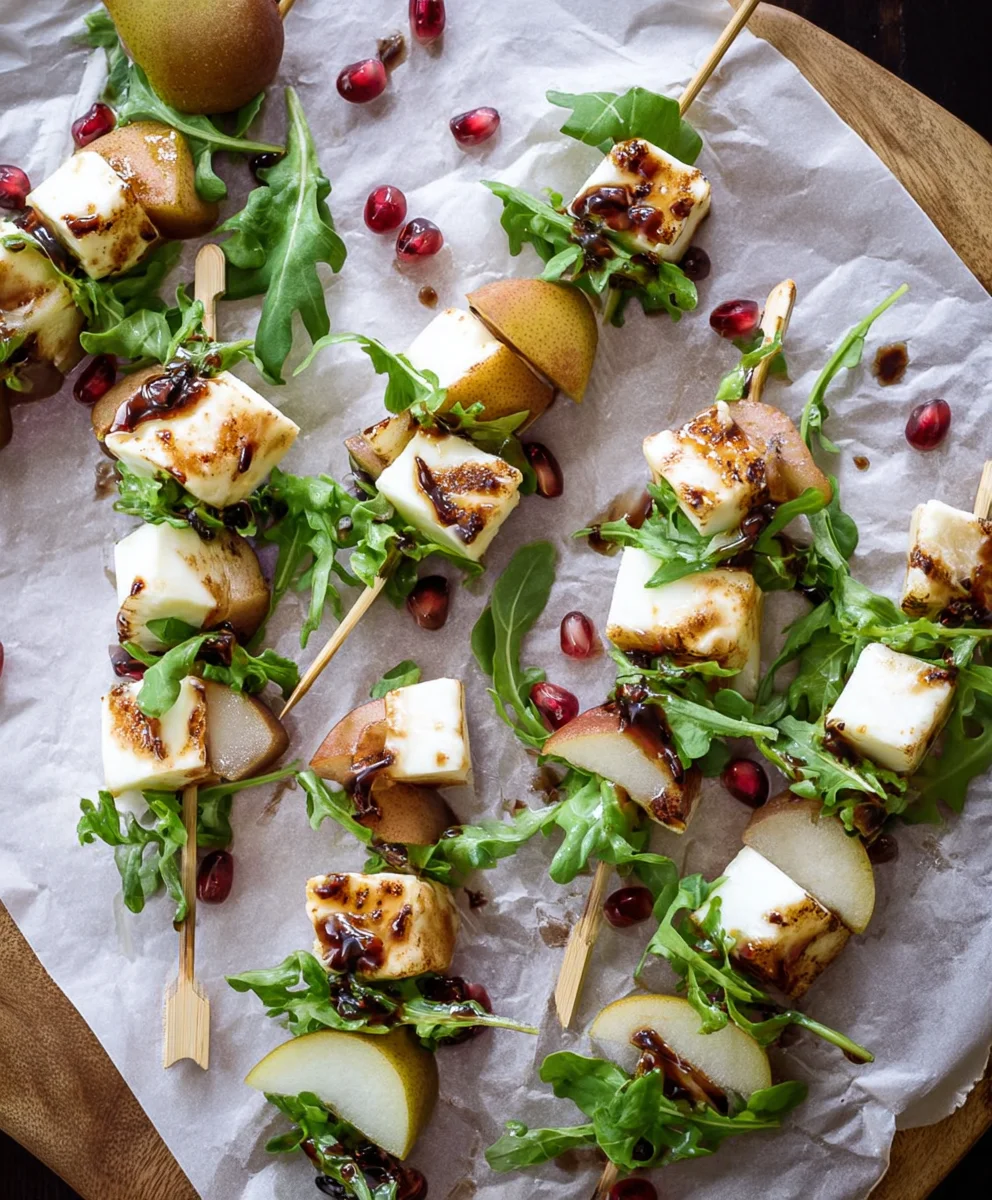
Pear Brie Salad Skewers are more than just a delightful appetizer; they’re a miniature masterpiece that captures the essence of simple elegance and irresistible flavor. Imagine tender, juicy pear slices meeting the creamy, slightly tangy embrace of brie, all artfully arranged and ready to be plucked and enjoyed. It’s no wonder these Pear Brie Salad Skewers have become a go-to for gatherings and sophisticated soirées. The magic lies in their perfect balance: the sweetness of the fruit harmonizes beautifully with the rich, luxurious cheese, creating a bite that’s both refreshing and utterly satisfying. What truly sets them apart is their effortless charm; they’re incredibly easy to assemble, making them a stress-free addition to any menu, yet they deliver a gourmet experience that will leave your guests clamoring for more. Prepare to impress with these show-stopping, flavor-packed skewers!

Ingredients:
- 2 ripe but firm pears
- 8 ounces Brie cheese
- 1/4 cup balsamic glaze
- 2 tablespoons chopped fresh basil
- 1 tablespoon olive oil
- 1/2 teaspoon Dijon mustard
- Salt, to taste
- Freshly ground black pepper, to taste
- Wooden skewers (about 6-8 inches long)
Preparing the Pear Brie Salad Skewers
Step 1: Prepare the Pears
Begin by washing your pears thoroughly under cool running water. We want them to be ripe enough to be sweet and slightly yielding, but still firm enough to hold their shape when skewered. This firmness is crucial to prevent them from becoming mushy. Pat them completely dry with a clean kitchen towel or paper towels. This ensures a clean cut and prevents any unwanted water from diluting the flavors later. Next, using a sharp paring knife, carefully core the pears. You can do this by cutting the pear in half vertically and then slicing out the core and seeds. Once cored, slice each pear half into roughly 1-inch thick wedges. Aim for consistent sizing so that each skewer has a balanced distribution of pear and cheese. You should get about 4-6 wedges per pear, depending on their size. Set these prepared pear wedges aside.
Step 2: Cube the Brie Cheese
Now, let’s prepare the star of our Pear Brie Salad Skewers – the Brie cheese. Remove the Brie from its packaging. If your Brie has a rind, you can choose to leave it on or carefully trim it away, depending on your personal preference. Many people enjoy the creamy texture of the rind, while others prefer a smoother bite. For this recipe, I find it’s best to leave it on for extra flavor and texture. Cut the Brie into roughly 1-inch cubes. Similar to the pears, aim for uniform sizing to create visually appealing and evenly balanced skewers. You’ll want a good amount of cheese for each skewer to complement the sweetness of the pear. Place the Brie cubes in a small bowl, ready for the next step.
Step 3: Assemble the Skewers
This is where the magic of the Pear Brie Salad Skewers truly comes together. Take your wooden skewers and begin assembling. For each skewer, start by threading a piece of Brie cheese. Follow this with a pear wedge. Continue alternating between a cube of Brie and a wedge of pear until you have used up your ingredients or reached a desired skewer length. Don’t over-stuff the skewers; leave a little space at the top and bottom for easier handling and presentation. Aim to place the pear with the curved side facing outwards for a more attractive appearance. You should be able to fit about 2-3 pieces of Brie and 2-3 pieces of pear on each skewer, depending on the size of your ingredients. It’s a simple process, but the visual appeal of the alternating colors and textures is immediate.
Step 4: Whisk Together the Dressing
While the skewers are assembled, it’s time to prepare a light and flavorful dressing that will enhance the natural sweetness of the pear and the richness of the Brie. In a small bowl, combine the balsamic glaze, olive oil, and Dijon mustard. Whisk these ingredients together vigorously until they are well emulsified and form a cohesive dressing. The Dijon mustard will add a subtle tang that cuts through the richness of the cheese, while the olive oil provides a smooth base. The balsamic glaze will contribute a beautiful sweetness and a hint of acidity. Season this dressing with a pinch of salt and a generous grind of freshly ground black pepper. Taste the dressing and adjust the seasoning as needed. You want a balanced flavor profile that complements, rather than overpowers, the main components.
Step 5: Drizzle and Garnish
Once your dressing is ready and your skewers are assembled, it’s time for the final touches that will elevate your Pear Brie Salad Skewers from delicious to exceptional. Carefully arrange the assembled skewers on a serving platter. Now, take your whisked dressing and artfully drizzle it over the Pear Brie Salad Skewers. You can use a spoon or a small squeeze bottle for more controlled drizzling. Make sure to get a little dressing on both the pear and the Brie for maximum flavor. Finally, sprinkle the chopped fresh basil evenly over the top of the skewers. The bright green basil not only adds a beautiful pop of color but also contributes a fresh, herbaceous aroma and flavor that perfectly complements the sweet pear and creamy Brie. Serve immediately and enjoy the delightful combination of textures and tastes!

Conclusion:
There you have it – a simple yet elegant recipe for Pear Brie Salad Skewers that is sure to impress! We’ve walked through how easy it is to assemble these delightful bites, transforming fresh pears and creamy brie into a sophisticated appetizer or light lunch. The combination of sweet fruit, rich cheese, and crisp salad greens creates a flavor profile that is both refreshing and satisfying. These Pear Brie Salad Skewers are incredibly versatile, making them perfect for gatherings, picnics, or even a quick, healthy snack.
For serving, I love presenting these skewers on a platter drizzled with a balsamic glaze or a light vinaigrette. They pair wonderfully with a crisp white wine or sparkling cider. Don’t be afraid to get creative with variations! Consider adding toasted walnuts or pecans for an extra crunch, a sprinkle of fresh mint for an aromatic lift, or even a touch of honey for an intensified sweetness. The beauty of this recipe is its adaptability. So go ahead, give these Pear Brie Salad Skewers a try and discover how delicious and easy healthy eating can be!
Frequently Asked Questions about Pear Brie Salad Skewers:
Can I make these skewers ahead of time?
Yes, you can! It’s best to assemble them a few hours in advance. Store them loosely covered in the refrigerator. To prevent the greens from wilting, you might want to add them just before serving or keep the dressing separate.
What kind of pears work best?
Firmer pears like Anjou, Bartlett, or Bosc hold their shape well and offer a pleasant texture. Softer pears might become too mushy when skewered. Ensure your pears are ripe but not overly soft.
Pear Brie Salad Skewers
An easy and elegant appetizer featuring the delightful combination of sweet pears and creamy Brie cheese, drizzled with a balsamic glaze and fresh basil.
Ingredients
-
2 ripe but firm pears
-
8 ounces Brie cheese
-
1/4 cup balsamic glaze
-
2 tablespoons chopped fresh basil
-
1 tablespoon olive oil
-
1/2 teaspoon Dijon mustard
-
Salt, to taste
-
Freshly ground black pepper, to taste
-
Wooden skewers (about 6-8 inches long)
Instructions
-
Step 1
Wash pears thoroughly and pat dry. Core and slice each pear into 1-inch thick wedges. Set aside. -
Step 2
Remove Brie from packaging. Leave rind on or trim as preferred. Cut Brie into 1-inch cubes. Place in a small bowl. -
Step 3
Thread Brie cubes and pear wedges onto wooden skewers, alternating between the two. Aim for 2-3 pieces of each per skewer. -
Step 4
In a small bowl, whisk together balsamic glaze, olive oil, and Dijon mustard until emulsified. Season with salt and pepper to taste. -
Step 5
Arrange assembled skewers on a serving platter. Artfully drizzle the prepared dressing over the skewers. Sprinkle with chopped fresh basil.
Important Information
Nutrition Facts (Per Serving)
It is important to consider this information as approximate and not to use it as definitive health advice.
Allergy Information
Please check ingredients for potential allergens and consult a health professional if in doubt.


Leave a Comment