
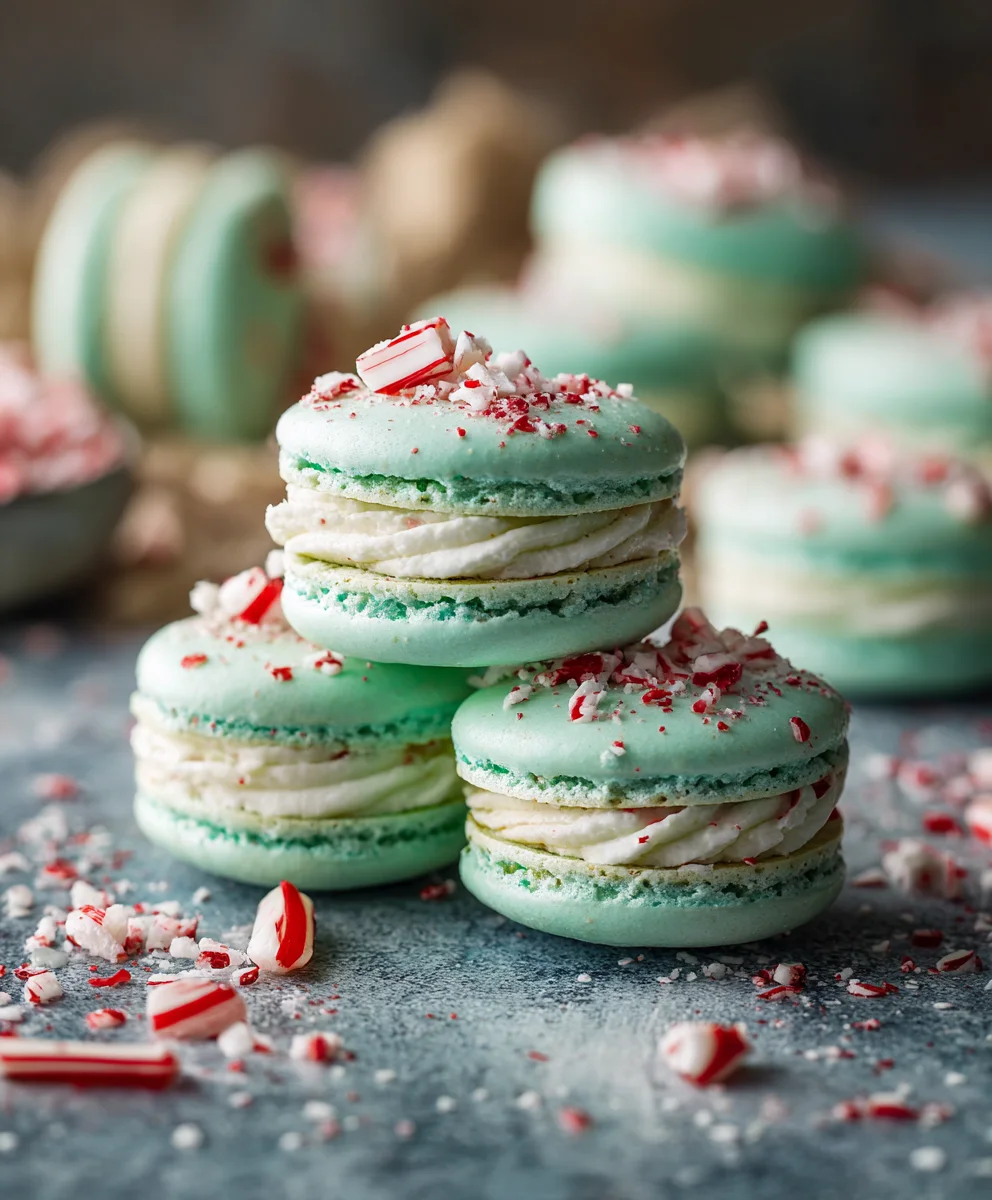
Peppermint Macarons are more than just a dessert; they are a miniature work of art, a perfect blend of elegance and festive cheer that captures hearts with every delicate bite. As someone who adores the magic of baking, few treats bring as much joy and visual delight as these vibrant, airy confections, especially when infused with the invigorating essence of peppermint. Imagine the delicate crunch of a perfectly baked shell giving way to a wonderfully chewy interior, all while a cool, refreshing wave of peppermint dances on your palate, perfectly complemented by a rich, creamy filling. This specific rendition, Peppermint Macarons, truly elevates the classic French delicacy into something spectacularly special, making it an irresistible choice for holiday gatherings or simply a sophisticated indulgence on a quiet afternoon.
The macaron itself boasts a rich history, originating in Italy and refined in the grand patisseries of France, evolving into the iconic sandwich cookie we cherish today. While traditional flavors like pistachio and raspberry hold a special place, the addition of peppermint transforms this sophisticated treat into a seasonal sensation. People adore this dish not only for its ethereal texture and balanced sweetness but also for its stunning visual appeal and the comforting, yet exhilarating, burst of minty freshness.
It’s a sophisticated treat that feels celebratory, offering a delightful contrast of textures and temperatures, making each bite an unforgettable experience.

Ingredients:
-
For the Peppermint Macaron Shells:
- 100g (approximately 1 cup) Almond Flour, finely ground and sifted
- 100g (approximately 1 cup) Powdered Sugar (Confectioners’ Sugar), sifted
- 80g (approximately 2 large) Egg Whites, aged (left at room temperature for at least 24 hours, or separated and refrigerated for a few days), at room temperature
- 80g (approximately ⅓ cup + 1 tbsp) Granulated Sugar (Caster Sugar)
- ¼ teaspoon Cream of Tartar (optional, but highly recommended for meringue stability)
- 1-2 drops Red Gel Food Coloring (I prefer gel over liquid for vibrant color without adding excess moisture)
-
For the Peppermint Buttercream Filling:
- 113g (1 stick / ½ cup) Unsalted Butter, softened to room temperature
- 240g (approximately 2 cups) Powdered Sugar (Confectioners’ Sugar), sifted
- 2-3 tablespoons Heavy Cream or Whole Milk, adjusted to desired consistency
- ½ teaspoon Pure Peppermint Extract
- ¼ teaspoon Pure Vanilla Extract
- 1-2 drops Red Gel Food Coloring (optional, for a swirled effect in the buttercream)
-
For Garnish (Optional):
- ¼ cup Crushed Peppermint Candies or Candy Canes
- 50g (approximately ¼ cup) White Chocolate, melted (for drizzling)
Preparation: Gathering Your Tools and Ingredients
Before we dive into the delightful world of Peppermint Macarons, it’s crucial to have everything ready. Baking macarons is a precise art, and having your mise en place will make the process much smoother and more enjoyable. Trust me, I’ve learned this the hard way!
First, make sure your egg whites are at room temperature. If you haven’t aged them already, now is not the time to start, but for your next batch, definitely try letting them sit uncovered in the fridge for a day or two, then bring them to room temp. This helps them whip up beautifully. Also, sift your almond flour and powdered sugar separately, then combine them. I usually sift them together twice to ensure there are absolutely no lumps, which is key for those perfectly smooth macaron shells we’re aiming for.
Next, prepare your baking sheets. Line at least two large baking sheets with silicone mats (like Silpat) or parchment paper. If you’re using parchment paper, I highly recommend drawing macaron templates on the underside (approximately 1.5 inches in diameter, spaced about 1 inch apart). This ensures uniformity in size, which is not only aesthetically pleasing but also helps with even baking. Gather your piping bags with a round tip (I use an Ateco 805 or Wilton 1A), a large bowl for your meringue, a stand mixer or hand mixer, and a rubber spatula.
Preheat your oven to 300°F (150°C). Oven temperature is critical for macarons, so if you have an oven thermometer, now is the time to use it. It can make all the difference between perfect feet and cracked shells.
Creating the Macaron Shells: The Dry Ingredients
- First things first, let’s prepare our dry ingredients. In a medium-sized bowl, combine your 100g of finely ground almond flour and 100g of sifted powdered sugar. I like to call this mixture “Tant Pour Tant,” which means “equal parts” in French, and it’s the foundation of our macaron shells.
- Now, and this is a step you absolutely cannot skip, sift this mixture together at least twice. I often go for three times just to be extra sure! The goal here is to achieve an incredibly fine, airy powder. Any lumps in the almond flour or powdered sugar can lead to bumpy, uneven macaron shells, and we want those perfectly smooth tops, don’t we? Use a fine-mesh sieve and gently press any larger bits of almond flour through, or discard them if they’re too stubborn. Set this super-fine mixture aside.
Creating the Macaron Shells: The Meringue (French Method)
This is where the magic really begins. A stable, glossy meringue is the backbone of successful macarons.
- In the clean, dry bowl of your stand mixer (or a large mixing bowl if using a hand mixer), add your 80g of room-temperature aged egg whites. It’s vital that the bowl and whisk attachment are completely free of any grease or water, as even a tiny bit can prevent your egg whites from whipping up properly.
- Begin whipping the egg whites on medium-low speed until they become foamy and bubbly. This usually takes about 1-2 minutes.
- Once foamy, sprinkle in the ¼ teaspoon of cream of tartar (if using). The cream of tartar acts as a stabilizer, helping the meringue hold its structure and volume. Increase the speed to medium.
- Gradually, a tablespoon at a time, begin adding the 80g of granulated sugar. Don’t dump it all in at once! This slow addition allows the sugar to dissolve properly into the egg whites, creating a smooth and stable meringue. Continue whipping.
- As you add the sugar and continue whipping, you’ll notice the egg whites becoming thicker, glossier, and whiter. Increase the speed to medium-high.
- Continue whipping until you reach stiff, glossy peaks. When you lift the whisk, the meringue should stand up firmly, and when you rub a small amount between your fingers, it should feel smooth with no gritty sugar crystals. This process can take anywhere from 8 to 12 minutes, depending on your mixer and the freshness of your egg whites. A common mistake is under-whipping, so err on the side of caution and whip until truly stiff.
- At this point, add 1-2 drops of red gel food coloring. I prefer gel coloring because it’s highly concentrated and doesn’t add excess moisture, which can destabilize your meringue. Whip for another 30 seconds to a minute, just until the color is evenly distributed and vibrant, and the meringue is fully incorporated. You want a lovely pastel pink to signify the peppermint!
Creating the Macaron Shells: Macaronage and Piping
Macaronage is the most crucial and often the trickiest step. It’s the process of folding the dry ingredients into the meringue to achieve the perfect consistency.
- Add half of your sifted almond flour and powdered sugar mixture to the meringue. Using a rubber spatula, begin to gently fold the dry ingredients into the meringue. Use a motion where you scoop from the bottom of the bowl and fold over the top, gently pressing the spatula through the center of the mixture.
- Once roughly combined, add the remaining dry ingredients. Continue folding using the same gentle technique. The goal here is to deflate the meringue just enough to create the right consistency, but not so much that it becomes runny.
- Continue folding until your batter reaches the “lava-like” or “ribbon” stage. When you lift your spatula, the batter should fall off in a slow, continuous ribbon that eventually melts back into itself within about 15-20 seconds. This is the “figure-8” test: you should be able to draw a figure 8 with the falling batter without it breaking. It’s better to slightly under-mix than over-mix. Over-mixed batter will be too runny and won’t form feet, while slightly under-mixed batter might just need an extra fold or two.
- Carefully transfer your perfectly macaronaged batter into a prepared piping bag fitted with a round tip. I like to stand my piping bag in a tall glass to make filling it less messy.
- Pipe uniform rounds of macaron batter onto your prepared baking sheets, using your templates as a guide. Hold the piping bag vertically, about half an inch above the mat, apply even pressure, and stop squeezing when the batter reaches the edge of your template. Give a quick flick of the wrist to create a neat circle.
- Once all your shells are piped, firmly tap each baking sheet against your counter 5-10 times. This is essential! It helps release any trapped air bubbles from the batter. You’ll see tiny bubbles rise to the surface; pop any stubborn large ones with a toothpick. This step is critical for preventing hollows and cracks in your finished shells.
Creating the Macaron Shells: Drying and Baking
The “drying” or “resting” phase is vital for forming the characteristic “feet” of the macaron.
- Now, let your piped macaron shells rest at room temperature for anywhere from 30 minutes to 2 hours. The resting time depends heavily on the humidity in your environment. You’ll know they’re ready when you can gently touch the top of a shell, and it feels dry and non-tacky, forming a slight “skin.” This skin is what allows the feet to form when they bake. If it’s humid, this might take longer.
- Once the shells have formed their skin, place one baking sheet at a time into your preheated 300°F (150°C) oven.
- Bake for 12-16 minutes. Baking time can vary significantly between ovens, so get to know yours. After about 6-8 minutes, you should start to see the “feet” magically appear at the base of the shells. This is always my favorite part!
- Halfway through baking (around 7-8 minutes), I like to quickly open the oven door, rotate the baking sheet 180 degrees, and close it again. This helps ensure even baking.
- The macarons are done when they don’t wobble on their feet when you gently try to twist them. If they still wobble, bake for another 1-2 minutes.
- Remove the baking sheet from the oven and immediately slide the silicone mat or parchment paper with the macarons onto a wire cooling rack. Allow them to cool completely on the mat before attempting to remove them. Trying to remove them too soon will result in broken shells and frustration! This cooling process can take 20-30 minutes. Once completely cool, they should peel off easily.
Preparing the Peppermint Buttercream Filling
While your macaron shells are cooling, let’s whip up that delicious, festive peppermint buttercream!
- In the bowl of your stand mixer (or a large bowl with a hand mixer), add your 113g of softened unsalted butter. Make sure it’s truly at room temperature – it should be soft enough to indent with your finger but not melted.
- Beat the butter on medium-high speed for 2-3 minutes, until it becomes light, fluffy, and pale in color. This creaming step is essential for a smooth buttercream.
- Reduce the speed to low and gradually add the 240g of sifted powdered sugar, about half a cup at a time. Sifting the sugar prevents lumps in your buttercream. If you add it all at once, you’ll end up with a sugar cloud in your kitchen!
- Once the sugar is mostly incorporated, scrape down the sides of the bowl. Add the ½ teaspoon of pure peppermint extract and ¼ teaspoon of pure vanilla extract. I find the hint of vanilla really complements the peppermint without overpowering it.
- With the mixer on low, slowly drizzle in 2 tablespoons of heavy cream or whole milk. Once incorporated, increase the speed to medium-high and beat for another 2-3 minutes, until the buttercream is light, airy, and wonderfully smooth. If it’s too thick, add the remaining tablespoon of cream, a tiny bit at a time, until you reach your desired piping consistency. If it seems too thin, you can add a little more sifted powdered sugar.
- Optional: For a pretty swirled effect, take about a quarter of your buttercream and transfer it to a small bowl. Add 1-2 drops of red gel food coloring and mix well until you achieve a vibrant pink. Then, spread this pink buttercream along one side of your piping bag before filling it with the plain white buttercream. This will create beautiful red streaks when you pipe!
- Transfer the finished buttercream to a piping bag fitted with a round or star tip (I prefer a star tip for a more decorative look on the filling).
Assembling Your Peppermint Macarons
This is the fun part where everything comes together to create these stunning holiday treats!
- Once your macaron shells are completely cool, gently peel them off the silicone mat or parchment paper. Turn half of them over so their flat bottoms are facing up.
- Match up shells of similar size and shape. Since macarons are handmade, no two will be perfectly identical, but pairing them up helps create even sandwiches.
- Pipe a generous dollop of peppermint buttercream onto the flat side of one shell. I usually pipe a ring around the edge and then fill the center, but a simple swirl works too!
- Carefully place a second matched shell on top of the buttercream, gently twisting and pressing down just enough to spread the filling to the edges. Be gentle, we don’t want to crack those beautiful shells!
- For the optional garnish, immediately roll the edge of the filled macaron in your crushed peppermint candies or candy canes, or sprinkle them directly onto the buttercream before placing the top shell.
- If you’re using melted white chocolate, you can drizzle it decoratively over the tops of the assembled macarons now, or wait until they’ve “matured” a bit.
Finishing Touches and Enjoyment
The waiting game is often the hardest part, but it’s essential for the best macaron experience!
- Once assembled, these Peppermint Macarons are best if allowed to “mature” or “marinate” in the refrigerator for at least 12-24 hours. During this time, the moisture from the filling softens the shells, creating that signature chewy, melt-in-your-mouth texture that we all adore. Place them in an airtight container in the fridge.
- When you’re ready to enjoy them, take them out of the refrigerator about 15-20 minutes before serving to allow the buttercream to soften slightly.
- Store any leftover Peppermint Macarons in an airtight container in the refrigerator for up to 5-7 days, or freeze them for up to 1 month. If freezing, thaw them in the refrigerator overnight before bringing them to room temperature to serve.
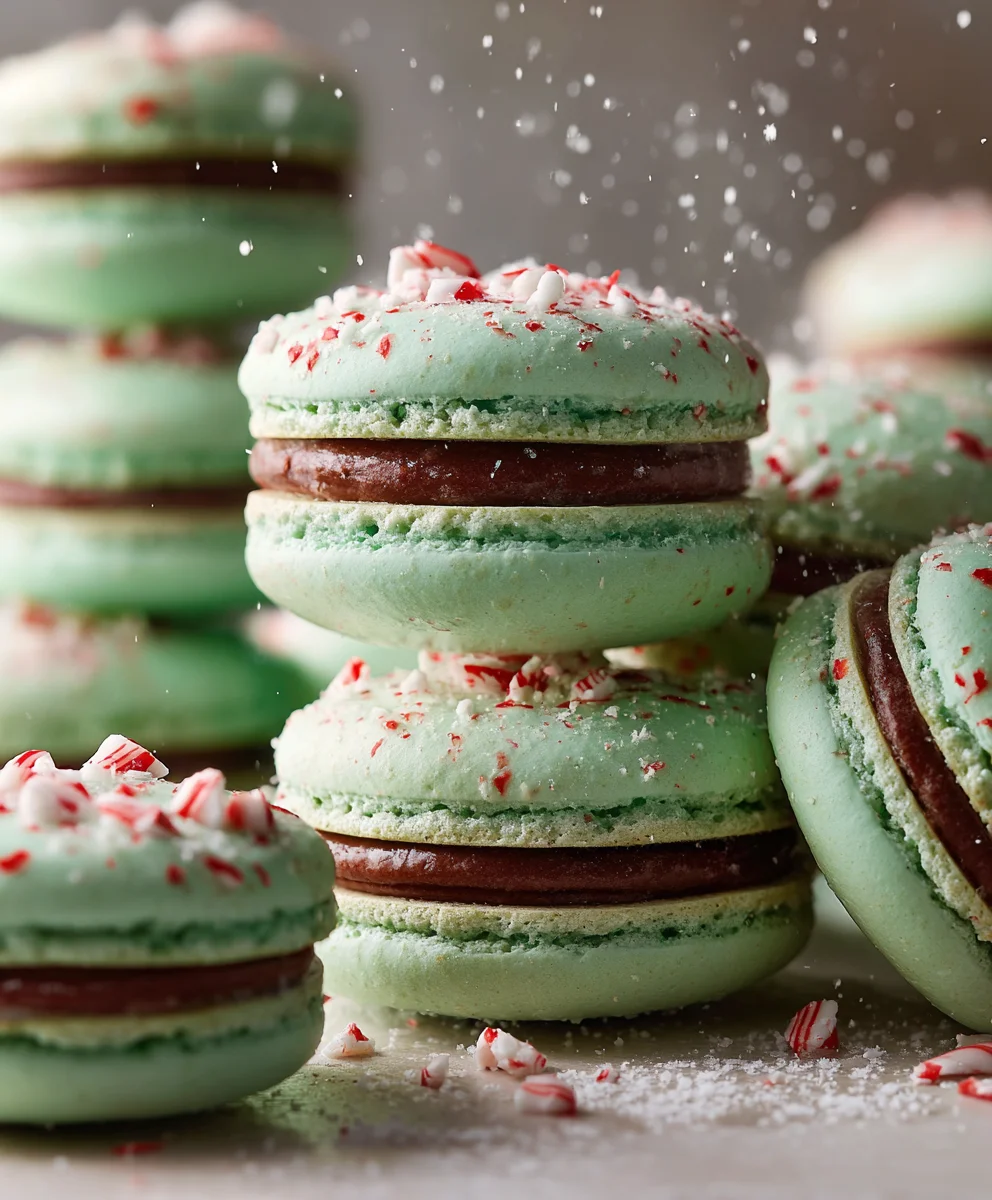
And there you have it! A truly exquisite batch of homemade Peppermint Macarons, perfect for holiday gifting, a festive treat, or simply indulging yourself. Enjoy every single bite of these delicate, minty delights!
Conclusion:
Oh, my baking friends, if there’s one recipe I absolutely insist you try, it’s this one for homemade Peppermint Macarons. I know, I know, macarons often come with a reputation for being finicky, a challenge that only the most seasoned bakers dare to undertake. But I promise you, with the detailed steps I’ve laid out, and a little patience, you are absolutely going to conquer these delightful treats. Imagine the sheer satisfaction of biting into a perfectly crisp shell, giving way to a wonderfully chewy interior, all infused with that invigorating, cool rush of peppermint. It’s a sensory experience unlike any other, a symphony of textures and flavors that will make you feel like a true culinary artist.
These aren’t just cookies; they’re miniature masterpieces, and the joy of creating something so elegant and delicious with your own hands is truly immeasurable. Every time I pull a tray of these vibrant beauties from the oven, with their characteristic “feet” perfectly formed, I can’t help but feel a swell of pride. And the compliments? Oh, they’ll come pouring in! Whether you’re making them for a festive holiday gathering, a special birthday, or simply as a well-deserved treat for yourself, these Peppermint Macarons are guaranteed to impress. The striking red or green hues, combined with the pure white filling, make them incredibly visually appealing, turning any dessert plate into a work of art.
Serving Suggestions and Delightful Variations:
Once you’ve mastered the basic recipe, the fun truly begins with serving and variations! For serving, I adore pairing these elegant cookies with a steaming mug of rich hot cocoa – the peppermint provides a delightful contrast to the chocolatey warmth. They also make a fantastic accompaniment to your morning coffee or a sophisticated afternoon tea. Don’t forget about gifting! Stacked in a beautiful box, tied with a ribbon, these macarons become an incredibly thoughtful and personal present for friends, family, or even colleagues.
Feeling adventurous? Let’s explore some delightful twists. While the classic peppermint buttercream is divine, consider a rich chocolate ganache filling for a mint-chocolate chip macaron experience. You could even swirl a touch of raspberry jam into the buttercream for a fruitier, more complex flavor profile. For an extra festive touch, try crushing some candy canes and sprinkling them over the filled macarons before they set, adding both texture and a visual pop. And don’t limit yourself to just red or green food coloring; imagine pastel pinks for Valentine’s Day, vibrant blues for a baby shower, or even a swirl of multiple colors for a whimsical look. These little cookies are incredibly versatile, waiting for your creative touch to make them uniquely yours.
Your Macaron Journey Starts Now!
So, what are you waiting for? I wholeheartedly encourage you to dive into this recipe. Don’t let any past baking fears hold you back. Approach it with an open mind, follow the instructions carefully, and enjoy the process. There’s a wonderful sense of accomplishment that comes with creating something so beautiful and tasty from scratch. These Peppermint Macarons are more than just a dessert; they’re an experience, a journey into the world of delicate French patisserie right in your own kitchen.
I am genuinely excited for you to try this recipe. And once you do, please, please, please come back and share your experience with me! I absolutely love hearing about your baking adventures. Did you try a fun variation? Did you struggle with a particular step and then overcome it? Did your family rave about them? Share your photos on social media too – tag me or use #MyPeppermintMacarons so I can see your magnificent creations! Your feedback and stories inspire me and help our community of home bakers grow. Let’s make some magic in the kitchen together! Happy baking!
People Also Ask:
Why are my macarons hollow?
Hollow macarons are a common issue, and they usually indicate that the meringue wasn’t quite stiff enough, or the macarons were underbaked. Ensure your meringue reaches stiff peaks, and try baking for a few extra minutes if they still feel soft when gently nudged. Also, make sure to properly “rest” your piped macarons to form a skin before baking; this helps prevent the shells from expanding too quickly and creating an air pocket.
How do I get the ‘feet’ on my macarons?
Ah, the coveted “feet”! These ruffled edges are a hallmark of a perfect macaron. They form due to a combination of properly aerated meringue, adequate resting time before baking (allowing a skin to form on the surface), and the correct oven temperature. The skin traps steam, forcing the batter to rise outwards from the bottom, creating those distinct frilly feet. Make sure your oven is accurately calibrated and avoid opening the oven door too early.
How do I store Peppermint Macarons?
To keep your Peppermint Macarons fresh and delightful, store them in an airtight container in the refrigerator for up to 5-7 days. The flavors actually meld beautifully overnight, so they often taste even better the next day! You can also freeze them in an airtight container for up to a month. Thaw them in the refrigerator overnight or at room temperature for about 30 minutes before serving.
What’s the best way to get a strong peppermint flavor?
For a really robust peppermint flavor in your Peppermint Macarons, I recommend using a high-quality pure peppermint extract for both the macaron shells (just a drop or two) and especially the buttercream filling. Start with the amount specified in the recipe, taste the buttercream, and then add a tiny bit more if you prefer an even stronger kick. Be careful not to add too much liquid extract to the macaron batter itself, as it can affect the consistency.
Can I make macaron batter ahead of time?
Unfortunately, macaron batter is quite delicate and doesn’t store well. It’s best to use it immediately after you’ve mixed and achieved the proper “macaronage” consistency. If it sits for too long, it can deflate and lose its structure, which will result in flat or hollow macarons without those beautiful feet. My advice is to prepare all your ingredients beforehand, then make the batter and pipe your shells right away.
Perfect Peppermint Macarons: Crisp, Chewy, Minty Delight
Peppermint Macarons are more than just a dessert; they are a miniature work of art, a perfect blend of elegance and festive cheer that captures hearts with every delicate bite. This specific rendition truly elevates the classic French delicacy into something spectacularly special, making it an irresistible choice for holiday gatherings or a sophisticated indulgence.
Ingredients
-
100g Almond Flour, sifted
-
100g Powdered Sugar, sifted
-
80g Egg Whites, room temperature
-
80g Granulated Sugar
-
¼ tsp Cream of Tartar (optional)
-
1-2 drops Red Gel Food Coloring
-
113g Unsalted Butter, softened
-
240g Powdered Sugar, sifted
-
2-3 tbsp Heavy Cream or Whole Milk
-
½ tsp Pure Peppermint Extract
-
¼ tsp Pure Vanilla Extract
-
1-2 drops Red Gel Food Coloring (optional)
-
¼ cup Crushed Peppermint Candies
-
50g White Chocolate, melted (optional)
Instructions
-
Step 1
Combine 100g almond flour and 100g powdered sugar. Sift this mixture at least twice to ensure no lumps. Set aside. -
Step 2
In a clean mixer bowl, whip 80g room-temperature egg whites on medium-low until foamy. Add ¼ tsp cream of tartar (optional), increase speed to medium. Gradually add 80g granulated sugar, a tablespoon at a time, whipping until glossy stiff peaks form (8-12 minutes). Add 1-2 drops red gel food coloring and whip for another 30-60 seconds until color is even. -
Step 3
Gently fold half of the sifted dry mixture into the meringue with a rubber spatula, then add the remaining dry ingredients. Continue folding until the batter falls in a slow, continuous ribbon (lava-like or figure-8 stage). -
Step 4
Transfer batter to a piping bag with a round tip. Pipe uniform 1.5-inch rounds onto baking sheets lined with silicone mats or parchment paper. -
Step 5
Firmly tap each baking sheet 5-10 times to release air bubbles. Pop any large bubbles with a toothpick. -
Step 6
Let piped shells rest at room temperature for 30 minutes to 2 hours until a dry, non-tacky skin forms. Preheat oven to 300°F (150°C). -
Step 7
{‘@type’: ‘HowToStep’, ‘text’: “Bake one sheet at a time for 12-16 minutes at 300°F (150°C). Rotate halfway through. Shells are done when they don’t wobble.”} -
Step 8
Remove from oven and slide mat onto a wire rack. Let cool completely on the mat (20-30 minutes) before gently peeling off. -
Step 9
For buttercream: Beat 113g softened unsalted butter on medium-high for 2-3 minutes until light and fluffy. Reduce speed to low, gradually add 240g sifted powdered sugar. Scrape bowl. Add ½ tsp peppermint extract and ¼ tsp vanilla extract. Drizzle in 2-3 tbsp heavy cream or whole milk. Beat on medium-high for 2-3 minutes until light and smooth. -
Step 10
(Optional) For swirled effect, mix 1-2 drops red gel food coloring into ¼ of buttercream, spread along piping bag side, then fill with white buttercream. Transfer buttercream to a piping bag with a round or star tip. -
Step 11
Match cooled macaron shells by size. Pipe a generous dollop of buttercream onto the flat side of one shell. Place a second shell on top, gently twisting and pressing to spread filling. -
Step 12
(Optional) Roll edges of filled macarons in crushed peppermint candies or drizzle with melted white chocolate. -
Step 13
Store assembled macarons in an airtight container in the refrigerator for at least 12-24 hours to mature. Bring to room temperature 15-20 minutes before serving. Store leftovers in the fridge for 5-7 days or freeze for up to 1 month.
Important Information
Nutrition Facts (Per Serving)
It is important to consider this information as approximate and not to use it as definitive health advice.
Allergy Information
Please check ingredients for potential allergens and consult a health professional if in doubt.

Leave a Comment