
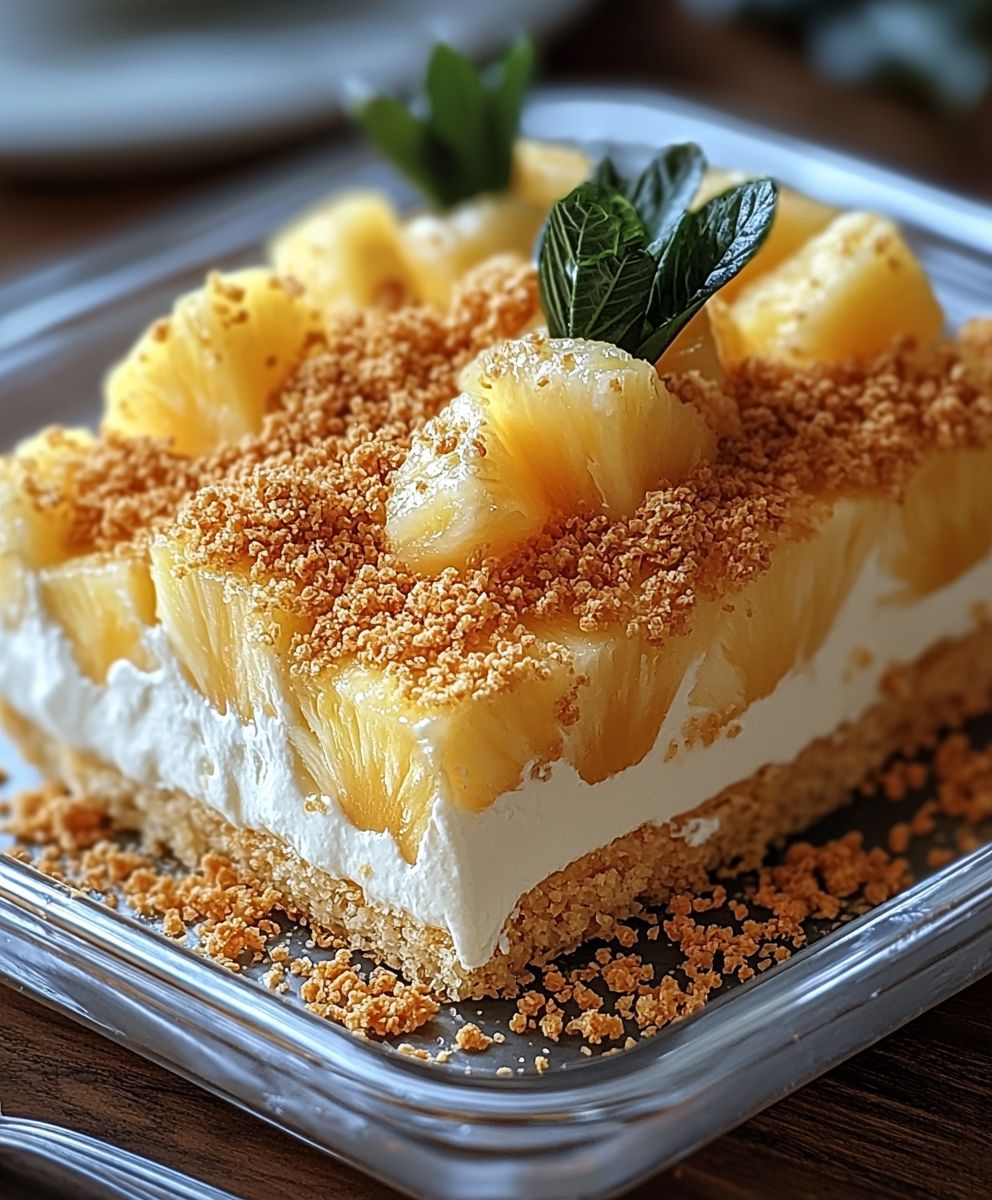
Pineapple Dream Dessert: just the name conjures images of sun-drenched beaches and carefree days, doesn’t it? But trust me, the reality is even better than the dream! This isn’t just another dessert; it’s a creamy, tangy, and utterly irresistible treat that will have everyone begging for seconds. I remember the first time I tasted this dessert; it was at a family reunion, and my Aunt Carol’s Pineapple Dream Dessert was the star of the potluck.
While its exact origins are a bit hazy, similar layered desserts have been gracing tables across the Southern United States for generations. They represent a tradition of simple, comforting sweets made with readily available ingredients a true testament to resourcefulness and deliciousness! What makes this particular dessert so beloved? It’s the perfect balance of textures: the crunchy graham cracker crust, the smooth and creamy filling, and the juicy bursts of pineapple. Plus, it’s incredibly easy to make, requiring minimal baking and prep time. Its a guaranteed crowd-pleaser, perfect for potlucks, holidays, or simply a sweet ending to any meal. Get ready to experience a taste of paradise with every bite!

Ingredients:
- 1 (20 ounce) can crushed pineapple, undrained
- 1 (3.4 ounce) package instant vanilla pudding mix
- 1 (8 ounce) container frozen whipped topping, thawed
- 1 (14 ounce) can sweetened condensed milk
- 1 (12 ounce) package vanilla wafers
- 1/2 cup chopped pecans or walnuts (optional)
- 1/4 cup shredded coconut (optional, for garnish)
- 2 tablespoons butter, melted (optional, for wafer crust)
Preparing the Pineapple Mixture:
Okay, let’s get started! First, we’re going to create the creamy, pineapple-infused base that makes this dessert so dreamy. This part is super easy, so don’t worry!
- Combine Pineapple and Pudding: In a large bowl, pour the entire can of crushed pineapple, including the juice. This is important because the juice adds so much flavor and moisture. Add the instant vanilla pudding mix to the bowl.
- Whisk Thoroughly: Using a whisk, thoroughly combine the pineapple and pudding mix. Make sure there are no lumps of pudding mix remaining. You want a smooth and consistent mixture. This usually takes about 2-3 minutes of vigorous whisking. Don’t be afraid to really get in there!
- Let it Sit: Once the mixture is smooth, let it sit for about 5 minutes. This allows the pudding mix to start setting up and thickening the pineapple juice. You’ll notice it getting a bit thicker as it sits.
- Fold in Whipped Topping: Now, gently fold in the thawed whipped topping. Be careful not to overmix, as this can deflate the whipped topping and make the mixture less airy. We want to keep it light and fluffy! Use a spatula and gently fold from the bottom up until the whipped topping is evenly distributed.
- Add Sweetened Condensed Milk: Pour in the sweetened condensed milk. This adds a wonderful sweetness and creaminess to the dessert. Again, gently fold it in until it’s fully incorporated. Make sure everything is well combined, but still light and airy.
Preparing the Vanilla Wafer Base:
Next, we’ll prepare the vanilla wafer base. You have a couple of options here: a simple layer of wafers or a slightly more structured crust. I’ll give you instructions for both!
Option 1: Simple Vanilla Wafer Layer
- Layer the Wafers: Simply arrange a single layer of vanilla wafers on the bottom of your serving dish. You can use a 9×13 inch baking dish, a trifle bowl, or individual dessert cups. Make sure the wafers cover the entire bottom surface. You might need to break some wafers to fill in any gaps.
Option 2: Vanilla Wafer Crust (Optional)
If you prefer a more defined crust, this option is for you. It adds a nice buttery flavor and a bit of texture.
- Crush the Vanilla Wafers: Place the vanilla wafers in a large zip-top bag. Seal the bag and use a rolling pin or your hands to crush the wafers into fine crumbs. You can also use a food processor for this step if you have one.
- Combine with Melted Butter: In a medium bowl, combine the crushed vanilla wafers with the melted butter. Mix well until the crumbs are evenly moistened. The mixture should resemble wet sand.
- Press into the Dish: Press the crumb mixture into the bottom of your serving dish. Use the bottom of a measuring cup or your fingers to firmly press the crumbs into an even layer. This will create a solid crust for your dessert.
Assembling the Pineapple Dream Dessert:
Now for the fun part putting it all together! This is where the magic happens, and you’ll start to see your Pineapple Dream Dessert taking shape.
- Pour Half of the Pineapple Mixture: Carefully pour half of the pineapple mixture over the vanilla wafer base (either the simple layer or the crust). Spread it evenly to cover the entire surface.
- Sprinkle with Pecans/Walnuts (Optional): If you’re using nuts, sprinkle half of the chopped pecans or walnuts over the pineapple mixture. This adds a nice crunch and nutty flavor.
- Add Another Layer of Vanilla Wafers: Arrange another layer of vanilla wafers over the pineapple mixture and nuts. Again, make sure to cover the entire surface, breaking wafers as needed to fill in any gaps.
- Pour the Remaining Pineapple Mixture: Pour the remaining pineapple mixture over the second layer of vanilla wafers. Spread it evenly to cover the entire surface.
- Sprinkle with Remaining Pecans/Walnuts (Optional): Sprinkle the remaining chopped pecans or walnuts over the top of the pineapple mixture.
- Garnish with Coconut (Optional): If you’re using shredded coconut, sprinkle it evenly over the top of the dessert. This adds a nice tropical touch and visual appeal.
Chilling and Serving:
Almost there! The final step is to chill the dessert, which allows the flavors to meld together and the dessert to set up properly. This is crucial for the best texture and taste.
- Cover and Chill: Cover the dessert tightly with plastic wrap or a lid. Make sure the plastic wrap doesn’t touch the top of the dessert, as this can make it soggy.
- Chill for at Least 4 Hours: Refrigerate the dessert for at least 4 hours, or preferably overnight. This allows the vanilla wafers to soften and the flavors to fully develop. The longer it chills, the better it will taste!
- Serve and Enjoy: Once the dessert is chilled, it’s ready to serve! Cut into squares or scoop into individual servings. Enjoy the creamy, pineapple-y goodness of your Pineapple Dream Dessert!
Tips and Variations:
- Fruit Variations: Feel free to add other fruits to this dessert. Mandarin oranges, sliced bananas, or fresh berries would all be delicious additions.
- Pudding Flavor: Experiment with different pudding flavors. Coconut cream, banana cream, or even cheesecake pudding would all work well.
- Wafer Alternatives: If you don’t have vanilla wafers, you can use graham crackers or shortbread cookies instead.
- Make it Healthier: Use sugar-free pudding mix and light whipped topping to reduce the sugar and fat content.
- Individual Servings: Assemble the dessert in individual dessert cups for a more elegant presentation.
- Storage: Store any leftover dessert in the refrigerator for up to 3 days.
Conclusion:
So, there you have it! This Pineapple Dream Dessert is truly a must-try for anyone looking for a light, refreshing, and utterly delicious treat. Its the perfect balance of sweet and tangy, creamy and crunchy, and its guaranteed to be a crowd-pleaser. I know Ive made it countless times for family gatherings, potlucks, and even just a simple weeknight dessert, and its always a hit. The ease of preparation is another huge plus you can whip this up in no time, making it ideal for those moments when you need a quick and impressive dessert solution.
But what truly sets this dessert apart is its versatility. While the recipe Ive shared is my go-to, feel free to experiment and make it your own! For a more decadent experience, try using a high-quality vanilla bean ice cream or even a coconut-flavored ice cream to complement the pineapple. If you’re feeling adventurous, a splash of rum or coconut liqueur in the pineapple mixture adds a delightful tropical twist.
Serving Suggestions and Variations:
- For a more elegant presentation, layer the dessert in individual parfait glasses. This is especially nice for dinner parties.
- Top each serving with a sprinkle of toasted coconut flakes or chopped macadamia nuts for added texture and flavor.
- If you’re not a fan of vanilla wafers, try using graham crackers or even shortbread cookies as the base.
- For a lighter version, use light cream cheese and sugar-free pudding mix.
- Consider adding other fruits like mandarin oranges or maraschino cherries for a colorful and flavorful variation.
- Want to make it even more festive? Add a layer of whipped cream and garnish with fresh pineapple chunks.
I truly believe that this Pineapple Dream Dessert will become a staple in your recipe collection. It’s a dessert that’s both comforting and exciting, familiar yet unique. It’s the kind of dessert that brings smiles to faces and creates lasting memories. And honestly, who doesn’t love a dessert that’s easy to make and tastes amazing?
So, what are you waiting for? Gather your ingredients, follow the simple steps, and prepare to be amazed by the deliciousness of this Pineapple Dream Dessert. I’m confident that you’ll love it as much as I do. And remember, don’t be afraid to get creative and put your own spin on it. The possibilities are endless!
I’m so excited for you to try this recipe! Once you’ve made it, please come back and share your experience in the comments below. I’d love to hear what you think, what variations you tried, and how much your family and friends enjoyed it. Your feedback is invaluable and helps me continue to create and share recipes that you’ll love. Happy baking (or should I say, chilling!) and I can’t wait to hear from you!
Enjoy every bite of your Pineapple Dream Dessert!
Pineapple Dream Dessert: A Tropical Delight Recipe
Easy no-bake Pineapple Dream Dessert with layers of vanilla wafers, creamy pineapple pudding, whipped topping, and sweetened condensed milk.
Ingredients
- 1 (20 ounce) can crushed pineapple, undrained
- 1 (3.4 ounce) package instant vanilla pudding mix
- 1 (8 ounce) container frozen whipped topping, thawed
- 1 (14 ounce) can sweetened condensed milk
- 1 (12 ounce) package vanilla wafers
- 1/2 cup chopped pecans or walnuts (optional)
- 1/4 cup shredded coconut (optional, for garnish)
- 2 tablespoons butter, melted (optional, for wafer crust)
Instructions
- Prepare Pineapple Mixture: In a large bowl, combine crushed pineapple (with juice) and instant vanilla pudding mix. Whisk thoroughly until smooth and let sit for 5 minutes to thicken. Gently fold in thawed whipped topping and sweetened condensed milk until well combined.
- Prepare Vanilla Wafer Base (Choose one):
- Simple Layer: Arrange a single layer of vanilla wafers on the bottom of your serving dish (9×13 inch baking dish, trifle bowl, or individual dessert cups). Break wafers to fill gaps.
- Crust (Optional): Crush vanilla wafers into fine crumbs. Combine with melted butter until moistened. Press firmly into the bottom of your serving dish to create an even crust.
- Assemble Dessert:
- Pour half of the pineapple mixture over the vanilla wafer base.
- Sprinkle with half of the chopped pecans/walnuts (if using).
- Add another layer of vanilla wafers.
- Pour the remaining pineapple mixture over the second layer of wafers.
- Sprinkle with remaining pecans/walnuts (if using).
- Garnish with shredded coconut (if using).
- Chill: Cover tightly and refrigerate for at least 4 hours, or preferably overnight.
- Serve: Cut into squares or scoop into individual servings and enjoy!
Notes
- Fruit Variations: Add mandarin oranges, sliced bananas, or fresh berries.
- Pudding Flavor: Experiment with coconut cream, banana cream, or cheesecake pudding.
- Wafer Alternatives: Use graham crackers or shortbread cookies.
- Healthier Option: Use sugar-free pudding mix and light whipped topping.
- Individual Servings: Assemble in individual dessert cups.
- Storage: Store leftovers in the refrigerator for up to 3 days.

Leave a Comment