
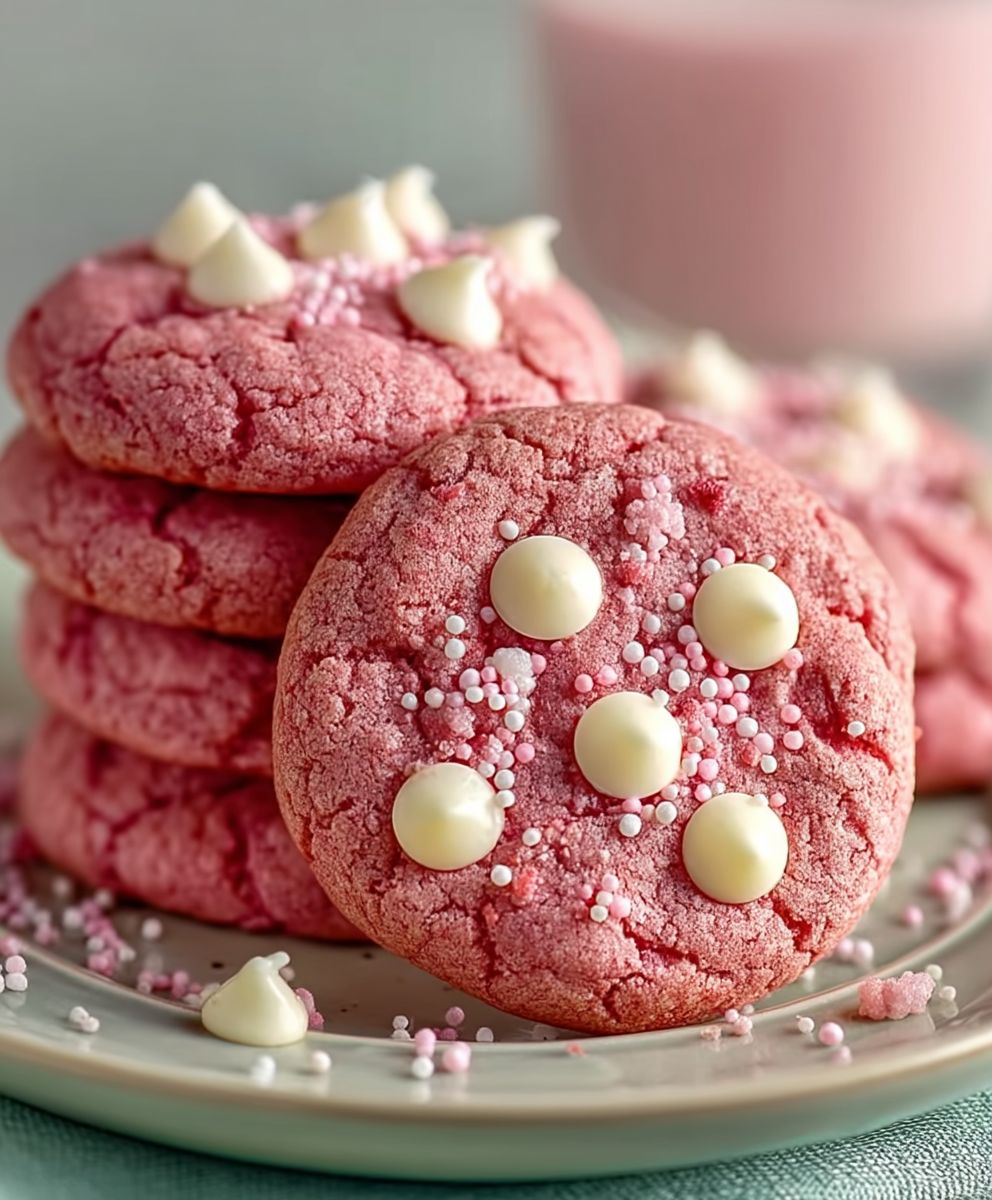
Pink Velvet Cookies: Prepare to fall in love with the most delightful, melt-in-your-mouth cookies you’ve ever tasted! Imagine biting into a soft, chewy cookie with a subtle hint of cocoa, a vibrant pink hue, and a tangy cream cheese frosting that perfectly complements the sweetness. These aren’t just cookies; they’re a celebration in every bite!
While the exact origins of pink velvet desserts are debated, they’re often considered a playful twist on the classic red velvet cake, which gained popularity in the early 20th century. Bakers began experimenting with different ingredients and food colorings, leading to the creation of these visually stunning and equally delicious treats. The pink variation offers a lighter, more whimsical take on the traditional red velvet flavor profile.
What makes pink velvet cookies so irresistible? It’s the perfect balance of flavors and textures. The slight tang from the buttermilk and cream cheese creates a depth of flavor that keeps you coming back for more. The soft, almost cake-like texture of the cookie itself is incredibly satisfying, and the creamy frosting adds a luxurious touch. Plus, let’s be honest, who can resist a cookie that’s as beautiful as it is delicious? Whether you’re baking for a special occasion or simply want to brighten up your day, these cookies are guaranteed to bring a smile to your face.

Ingredients:
- For the Cookies:
- 2 1/4 cups all-purpose flour
- 1 teaspoon baking soda
- 1/2 teaspoon baking powder
- 1/4 teaspoon salt
- 1 cup (2 sticks) unsalted butter, softened
- 1 1/2 cups granulated sugar
- 2 large eggs
- 1 teaspoon vanilla extract
- 1 teaspoon white vinegar
- 1 ounce (2 tablespoons) red food coloring
- 1 cup buttermilk
- For the Cream Cheese Frosting:
- 8 ounces cream cheese, softened
- 1/2 cup (1 stick) unsalted butter, softened
- 4 cups powdered sugar
- 1 teaspoon vanilla extract
- 2-4 tablespoons milk (or more, to reach desired consistency)
- Optional: Pink sprinkles for decoration
Preparing the Pink Velvet Cookie Dough
- Combine Dry Ingredients: In a medium-sized bowl, whisk together the flour, baking soda, baking powder, and salt. This ensures that the leavening agents are evenly distributed throughout the dough, resulting in a consistent texture. Set this bowl aside for later.
- Cream Butter and Sugar: In a large mixing bowl (or the bowl of your stand mixer), cream together the softened butter and granulated sugar until light and fluffy. This process incorporates air into the mixture, which is crucial for creating a tender cookie. This usually takes about 3-5 minutes on medium speed. Scrape down the sides of the bowl occasionally to ensure everything is evenly combined.
- Incorporate Eggs and Vanilla: Beat in the eggs one at a time, mixing well after each addition. Then, stir in the vanilla extract. The eggs add richness and structure to the cookies, while the vanilla enhances the overall flavor profile.
- Prepare the Wet Ingredients: In a separate small bowl, whisk together the red food coloring, white vinegar, and buttermilk. The vinegar helps to activate the red food coloring, giving the cookies their vibrant pink hue. The buttermilk adds a subtle tang and helps to create a moist and tender crumb.
- Alternate Wet and Dry Ingredients: Gradually add the dry ingredients to the wet ingredients, alternating with the buttermilk mixture. Begin and end with the dry ingredients. Mix until just combined. Be careful not to overmix the dough, as this can result in tough cookies. Overmixing develops the gluten in the flour, leading to a chewier texture, which isn’t what we’re aiming for here. I usually add the dry ingredients in three additions and the wet ingredients in two.
- Chill the Dough: Cover the bowl with plastic wrap and refrigerate the dough for at least 1 hour, or preferably 2-3 hours. Chilling the dough allows the gluten to relax, which prevents the cookies from spreading too much during baking. It also makes the dough easier to handle. I know it’s tempting to skip this step, but trust me, it’s worth the wait!
Baking the Pink Velvet Cookies
- Preheat Oven and Prepare Baking Sheets: Preheat your oven to 350°F (175°C). Line baking sheets with parchment paper or silicone baking mats. Parchment paper prevents the cookies from sticking and makes cleanup a breeze.
- Scoop and Shape the Dough: Use a cookie scoop or spoon to drop rounded tablespoons of dough onto the prepared baking sheets, leaving about 2 inches between each cookie. This allows for proper air circulation and prevents the cookies from baking together.
- Bake the Cookies: Bake for 8-10 minutes, or until the edges are lightly golden brown and the centers are set. Keep a close eye on the cookies, as baking times may vary depending on your oven. You want them to be soft and slightly chewy, not crispy.
- Cool the Cookies: Remove the baking sheets from the oven and let the cookies cool on the baking sheets for a few minutes before transferring them to a wire rack to cool completely. This prevents them from breaking apart while they’re still warm and delicate.
Preparing the Cream Cheese Frosting
- Cream Cheese and Butter: In a large mixing bowl (or the bowl of your stand mixer), cream together the softened cream cheese and butter until smooth and creamy. Make sure both the cream cheese and butter are at room temperature for the best results. This will prevent lumps from forming in the frosting.
- Add Powdered Sugar: Gradually add the powdered sugar, one cup at a time, mixing on low speed until combined. Be careful not to add the powdered sugar too quickly, as this can create a cloud of dust.
- Incorporate Vanilla and Milk: Stir in the vanilla extract. Then, add the milk, one tablespoon at a time, until the frosting reaches your desired consistency. You may need more or less milk depending on the humidity and the consistency of your cream cheese and butter.
- Whip the Frosting: Increase the mixer speed to medium-high and whip the frosting for 2-3 minutes, or until it is light and fluffy. This incorporates air into the frosting, making it easier to spread.
Assembling the Pink Velvet Cookies
- Frost the Cookies: Once the cookies are completely cooled, spread a generous amount of cream cheese frosting onto the top of each cookie. You can use a knife, spatula, or piping bag to apply the frosting.
- Decorate (Optional): If desired, sprinkle the frosted cookies with pink sprinkles or other decorations. This adds a festive touch and makes them even more appealing.
- Chill (Optional): For best results, chill the frosted cookies in the refrigerator for at least 30 minutes before serving. This allows the frosting to set and prevents it from becoming too soft.
- Serve and Enjoy: Serve the Pink Velvet Cookies and enjoy! These cookies are best enjoyed within a few days of baking, but they can be stored in an airtight container in the refrigerator for up to a week.
Tips for Perfect Pink Velvet Cookies:
- Don’t Overmix: Overmixing the dough develops the gluten in the flour, resulting in tough cookies. Mix until just combined.
- Chill the Dough: Chilling the dough is crucial for preventing the cookies from spreading too much during baking.
- Use Room Temperature Ingredients: Using room temperature butter and cream cheese ensures that the frosting is smooth and creamy.
- Adjust Sweetness: If you prefer a less sweet frosting, you can reduce the amount of powdered sugar.
- Experiment with Flavors: Feel free to add other flavorings to the frosting, such as lemon zest or almond extract.
- Storage: Store the unfrosted cookies in an airtight container at room temperature for up to 3 days or in the freezer for up to 2 months. Store the frosted cookies in an airtight container in the refrigerator for up to 1 week.
Troubleshooting:
- Cookies Spreading Too Much: If your cookies are spreading too much, try chilling the dough for a longer period of time. You can also add a tablespoon or two of flour to the dough.
- Cookies Too Dry: If your cookies are too dry, try reducing the baking time or adding a tablespoon or two of milk to the dough.
- Frosting Too Thin: If your frosting is too thin, add more powdered sugar, a tablespoon at a time, until it reaches your desired consistency.
- Frosting Too Thick: If your frosting is too thick, add more milk, a teaspoon at a time, until it reaches your desired consistency.
Conclusion:
And there you have it! These Pink Velvet Cookies are truly something special, and I genuinely believe they deserve a spot in your baking repertoire. From their vibrant color and soft, chewy texture to that irresistible hint of cocoa balanced by the tangy cream cheese frosting, every bite is a little piece of heaven. They’re not just cookies; they’re an experience!
Why are these a must-try? Well, beyond the obvious deliciousness, they’re surprisingly easy to make. The recipe is straightforward, using ingredients you likely already have in your pantry. Plus, they’re incredibly versatile. Need a show-stopping dessert for a party? These cookies will be the star. Looking for a sweet treat to brighten someone’s day? A batch of these will do the trick. Want to elevate your afternoon tea? Look no further! The combination of the striking pink hue and the delicate flavor makes them perfect for any occasion.
But the real magic lies in the taste. The subtle cocoa notes in the cookie dough perfectly complement the rich and creamy frosting. It’s a flavor combination that’s both familiar and exciting, comforting and sophisticated. Trust me, once you try one, you won’t be able to stop!
Now, let’s talk serving suggestions and variations because the possibilities are endless! For a classic presentation, simply pipe the cream cheese frosting onto the cooled cookies and add a sprinkle of edible glitter or pink sugar crystals for extra sparkle. If you’re feeling adventurous, try adding a few drops of pink food coloring to the frosting for an even more vibrant hue.
Serving Suggestions and Variations:
* Ice Cream Sandwiches: Use these cookies to make ice cream sandwiches with vanilla, strawberry, or even chocolate ice cream.
* Cookie Crumble Topping: Crumble the cookies and use them as a topping for yogurt, parfaits, or ice cream sundaes.
* Dipped in Chocolate: Dip the cooled cookies in melted white or dark chocolate for an extra decadent treat.
* Different Frostings: Experiment with different frostings, such as a lemon cream cheese frosting or a simple vanilla buttercream.
* Add-Ins: Fold in white chocolate chips, chopped pecans, or dried cranberries into the cookie dough for added texture and flavor.
* Holiday Twist: For Christmas, use red food coloring and add peppermint extract to the dough for a festive twist.
I personally love serving these cookies with a glass of cold milk or a cup of hot coffee. They’re also fantastic as part of a dessert platter alongside other sweet treats. And if you have any leftovers (which I highly doubt!), they store well in an airtight container at room temperature for a few days.
But the best part of baking is sharing! So, I encourage you to give this recipe a try and share your creations with your friends and family. I’m confident that these Pink Velvet Cookies will be a hit!
And most importantly, don’t forget to share your experience with me! I’d love to hear how they turned out, what variations you tried, and what your loved ones thought. Tag me in your photos on social media, or leave a comment below. I can’t wait to see your beautiful creations and hear your feedback. Happy baking! I hope you enjoy these as much as I do!
Pink Velvet Cookies: The Ultimate Recipe & Baking Guide
Soft, chewy pink velvet cookies with tangy-sweet cream cheese frosting. Perfect for any occasion!
Ingredients
- 2 1/4 cups all-purpose flour
- 1 teaspoon baking soda
- 1/2 teaspoon baking powder
- 1/4 teaspoon salt
- 1 cup (2 sticks) unsalted butter, softened
- 1 1/2 cups granulated sugar
- 2 large eggs
- 1 teaspoon vanilla extract
- 1 teaspoon white vinegar
- 1 ounce (2 tablespoons) red food coloring
- 1 cup buttermilk
- 8 ounces cream cheese, softened
- 1/2 cup (1 stick) unsalted butter, softened
- 4 cups powdered sugar
- 1 teaspoon vanilla extract
- 2-4 tablespoons milk (or more, to reach desired consistency)
- Optional: Pink sprinkles for decoration
Instructions
- In a medium-sized bowl, whisk together the flour, baking soda, baking powder, and salt. Set aside.
- In a large mixing bowl, cream together the softened butter and granulated sugar until light and fluffy (3-5 minutes on medium speed). Scrape down the sides of the bowl occasionally.
- Beat in the eggs one at a time, mixing well after each addition. Then, stir in the vanilla extract.
- In a separate small bowl, whisk together the red food coloring, white vinegar, and buttermilk.
- Gradually add the dry ingredients to the wet ingredients, alternating with the buttermilk mixture. Begin and end with the dry ingredients. Mix until just combined. Do not overmix.
- Cover the bowl with plastic wrap and refrigerate the dough for at least 1 hour, or preferably 2-3 hours.
- Preheat your oven to 350°F (175°C). Line baking sheets with parchment paper or silicone baking mats.
- Use a cookie scoop or spoon to drop rounded tablespoons of dough onto the prepared baking sheets, leaving about 2 inches between each cookie.
- Bake for 8-10 minutes, or until the edges are lightly golden brown and the centers are set.
- Remove the baking sheets from the oven and let the cookies cool on the baking sheets for a few minutes before transferring them to a wire rack to cool completely.
- In a large mixing bowl, cream together the softened cream cheese and butter until smooth and creamy.
- Gradually add the powdered sugar, one cup at a time, mixing on low speed until combined.
- Stir in the vanilla extract. Then, add the milk, one tablespoon at a time, until the frosting reaches your desired consistency.
- Increase the mixer speed to medium-high and whip the frosting for 2-3 minutes, or until it is light and fluffy.
- Once the cookies are completely cooled, spread a generous amount of cream cheese frosting onto the top of each cookie.
- If desired, sprinkle the frosted cookies with pink sprinkles or other decorations.
- For best results, chill the frosted cookies in the refrigerator for at least 30 minutes before serving.
- Serve the Pink Velvet Cookies and enjoy!
Notes
- Don’t Overmix: Overmixing the dough develops the gluten in the flour, resulting in tough cookies. Mix until just combined.
- Chill the Dough: Chilling the dough is crucial for preventing the cookies from spreading too much during baking.
- Use Room Temperature Ingredients: Using room temperature butter and cream cheese ensures that the frosting is smooth and creamy.
- Adjust Sweetness: If you prefer a less sweet frosting, you can reduce the amount of powdered sugar.
- Experiment with Flavors: Feel free to add other flavorings to the frosting, such as lemon zest or almond extract.
- Storage: Store the unfrosted cookies in an airtight container at room temperature for up to 3 days or in the freezer for up to 2 months. Store the frosted cookies in an airtight container in the refrigerator for up to 1 week.


Leave a Comment