
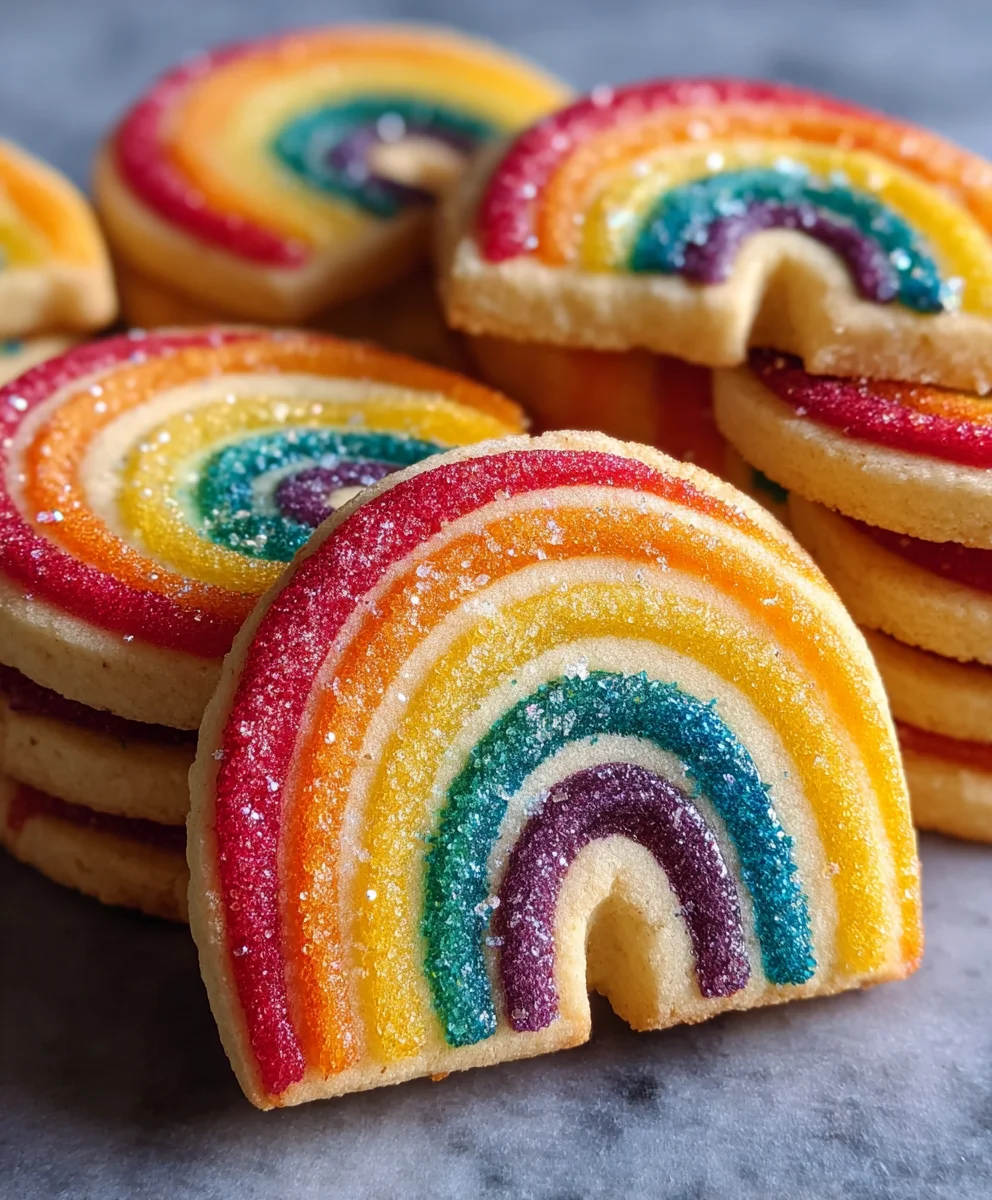
Piped Rainbow Shortbread Cookies are not merely a confection; they are a vibrant symphony of color and flavor, a true feast for both the eyes and the palate. Imagine biting into a delicate, buttery swirl, where each segment reveals a cheerful hue, melting effortlessly in your mouth to leave a wonderfully rich, sweet sensation. I am absolutely delighted to guide you through crafting these stunning edible masterpieces, which are perfect for brightening any occasion, from a festive gathering to simply adding a touch of joy to your afternoon tea.
Historically, shortbread hails from Scotland, an ancient biscuit celebrated for its pure, humble ingredients: butter, sugar, and flour. Its simplicity is its genius, offering a rich, crumbly texture that has charmed palates for centuries. Our modern take, the delightful Piped Rainbow Shortbread Cookies, builds upon this cherished tradition, infusing it with a playful, contemporary twist through the magic of vibrant food coloring and elegant piping techniques. People adore these cookies not only for their irresistible melt-in-your-mouth texture and rich, comforting buttery taste but also for their incredible visual appeal. They are surprisingly simple to create, yet they consistently evoke gasps of delight and admiration, making them an absolute joy to bake and an even greater pleasure to share.

Ingredients:
- Unsalted Butter: 2 cups (4 sticks or 450g), softened to room temperature. This is crucial for a smooth, creamy base.
- Granulated Sugar: 1 cup (200g). For that classic shortbread sweetness and delicate crispness.
- Pure Vanilla Extract: 2 teaspoons. Essential for depth of flavor that complements the butter.
- Fine Sea Salt: ½ teaspoon. A pinch of salt perfectly balances the sweetness and enhances all the other flavors.
- All-Purpose Flour: 4 cups (480g), sifted. Sifting helps ensure a light, airy texture and prevents lumps.
- Gel Food Coloring: A selection of vibrant colors (e.g., red, orange, yellow, green, blue, purple). Gel colors are highly concentrated and won’t thin out your dough, which is perfect for these Piped Rainbow Shortbread Cookies.
Preparing the Classic Shortbread Dough
- Cream the Butter and Sugar: In the bowl of a stand mixer fitted with the paddle attachment, or using a large bowl and a hand mixer, combine the softened unsalted butter and granulated sugar. Beat on medium speed for about 3 to 5 minutes, until the mixture is light, fluffy, and pale in color. This is a critical step, as creaming incorporates air into the butter, which will contribute to the delicate, melt-in-your-mouth texture of your finished shortbread. Scrape down the sides of the bowl occasionally to ensure everything is evenly mixed. You want to see the butter transform from dense to a much lighter, almost aerated consistency.
- Add Vanilla and Salt: Reduce the mixer speed to low, then add the pure vanilla extract and fine sea salt. Mix until just combined, about 30 seconds. Be careful not to overmix at this stage; we just want to distribute these flavor enhancers throughout our creamy butter and sugar base. The vanilla will provide a warm, inviting aroma and taste, while the salt will highlight the rich butteriness.
- Incorporate the Flour: Gradually add the sifted all-purpose flour to the butter mixture, about a cup at a time, mixing on the lowest speed until just combined after each addition. The key here is not to overmix the dough once the flour is added. Overmixing develops gluten in the flour, which can lead to tough, chewy cookies rather than the tender, crumbly shortbread texture we’re aiming for. As you add the last portion of flour, the mixture will transition from crumbly to a cohesive, soft dough that just comes together when pressed. You might need to finish mixing by hand with a spatula or even your clean hands to avoid overworking the dough with the mixer, ensuring all the flour is incorporated without excessive agitation. The dough should be soft and pliable but not sticky.
- Form the Dough: Gently gather the shortbread dough into a large ball or disk. At this point, the dough is ready for coloring, which is where our Piped Rainbow Shortbread Cookies truly begin to take shape!
Dividing and Coloring the Dough for Our Piped Rainbow Shortbread Cookies
- Divide the Dough: Carefully divide the large dough ball into equal portions, one for each color of your rainbow. For a classic rainbow, this would typically mean six portions (red, orange, yellow, green, blue, purple). If you prefer fewer colors, adjust accordingly. I find a kitchen scale helpful here to ensure truly even distribution, which helps in uniform cookie texture and color intensity. Weigh the entire dough and then divide by your desired number of colors.
- Color Each Portion: Take one portion of dough and place it in a separate bowl. Add a small amount of gel food coloring – start with a pea-sized drop, as gel colors are very concentrated. Using a spoon, spatula, or even gloved hands, gently fold and knead the color into the dough until it is uniformly distributed and vibrantly colored. It’s important to mix gently and efficiently to avoid overworking the dough, which can make the cookies tough. Repeat this process for each portion of dough, using a different color for each. You’ll be amazed at how quickly the dough transforms into a beautiful palette of colors. For deeper, more intense colors, you can add a tiny bit more gel, but do so incrementally.
- Chill the Colored Dough (Optional but Recommended): Once all your dough portions are colored, flatten each portion slightly into a disk, wrap them individually in plastic wrap, and refrigerate for about 20-30 minutes. This chilling step isn’t strictly necessary if your kitchen is cool and your dough is firm, but it significantly helps firm up the dough, making it much easier to handle and pipe later, especially when creating intricate designs for your Piped Rainbow Shortbread Cookies. A slightly firmer dough will hold its piped shape much better.
Preparing for Piping: Assembling the Piping Bags
- Prepare Your Piping Bags: While the dough is chilling, prepare your piping bags. You’ll need at least one large piping bag fitted with a large open star tip (such as a Wilton 1M or Ateco 827) for the best “Piped Rainbow Shortbread Cookies” effect. If you’re doing individual colors, you’ll need one bag per color and then possibly a larger final bag. For the rainbow swirl effect, which is truly magical, we’ll load multiple colors into one bag.
-
Load Multiple Colors for the Rainbow Effect: This is where the magic of “Piped Rainbow Shortbread Cookies” truly shines! Unwrap your chilled, colored dough portions. Gently roll each colored dough portion into a log or flatten it into a rectangle that’s roughly the length of your piping bag. The goal is to create long strips of each color.
- Method 1 (My Preferred Method for Vibrant Stripes): Lay out a piece of plastic wrap on your counter. Arrange the colored dough logs side by side on the plastic wrap, pressing them gently together to form a large rectangular block of striped dough. For instance, place red, then orange, yellow, green, blue, and purple logs next to each other. Once assembled, carefully roll the plastic wrap around the dough block to create a large, multi-colored log. Then, very gently unwrap one end and carefully insert this striped log into your prepared piping bag, pushing it down towards the tip. When you pipe, the different colors will emerge in beautiful stripes, creating a stunning rainbow effect.
- Method 2 (For a Swirl Effect): Alternatively, if you want a more swirled look, you can place small, random dollops of each colored dough directly into the piping bag, alternating colors as you go. This method can also produce a beautiful, organic rainbow swirl.
Make sure the dough is packed snugly into the bag, but don’t overfill it – leave some room at the top to twist the bag closed.
- Prepare Baking Sheets: Line several baking sheets with parchment paper. This prevents sticking and ensures even baking, making cleanup a breeze. Preheat your oven now to 325°F (160°C).
Piping the Piped Rainbow Shortbread Cookies
- Practice Piping (Optional but Recommended): Before piping directly onto your baking sheet, you might want to do a quick test pipe on a small piece of parchment or a plate. This allows you to get a feel for the dough’s consistency and the pressure needed to create consistent shapes. It also helps in observing how the colors are coming out and adjusting your technique if needed.
-
Pipe the Cookies: Hold the piping bag directly perpendicular to the baking sheet, about ½ inch above the surface. Apply steady, even pressure to the bag to pipe your desired shapes.
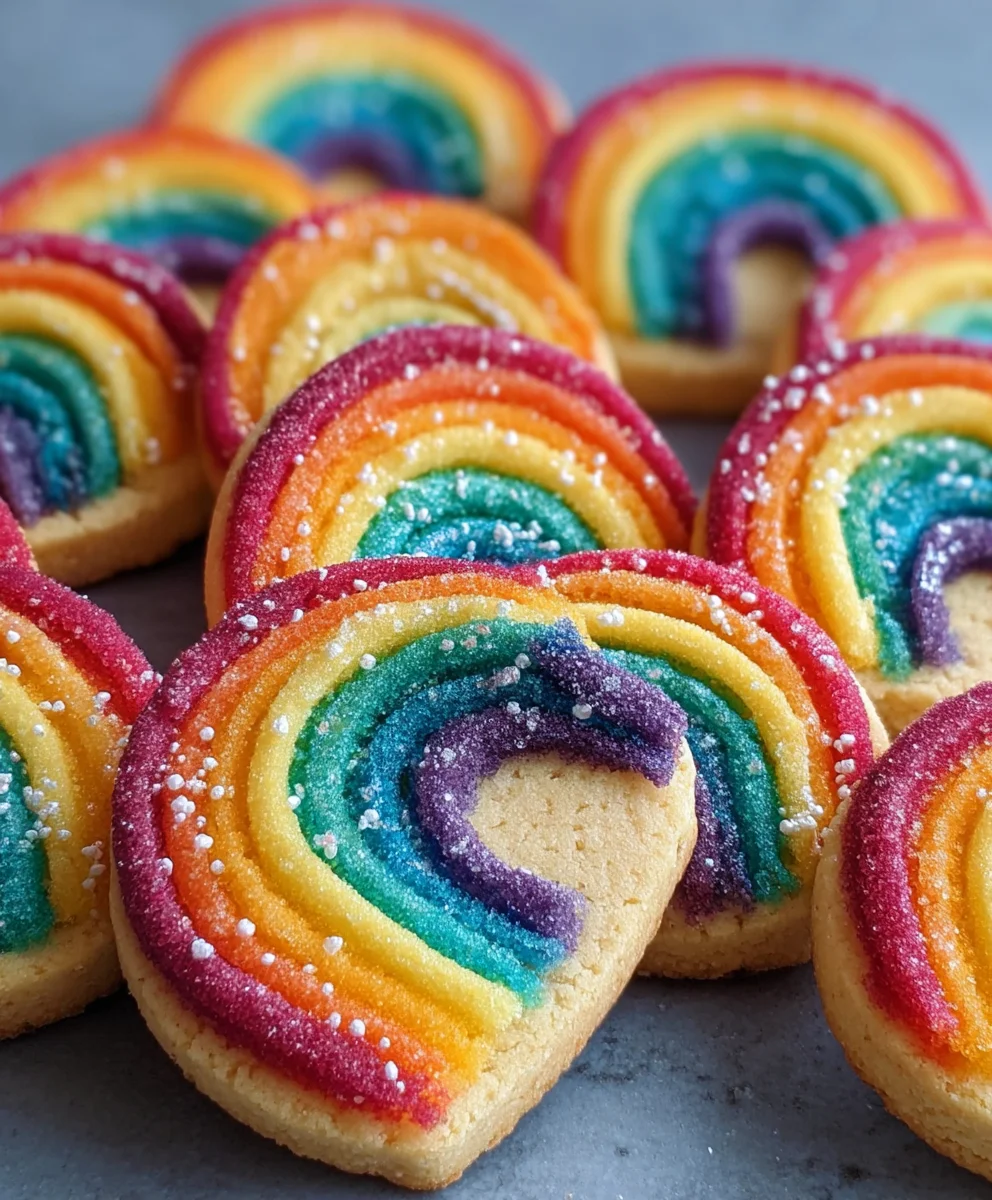
- For Rosettes: Start in the center, pipe a small star, then continuing in a circular motion, pipe outwards to create a beautiful spiral. Release pressure and lift the bag cleanly.
- For S-Shapes or Wavy Lines: Start at one end, pipe a continuous S-shape or a gentle wavy line, maintaining even pressure, then release and lift.
- For Simple Stars: Simply press down, let the dough bloom into a star shape, then quickly release pressure and lift.
Leave about 1 to 1.5 inches of space between each cookie on the baking sheet to allow for slight spreading during baking. The key to beautiful Piped Rainbow Shortbread Cookies is steady, consistent pressure and confident movements. Don’t be afraid to experiment with different patterns; the joy is in the vibrant colors!
Baking the Piped Rainbow Shortbread Cookies
- Bake the Cookies: Place the baking sheets in your preheated oven. Bake for approximately 15 to 20 minutes. Baking time can vary depending on your oven and the size/thickness of your cookies, so keep a close eye on them. The cookies are done when the edges are just very lightly golden, and the centers appear set and firm to the touch. They should not be heavily browned, as shortbread is meant to be pale and tender. The vibrant colors of your Piped Rainbow Shortbread Cookies should remain bright and distinct.
- Cool on Baking Sheet: Once baked, remove the baking sheets from the oven and let the Piped Rainbow Shortbread Cookies cool on the sheets for about 5 to 10 minutes. Shortbread is quite delicate when warm, so allowing them to firm up slightly on the hot sheet prevents breakage when transferring.
- Transfer to Wire Rack: After initial cooling, carefully transfer the cookies to a wire rack to cool completely. This ensures air circulates around them, preventing sogginess and maintaining their crisp, tender texture. Ensure they are completely cool before handling further or storing. This is vital for the optimal texture and enjoyment of your delightful “Piped Rainbow Shortbread Cookies”.
Optional: Elevating and Storing Your Piped Rainbow Shortbread Cookies
- Dust with Sugar (Optional): For an extra touch of sweetness and a sparkling finish, you can lightly dust the completely cooled Piped Rainbow Shortbread Cookies with powdered sugar using a fine-mesh sieve. This adds a delicate, elegant touch without overwhelming the natural shortbread flavor.
- Storage: Once completely cool, store your beautiful Piped Rainbow Shortbread Cookies in an airtight container at room temperature for up to 1 week. Shortbread actually develops more flavor after a day or two, making them even more delicious. For longer storage, you can freeze the unbaked dough logs, wrapped tightly in plastic wrap and then foil, for up to 3 months. When ready to bake, thaw the dough in the refrigerator overnight, then proceed with the piping and baking steps. You can also freeze the baked cookies for up to 1 month; thaw at room temperature before serving. These cookies are not just a treat for the eyes but also a delightful experience for the taste buds, making them perfect for gifts or a colorful spread!
Conclusion:

Well, my friends, we've reached the sweet finale of our journey with these delightful creations. If there's one recipe I implore you to try, it's this one for our Piped Rainbow Shortbread Cookies. Why are they a must-try, you ask? Because they are more than just a dessert; they are a miniature celebration, a burst of joy in every bite, and a testament to how simple ingredients can transform into something truly magical. The vibrant, swirling colors are an instant mood-lifter, promising a smile before the first crumb even touches your lips. Imagine the delight on the faces of your loved ones as they encounter these edible works of art. Beyond their undeniable visual appeal, the taste is absolutely divine – a classic, buttery shortbread that melts in your mouth, perfectly balanced in sweetness, with just a hint of vanilla that sings with every bite. They are surprisingly easy to make, even for novice bakers, offering a rewarding experience as you watch the dough transform into beautiful, intricate patterns through the piping bag. Trust me, the satisfaction of baking a batch of these radiant cookies is immense, making them a perfect project for a rainy afternoon, a special occasion, or simply to add a splash of color to your daily routine.

Elevate Your Cookie Experience: Serving Suggestions & Creative Variations

Once your beautiful Piped Rainbow Shortbread Cookies are baked and cooled, the possibilities for enjoyment are endless! For a simple, comforting treat, they pair exquisitely with a warm cup of coffee or your favorite herbal tea, making afternoon breaks feel incredibly indulgent. Imagine hosting a garden party or a brunch; these cookies would be the absolute showstopper on any dessert platter, drawing gasps of admiration from your guests. For a slightly more decadent experience, consider serving them alongside a scoop of vanilla bean ice cream or a dollop of freshly whipped cream, perhaps with a scattering of fresh berries. They also make truly thoughtful and impressive homemade gifts. Package them in clear cellophane bags tied with a pretty ribbon, and you have a personalized present that speaks volumes of your effort and care. They are perfect for teacher appreciation, hostess gifts, or as a charming surprise for a friend.

But why stop there? Let your creativity soar with a few variations! While the rainbow is undeniably charming, consider adapting the colors to fit specific themes or holidays. Think festive reds and greens for Christmas, pastels for Easter or a baby shower, or even monochromatic shades for a sophisticated touch. You could experiment with different flavor extracts in the dough – a touch of almond extract for a marzipan-like nuance, a hint of lemon zest for brightness, or even a subtle rosewater for an elegant floral note. Another delightful variation involves dipping half of the cooled cookies into melted white chocolate and then sprinkling them with edible glitter or mini nonpareils for extra sparkle and texture. You could also try different piping tips – a star tip will give you a classic swirl, while a petal tip might create a more ruffled, floral effect. Don't be afraid to play with the designs; overlapping colors, striped patterns, or even polka dots can add another layer of fun to your baking adventure. The beauty of these cookies lies in their versatility and how easily they can be customized to suit any mood or occasion.

Your Baking Adventure Awaits! Share Your Masterpieces!

Now, it's your turn! I genuinely hope you feel inspired to roll up your sleeves, gather your ingredients, and embark on the delightful journey of making these Piped Rainbow Shortbread Cookies. Don't let the piping intimidate you; it's a process of joyful creation, and even if your first attempt isn't picture-perfect, I promise you, they will still be utterly delicious and charmingly homemade. Baking should be fun, an exploration of flavors and textures, and an opportunity to create something beautiful with your own hands. So, grab your piping bag, choose your colors, and get ready to create some edible sunshine!

I am incredibly excited for you to experience the magic of this recipe. Once you've baked your batch, I would absolutely love to hear about your experience! What colors did you choose? Did you try any fun variations? How did your family and friends react to these vibrant treats? Please, share your stories, your triumphs, and even your funny baking mishaps. Better yet, snap some photos of your stunning creations! There's nothing more rewarding than seeing what you, my wonderful readers, create in your own kitchens. Let's celebrate the joy of baking together!
Piped Rainbow Shortbread Cookies
Piped Rainbow Shortbread Cookies are not merely a confection; they are a vibrant symphony of color and flavor, a true feast for both the eyes and the palate. Imagine biting into a delicate, buttery swirl, where each segment reveals a cheerful hue, melting effortlessly in your mouth to leave a wonderfully rich, sweet sensation. I am absolutely delighted to guide you through crafting these stunning edible masterpieces, which are perfect for brightening any occasion, from a festive gathering to simply adding a touch of joy to your afternoon tea.
Ingredients
-
2 cups (450g) unsalted butter, softened
-
1 cup (200g) granulated sugar
-
2 tsp pure vanilla extract
-
½ tsp fine sea salt
-
4 cups (480g) all-purpose flour, sifted
-
Gel food coloring (various vibrant colors)
Instructions
-
Step 1
In a stand mixer, cream softened unsalted butter and granulated sugar on medium speed for 3-5 minutes until light and fluffy. Scrape down the bowl. Add vanilla extract and fine sea salt; mix on low speed until just combined. Gradually add sifted all-purpose flour, mixing on the lowest speed until just incorporated and a soft, cohesive dough forms. Avoid overmixing. -
Step 2
Divide the dough into equal portions (e.g., 6 for rainbow colors). Add a small amount of gel food coloring to each portion and gently knead until uniformly colored. Flatten colored dough portions into disks, wrap individually, and refrigerate for 20-30 minutes to firm up. -
Step 3
Prepare a large piping bag with an open star tip (e.g., Wilton 1M). Roll each colored dough portion into a log and arrange them side-by-side on plastic wrap. Gently roll into a multi-colored log and insert into the piping bag. Preheat oven to 325°F (160°C). Line baking sheets with parchment paper. -
Step 4
Pipe desired shapes (rosettes, S-shapes, stars) onto the prepared baking sheets, leaving 1-1.5 inches between cookies. Bake for 15-20 minutes, or until the edges are very lightly golden and centers are set. Let cookies cool on the baking sheets for 5-10 minutes, then transfer to a wire rack to cool completely. -
Step 5
(Optional) Dust cooled cookies with powdered sugar for an elegant finish. Store in an airtight container at room temperature for up to 1 week. Baked cookies can be frozen for up to 1 month; thaw at room temperature before serving.
Important Information
Nutrition Facts (Per Serving)
It is important to consider this information as approximate and not to use it as definitive health advice.
Allergy Information
Please check ingredients for potential allergens and consult a health professional if in doubt.
Leave a Comment