
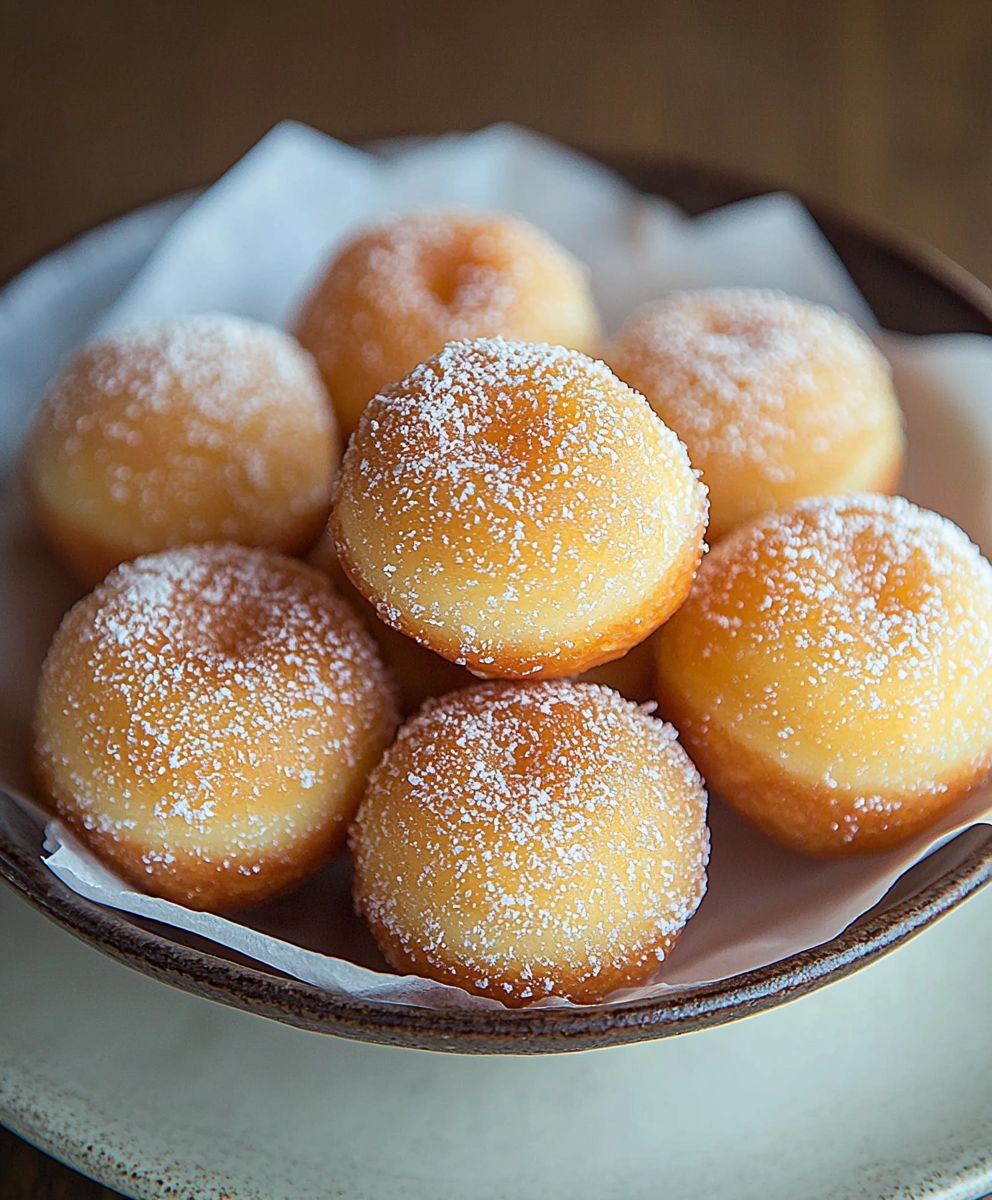
Portuguese Malasadas, those pillowy clouds of fried dough, are more than just a dessert; they’re a taste of tradition, a celebration of indulgence, and a guaranteed way to brighten any day. Have you ever bitten into something so perfectly light and airy, yet so satisfyingly rich and comforting? That’s the magic of a truly great malasada, and I’m thrilled to share my family’s recipe with you!
These delightful treats have a fascinating history, deeply rooted in Portuguese culture. Originally created as a way to use up all the lard and sugar before Lent, malasadas became a symbol of pre-Lenten feasting. Portuguese immigrants carried this tradition with them, and today, Portuguese Malasadas are especially popular in Hawaii, where they’ve become a beloved local favorite.
But what makes them so irresistible? It’s the combination of textures the slightly crisp exterior giving way to a soft, almost melt-in-your-mouth interior. The subtle sweetness, often enhanced with a dusting of sugar or cinnamon, is perfectly balanced. Plus, let’s be honest, who can resist a freshly fried doughnut? Whether you’re looking to recreate a taste of Portugal, experience a Hawaiian delicacy, or simply treat yourself to something special, this recipe is your ticket to malasada heaven. Get ready to embark on a delicious journey!

Ingredients:
- 500g (about 4 cups) all-purpose flour, plus extra for dusting
- 25g (about 1 ounce) fresh yeast or 7g (about 1 packet) active dry yeast
- 125ml (about ½ cup) lukewarm milk
- 100g (about ½ cup) granulated sugar, plus extra for coating
- 2 large eggs
- 50g (about ¼ cup) unsalted butter, melted and cooled slightly
- 1 teaspoon lemon zest, finely grated
- 1 teaspoon orange zest, finely grated
- 1 teaspoon vanilla extract
- ½ teaspoon salt
- Vegetable oil or canola oil, for frying (about 4-6 cups, depending on your pot)
- Optional: Ground cinnamon, for coating (mixed with sugar)
Preparing the Dough: The Foundation of Fluffy Malasadas
Okay, let’s get started! The key to amazing malasadas is a well-developed, slightly sticky dough. Don’t be intimidated; I’ll walk you through it.
- Activate the Yeast: If you’re using fresh yeast, crumble it into a small bowl. If you’re using active dry yeast, sprinkle it over the lukewarm milk in a small bowl. Add a teaspoon of sugar to the milk and yeast mixture. Stir gently and let it sit for 5-10 minutes, or until foamy. This step is crucial to ensure your yeast is alive and kicking! If it doesn’t foam, your yeast might be old, and you’ll need to start with fresh yeast.
- Combine Dry Ingredients: In a large bowl, whisk together the flour and salt. This helps distribute the salt evenly throughout the dough.
- Incorporate Wet Ingredients: Make a well in the center of the dry ingredients. Pour in the foamy yeast mixture, the remaining sugar, eggs, melted butter, lemon zest, orange zest, and vanilla extract.
- Mix the Dough: Using a wooden spoon or your hands, gradually incorporate the wet ingredients into the dry ingredients. Start mixing from the center and work your way outwards. The dough will be quite sticky at first, and that’s perfectly normal!
- Knead the Dough: Turn the dough out onto a lightly floured surface. Knead the dough for 8-10 minutes, or until it becomes smooth and elastic. If the dough is too sticky, add a little more flour, one tablespoon at a time, until it’s manageable. Be careful not to add too much flour, as this will make the malasadas tough. You can also use a stand mixer with a dough hook attachment. Knead on medium speed for about 6-8 minutes. The dough should pull away from the sides of the bowl and form a smooth ball.
- First Rise: Place the dough in a lightly oiled bowl, turning to coat all sides. Cover the bowl with plastic wrap or a clean kitchen towel. Let the dough rise in a warm place for 1-1.5 hours, or until doubled in size. This is where the magic happens! The yeast is working its wonders, creating all those lovely air pockets that will make our malasadas light and airy.
Shaping and Second Rise: Preparing for Frying
Now that our dough has doubled in size, it’s time to shape it into those irresistible malasadas!
- Punch Down the Dough: Gently punch down the dough to release the air. This helps to even out the texture and prevent large air bubbles from forming during frying.
- Divide the Dough: Turn the dough out onto a lightly floured surface. Divide the dough into 12-16 equal pieces. You can use a knife or a dough scraper for this.
- Shape the Malasadas: Gently roll each piece of dough into a ball. Don’t overwork the dough; just aim for a smooth, round shape. You can also flatten them slightly into a disc shape if you prefer.
- Second Rise: Place the shaped malasadas on a baking sheet lined with parchment paper. Cover them loosely with plastic wrap or a clean kitchen towel. Let them rise in a warm place for 30-45 minutes, or until they have puffed up slightly. This second rise is important for achieving that signature light and airy texture.
Frying the Malasadas: The Golden Touch
This is where the fun begins! Frying the malasadas is quick, so make sure you have everything ready before you start.
- Heat the Oil: Pour the vegetable oil or canola oil into a deep pot or Dutch oven. Heat the oil over medium heat to 350°F (175°C). Use a deep-fry thermometer to monitor the temperature. Maintaining the correct oil temperature is crucial for even cooking and preventing the malasadas from becoming greasy.
- Fry the Malasadas: Carefully place 2-3 malasadas into the hot oil at a time, being careful not to overcrowd the pot. Overcrowding will lower the oil temperature and result in greasy malasadas.
- Cook Until Golden Brown: Fry the malasadas for 2-3 minutes per side, or until they are golden brown and cooked through. Use a slotted spoon or spider to flip them over.
- Drain the Malasadas: Remove the fried malasadas from the oil and place them on a wire rack lined with paper towels to drain excess oil.
Coating and Serving: The Sweet Finale
Almost there! Now for the final touch coating those warm, fluffy malasadas in sugar!
- Coat with Sugar: While the malasadas are still warm, generously roll them in granulated sugar. You can also mix the sugar with ground cinnamon for a warm, spicy flavor. The sugar will adhere better to the warm malasadas.
- Serve Immediately: Serve the malasadas immediately while they are still warm and fluffy. They are best enjoyed fresh!
Tips for Perfect Malasadas:
- Don’t Overcrowd the Pot: Frying too many malasadas at once will lower the oil temperature and result in greasy, undercooked pastries.
- Maintain Oil Temperature: Use a deep-fry thermometer to ensure the oil stays at 350°F (175°C). Adjust the heat as needed.
- Don’t Overknead: Overkneading can result in tough malasadas. Knead until the dough is smooth and elastic, but not overly firm.
- Let the Dough Rise Properly: Proper rising is essential for light and airy malasadas. Make sure the dough doubles in size during the first rise and puffs up slightly during the second rise.
- Use Fresh Yeast: Old yeast may not activate properly, resulting in dense, flat malasadas.
- Experiment with Flavors: Feel free to add other flavorings to the dough, such as cardamom, nutmeg, or almond extract.
- Filling Options: While traditionally unfilled, you can inject the malasadas with custard, chocolate, or fruit filling after they have cooled slightly. Use a pastry bag fitted with a long, thin tip.
Troubleshooting:
- Malasadas are too greasy: The oil temperature was likely too low. Make sure to maintain the correct temperature.
- Malasadas are too dense: The dough may not have risen enough, or the yeast may have been old.
- Malasadas are burning on the outside but raw on the inside: The oil temperature was likely too high. Reduce the heat and cook for a longer time.
- Dough is too sticky: Add a little more flour, one tablespoon at a time, until the dough is manageable. Be careful not to add too much flour.
- Dough is too dry: Add a little more milk, one tablespoon at a time, until the dough is smooth and elastic.
Enjoy your homemade Portuguese Malasadas! They are a delightful treat that’s perfect for any occasion. Bom apetite!
Conclusion:
And there you have it! These Portuguese Malasadas are more than just fried dough; they’re a taste of tradition, a burst of sweetness, and a guaranteed crowd-pleaser. I truly believe this recipe is a must-try because it’s surprisingly simple to make, yet delivers an incredibly satisfying and authentic flavor. Forget store-bought donuts once you’ve experienced the warm, pillowy texture and the delicate dusting of sugar on these homemade treats, you’ll never look back.
Why are these Malasadas so special? It’s the perfect balance of a slightly crisp exterior giving way to a soft, airy interior. The subtle hint of lemon zest adds a bright, refreshing note that cuts through the richness, making them utterly irresistible. Plus, the recipe is incredibly adaptable. Feel free to adjust the sweetness to your liking, or experiment with different flavorings.
Speaking of variations, let’s talk serving suggestions! While traditionally enjoyed simply dusted with granulated sugar, don’t be afraid to get creative. Imagine these warm Malasadas served alongside a scoop of vanilla ice cream and a drizzle of chocolate sauce for an indulgent dessert. Or, try filling them with pastry cream, Nutella, or even a dollop of your favorite jam for an extra special treat. For a more Portuguese experience, serve them with a strong cup of coffee or a glass of Madeira wine. You could even sprinkle them with cinnamon sugar instead of plain sugar for a warmer, spicier flavor profile. Another fantastic idea is to make mini Malasadas and serve them as bite-sized appetizers at your next party. They’re guaranteed to be a hit!
Ready to embark on your Malasada-making adventure? I’ve tried to make this recipe as clear and straightforward as possible, but don’t hesitate to reach out if you have any questions along the way. Remember, the key to perfect Malasadas is patience and a little bit of love. Don’t be discouraged if your first batch isn’t perfect practice makes perfect, and even imperfect Malasadas are still delicious!
I’m so excited for you to try this recipe and experience the joy of making your own Portuguese Malasadas. I truly believe that sharing food is a way to share love, and these Malasadas are the perfect way to spread some sweetness in your life.
So, go ahead, gather your ingredients, and get ready to create some magic in your kitchen. And most importantly, don’t forget to share your creations with me! I’d love to see your photos and hear about your experiences. Tag me on social media using #HomemadeMalasadas or leave a comment below. I can’t wait to see what you come up with! Happy baking! I hope you enjoy this Malasadas recipe as much as I do!
Portuguese Malasadas: A Delicious Guide to the Traditional Treat
Fluffy, golden-brown Portuguese doughnuts, fried to perfection and coated in sugar. These malasadas are a delightful treat, perfect for any occasion!
Ingredients
- 500g (about 4 cups) all-purpose flour, plus extra for dusting
- 25g (about 1 ounce) fresh yeast or 7g (about 1 packet) active dry yeast
- 125ml (about ½ cup) lukewarm milk
- 100g (about ½ cup) granulated sugar, plus extra for coating
- 2 large eggs
- 50g (about ¼ cup) unsalted butter, melted and cooled slightly
- 1 teaspoon lemon zest, finely grated
- 1 teaspoon orange zest, finely grated
- 1 teaspoon vanilla extract
- ½ teaspoon salt
- Vegetable oil or canola oil, for frying (about 4-6 cups, depending on your pot)
- Optional: Ground cinnamon, for coating (mixed with sugar)
Instructions
- Activate the Yeast: If using fresh yeast, crumble it into a small bowl. If using active dry yeast, sprinkle it over the lukewarm milk in a small bowl. Add a teaspoon of sugar to the milk and yeast mixture. Stir gently and let it sit for 5-10 minutes, or until foamy.
- Combine Dry Ingredients: In a large bowl, whisk together the flour and salt.
- Incorporate Wet Ingredients: Make a well in the center of the dry ingredients. Pour in the foamy yeast mixture, the remaining sugar, eggs, melted butter, lemon zest, orange zest, and vanilla extract.
- Mix the Dough: Using a wooden spoon or your hands, gradually incorporate the wet ingredients into the dry ingredients. The dough will be quite sticky at first.
- Knead the Dough: Turn the dough out onto a lightly floured surface. Knead the dough for 8-10 minutes, or until it becomes smooth and elastic. If the dough is too sticky, add a little more flour, one tablespoon at a time, until it’s manageable. Alternatively, use a stand mixer with a dough hook attachment. Knead on medium speed for about 6-8 minutes.
- First Rise: Place the dough in a lightly oiled bowl, turning to coat all sides. Cover the bowl with plastic wrap or a clean kitchen towel. Let the dough rise in a warm place for 1-1.5 hours, or until doubled in size.
- Punch Down the Dough: Gently punch down the dough to release the air.
- Divide the Dough: Turn the dough out onto a lightly floured surface. Divide the dough into 12-16 equal pieces.
- Shape the Malasadas: Gently roll each piece of dough into a ball. You can also flatten them slightly into a disc shape if you prefer.
- Second Rise: Place the shaped malasadas on a baking sheet lined with parchment paper. Cover them loosely with plastic wrap or a clean kitchen towel. Let them rise in a warm place for 30-45 minutes, or until they have puffed up slightly.
- Heat the Oil: Pour the vegetable oil or canola oil into a deep pot or Dutch oven. Heat the oil over medium heat to 350°F (175°C). Use a deep-fry thermometer to monitor the temperature.
- Fry the Malasadas: Carefully place 2-3 malasadas into the hot oil at a time, being careful not to overcrowd the pot.
- Cook Until Golden Brown: Fry the malasadas for 2-3 minutes per side, or until they are golden brown and cooked through. Use a slotted spoon or spider to flip them over.
- Drain the Malasadas: Remove the fried malasadas from the oil and place them on a wire rack lined with paper towels to drain excess oil.
- Coat with Sugar: While the malasadas are still warm, generously roll them in granulated sugar. You can also mix the sugar with ground cinnamon for a warm, spicy flavor.
- Serve Immediately: Serve the malasadas immediately while they are still warm and fluffy.
Notes
- Don’t Overcrowd the Pot: Frying too many malasadas at once will lower the oil temperature and result in greasy, undercooked pastries.
- Maintain Oil Temperature: Use a deep-fry thermometer to ensure the oil stays at 350°F (175°C). Adjust the heat as needed.
- Don’t Overknead: Overkneading can result in tough malasadas. Knead until the dough is smooth and elastic, but not overly firm.
- Let the Dough Rise Properly: Proper rising is essential for light and airy malasadas. Make sure the dough doubles in size during the first rise and puffs up slightly during the second rise.
- Use Fresh Yeast: Old yeast may not activate properly, resulting in dense, flat malasadas.
- Experiment with Flavors: Feel free to add other flavorings to the dough, such as cardamom, nutmeg, or almond extract.
- Filling Options: While traditionally unfilled, you can inject the malasadas with custard, chocolate, or fruit filling after they have cooled slightly. Use a pastry bag fitted with a long, thin tip.

Leave a Comment