
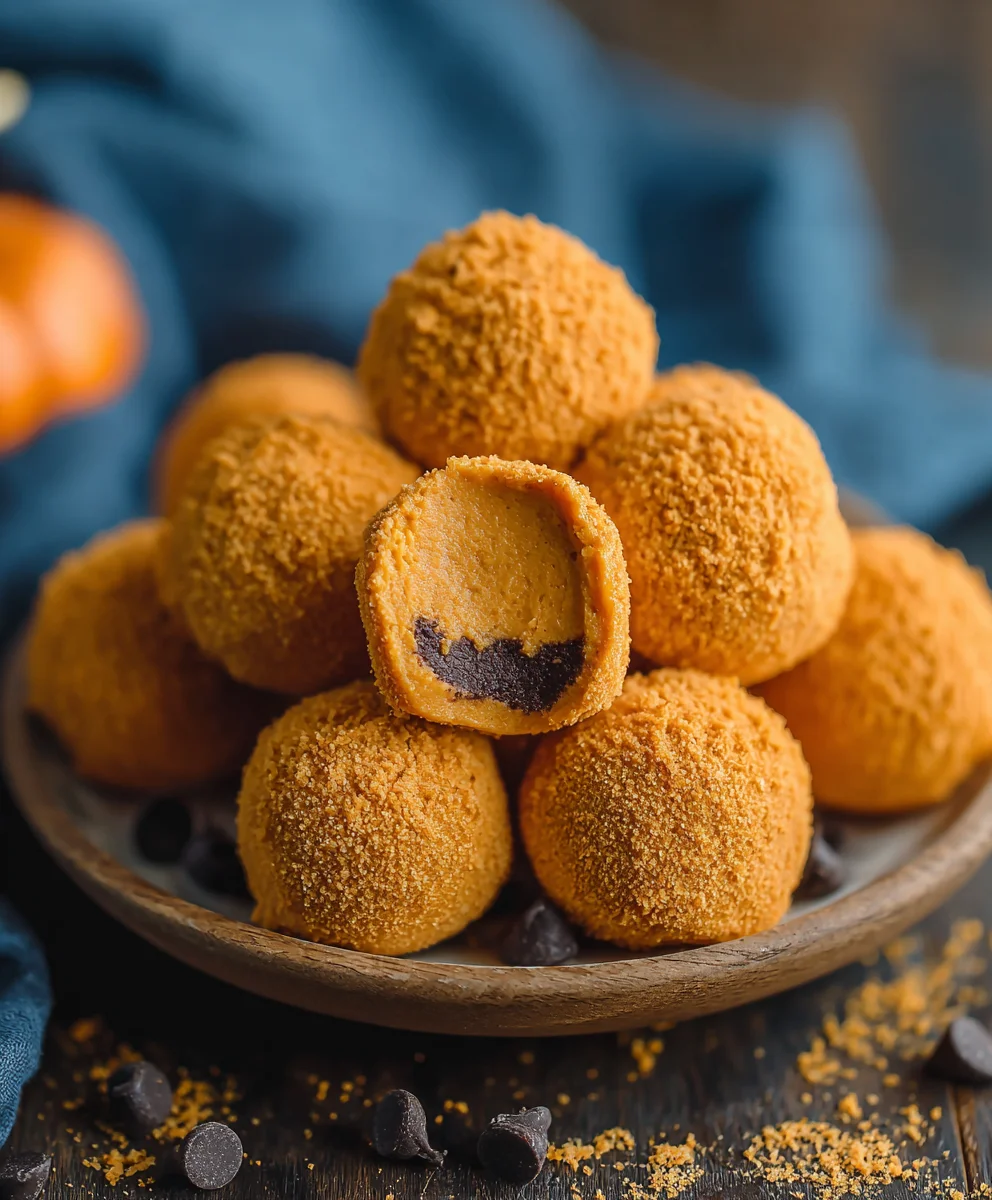
Pumpkin Cheesecake Truffles! As the crisp air of autumn descends and the leaves begin their magnificent transformation, there’s a particular craving that emerges for those warm, comforting flavors of the season. I find myself reaching for all things pumpkin spice, but sometimes, a slice of pie feels a little too traditional, or perhaps too large for a quick indulgence. That’s precisely why I am so thrilled to introduce you to these delightful, bite-sized wonders.
While truffles themselves have a rich history, dating back to French confectioners creating chocolate masterpieces, and cheesecake boasts ancient origins, our modern fusion of these concepts into a no-bake treat is truly genius. This recipe takes the beloved creaminess of cheesecake and infuses it with the quintessential autumn spices and earthy sweetness of pumpkin, all rolled into a convenient, irresistible ball.
Why People Adore This Dish
People absolutely adore these Pumpkin Cheesecake Truffles for so many reasons. They offer the luxurious taste and texture of a decadent dessert without the fuss of baking a whole cake. Their portable, portion-controlled nature makes them perfect for holiday gatherings, a thoughtful hostess gift, or simply a satisfying treat enjoyed with a warm cup of coffee. I promise you, one bite of these velvety, spiced spheres, and you’ll understand why they’re set to become your new favorite fall indulgence.

Ingredients:
Oh, get ready, my friend! These Pumpkin Cheesecake Truffles are an absolute dream, and gathering your ingredients is the first exciting step to creating these delightful fall treats. I always recommend using the best quality ingredients you can find, especially for things like cream cheese and chocolate, as it truly makes a noticeable difference in the final taste and texture of your truffles.
- For the Pumpkin Cheesecake Filling:
- 16 ounces (two 8-ounce blocks) full-fat cream cheese, softened: It’s absolutely crucial that your cream cheese is at room temperature. This is key for achieving that perfectly smooth, lump-free filling that we’re aiming for. If it’s too cold, you’ll end up with lumps, no matter how much you beat it!
- 1 cup (about 8 ounces) canned pumpkin puree, NOT pumpkin pie filling: Make sure you grab pure pumpkin puree from the baking aisle. Pumpkin pie filling already has spices and sugar, which would throw off our delicate flavor balance. We want that pure pumpkin goodness!
- 1 ½ cups powdered sugar (confectioners’ sugar), sifted: Sifting the powdered sugar is a small but mighty step. It helps prevent clumps and ensures your filling is silky smooth. Plus, it incorporates more easily into the wet ingredients.
- 1 cup finely crushed graham cracker crumbs: While optional for some truffle recipes, I find that graham cracker crumbs add a lovely structural stability to our pumpkin cheesecake base, making them easier to roll. They also lend that classic cheesecake crust flavor profile.
- 2 teaspoons pumpkin pie spice: This blend of cinnamon, nutmeg, ginger, and cloves is the heart of our fall flavor. Feel free to adjust to your personal preference – if you love a bolder spice, add a little extra!
- 1 teaspoon pure vanilla extract: Don’t skimp on good vanilla! It enhances all the other flavors beautifully.
- ¼ teaspoon fine sea salt: Just a pinch to balance the sweetness and bring out the depth of the pumpkin and spices.
- For the Chocolate Coating:
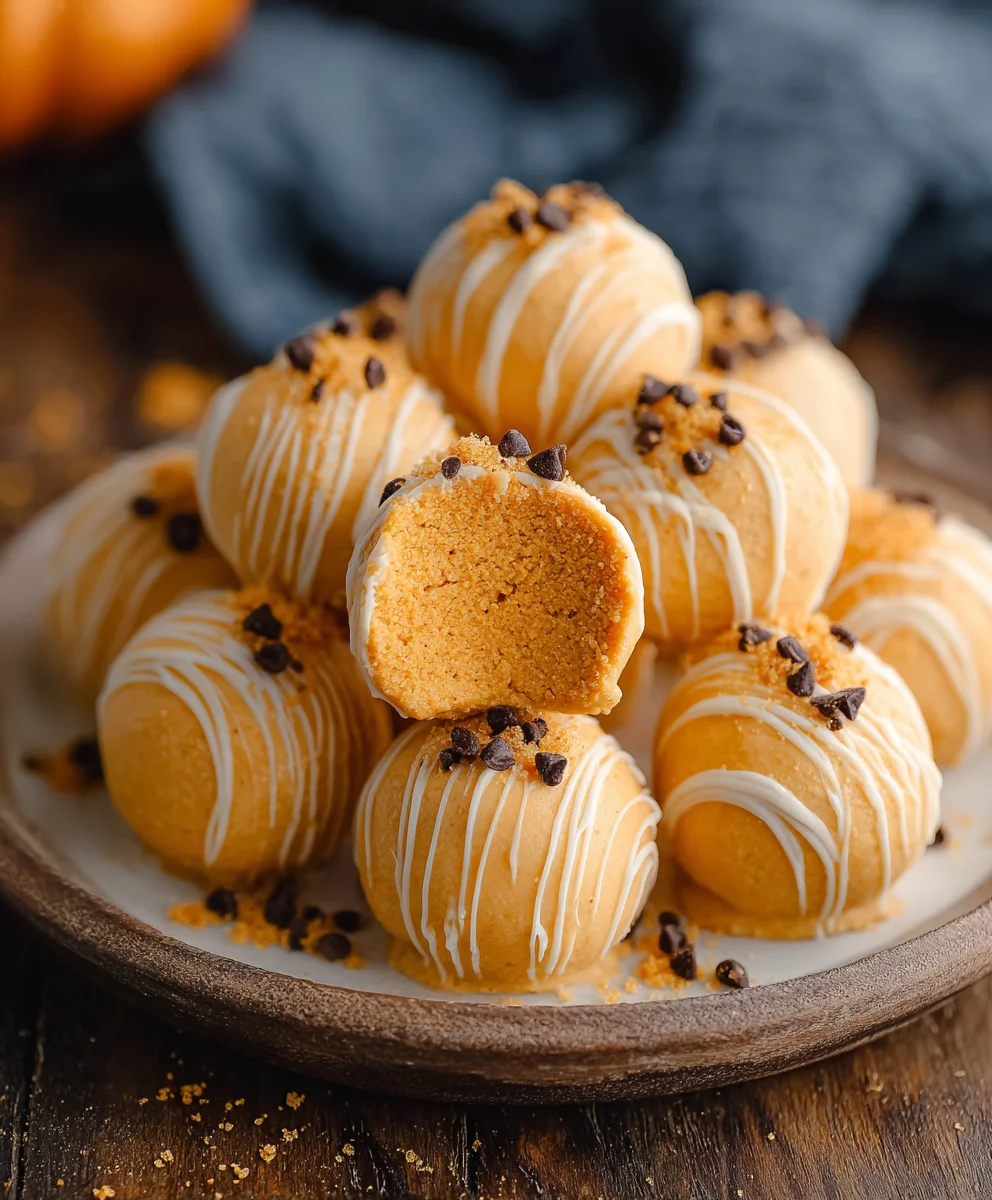
- 12 ounces high-quality white chocolate chips or melting wafers: I often go for white chocolate because it really lets the vibrant pumpkin color shine through, but you can absolutely use milk or dark chocolate if that’s your preference! Using good quality chocolate is paramount for a smooth, crack-free coating.
- 1 tablespoon coconut oil or vegetable shortening: This isn’t just for shine; it thins the melted chocolate ever so slightly, making it much easier to dip your truffles and achieve a beautiful, even coating without being too thick.
- Optional Decorations:
- A dusting of extra pumpkin pie spice
- Finely chopped pecans or walnuts
- Sprinkles (fall-themed, perhaps?)
- A drizzle of contrasting melted chocolate (e.g., dark chocolate over white-coated truffles)
Equipment You’ll Need:
Having the right tools at hand makes the process so much smoother and more enjoyable. I like to lay everything out before I even start mixing.
- Large mixing bowl
- Electric mixer (handheld or stand mixer with paddle attachment)
- Rubber spatula
- Sifter (for powdered sugar)
- Measuring cups and spoons
- Parchment paper or silicone baking mats
- Two baking sheets
- Small cookie scoop (1 to 1.5 tablespoons capacity) – essential for uniform truffles!
- Microwave-safe bowls OR a double boiler setup (for melting chocolate)
- Dipping tools or forks for coating truffles
- Airtight container for storage
Preparing the Pumpkin Cheesecake Base:
Alright, let’s get our hands (or at least our mixer!) dirty! This is where the magic truly begins, creating that irresistible pumpkin cheesecake core for our truffles. Remember, patience in the first few steps pays off immensely in the end.
- Cream the Cream Cheese: In a large mixing bowl, using your electric mixer on medium speed, beat the softened cream cheese for about 2-3 minutes. You want it to be incredibly smooth, light, and airy, with no lumps whatsoever. This is a critical step; if your cream cheese isn’t completely smooth here, it will never be smooth in the final mixture. If you’re struggling to get it smooth, your cream cheese might not be soft enough.
- Incorporate the Pumpkin and Flavorings: Reduce your mixer speed to low. Add the pure pumpkin puree, vanilla extract, pumpkin pie spice, and salt to the creamed cream cheese. Mix until just combined and evenly distributed. You’ll see it transform into a lovely pale orange color, smelling wonderfully of autumn already! Be careful not to overmix at this stage; we just want everything to be incorporated.
- Add Powdered Sugar and Graham Cracker Crumbs: With the mixer still on low, gradually add the sifted powdered sugar, a little at a time, allowing it to fully incorporate before adding more. This prevents a “sugar cloud” and ensures it mixes in smoothly. Once all the powdered sugar is in, gently fold in the finely crushed graham cracker crumbs with your rubber spatula. Mix until just combined. The mixture should be thick, creamy, and hold its shape well. If it seems too wet, don’t panic! The chilling process will firm it up.
- Taste and Adjust: Now’s your chance to be a chef! Take a small spoonful and taste your pumpkin cheesecake mixture. Does it need a tiny bit more pumpkin pie spice? A touch more sweetness? Adjust to your personal preference. Remember, these are your Pumpkin Cheesecake Truffles!
- Initial Chill – The Foundation of Firmness: Cover the bowl tightly with plastic wrap and refrigerate the mixture for at least 2-3 hours. I highly recommend chilling it overnight if your schedule allows. This chilling period is absolutely essential. It allows the flavors to meld beautifully and, more importantly, firms up the mixture significantly, making it much easier to scoop and roll into perfect truffle shapes later on. Trying to roll warm, soft mixture is an exercise in frustration, and trust me, I’ve been there!
Chilling and Rolling the Truffles:
After a good chill, your pumpkin cheesecake mixture is ready to be transformed into individual truffle spheres. This part is quite fun, almost like playing with edible dough!
- Prepare Your Workspace: Line two large baking sheets with parchment paper or silicone baking mats. This will prevent your rolled truffles from sticking and make them easy to transfer later.
- Scoop and Roll: Remove the chilled pumpkin cheesecake mixture from the refrigerator. Using a small cookie scoop (I find a 1 to 1.5 tablespoon scoop works perfectly for bite-sized truffles), scoop out portions of the mixture. Gently roll each portion between the palms of your hands to form smooth, round balls. Try to make them as uniform in size as possible for even coating and a professional look. If the mixture starts to get too sticky, you can lightly dust your hands with a tiny bit of powdered sugar, or simply pop the bowl back into the fridge for 10-15 minutes to firm up again. Don’t be afraid to take breaks if your hands get warm; warmth softens the mixture quickly.
- Second Chill – The Dipping Prep: Arrange the rolled truffles on your prepared baking sheets, leaving a little space between each. Once all the truffles are rolled, place the baking sheets into the freezer for at least 30-60 minutes. This deep chill is crucial before dipping. It ensures the truffles are very firm, which prevents them from falling apart or losing their shape when they hit the warm chocolate coating. A solid, frozen core is your best friend for successful dipping!
Preparing the Chocolate Coating and Dipping:
Now for the grand finale – enrobing our beautiful pumpkin cheesecake centers in a luscious chocolate shell! This step requires a little care and attention to detail, but it’s incredibly rewarding.
- Melt the Chocolate: While your truffles are getting their final freeze, it’s time to prepare the chocolate coating.
- Microwave Method: Place your white chocolate chips (or preferred chocolate) and coconut oil/shortening in a microwave-safe bowl. Microwave in 30-second intervals, stirring thoroughly after each interval. Chocolate can seize or burn easily, so go slow! Stirring is just as important as heating. Continue until the chocolate is smooth and completely melted, with no lumps remaining.
- Double Boiler Method (My Preferred for Control): Fill a saucepan with about an inch or two of water and bring it to a simmer. Place a heatproof bowl (make sure it fits snugly over the saucepan without touching the water) with the chocolate chips and coconut oil/shortening over the simmering water. Stir constantly until the chocolate is smooth and completely melted. The gentle, indirect heat of the double boiler provides much better control and reduces the risk of burning or seizing the chocolate.
Once melted, the chocolate should be fluid and glossy. The coconut oil or shortening helps achieve that perfect dipping consistency and gives the finished truffles a lovely shine.
- Set Up Your Dipping Station: Place your melted chocolate near your frozen truffles. Have your decorated baking sheets ready. If you have specific dipping tools, now’s the time to grab them. Otherwise, a simple fork works perfectly well.
- Dip the Truffles: Working quickly (remember, the truffles are cold!), take one frozen pumpkin cheesecake truffle and carefully drop it into the melted chocolate. Use a dipping tool or fork to completely submerge the truffle, ensuring it’s fully coated. Lift the truffle out of the chocolate, gently tapping the tool or fork against the rim of the bowl to allow any excess chocolate to drip off. This helps create a smooth, thin coating.
- Place on Parchment and Decorate: Carefully transfer the coated truffle back onto your parchment-lined baking sheet. If you’re adding any optional decorations (like a dusting of pumpkin pie spice, chopped nuts, or sprinkles), do so immediately while the chocolate is still wet and pliable. The chocolate sets surprisingly fast when it comes into contact with the cold truffle.
- Repeat and Reheat (if necessary): Continue dipping the remaining truffles. As you work, if your chocolate coating starts to thicken, you can gently reheat it for a few seconds in the microwave or over the double boiler until it’s fluid again. Don’t worry if your first few aren’t perfect; practice makes progress!
Decorating and Final Chill:
You’re almost there! A final chill ensures your Pumpkin Cheesecake Truffles are perfectly set, firm, and ready to be devoured.
- Allow Decorations to Set (if applicable): If you’re drizzling with a contrasting chocolate, let the initial coating of white chocolate set completely first. Then, melt a small amount of your contrasting chocolate (dark or milk works wonderfully) and use a spoon or a piping bag with a very small tip to create delicate drizzles over the set truffles.
- Final Chill – The Ultimate Firmness: Once all your truffles are dipped and decorated, place the baking sheets back into the refrigerator for at least 30-60 minutes, or until the chocolate coating is completely set and firm to the touch. This final chill ensures the chocolate has fully hardened, giving you that satisfying snap when you bite into them.
- Store and Serve: Once fully set, transfer your beautiful Pumpkin Cheesecake Truffles to an airtight container. Store them in the refrigerator. They will stay fresh and delicious for up to 1 week. Bring them out a few minutes before serving to allow the flavors to truly bloom!
My Tips for Perfect Pumpkin Cheesecake Truffles:
Over the years, I’ve learned a few tricks that make these truffles even more foolproof and delightful. Think of these as little nuggets of wisdom from my kitchen to yours!
- Embrace Room Temperature Ingredients: I cannot stress this enough, especially for the cream cheese. It truly is the secret to a silky-smooth filling. If you forget to take it out ahead of time, you can unwrap the blocks and microwave them for 10-15 seconds per block, flipping halfway, just until slightly softened but not melted.
- Don’t Skimp on Chilling: Seriously, those chilling steps are your best friends. They prevent frustration, sticky hands, and misshapen truffles. If the mixture or truffles start to soften while you’re working, just pop them back in the fridge or freezer for a few minutes. A little patience here saves a lot of headaches.
- Quality Chocolate Matters: Investing in good quality chocolate for melting is worth every penny. It melts more smoothly, sets beautifully, and tastes infinitely better than cheaper compound chocolates. Look for chocolate specifically designed for melting or dipping.
- Work Clean and Cool: Keep your hands as clean and cool as possible when rolling the truffles. If your hands get warm and sticky, give them a quick wash with cold water, dry them thoroughly, or even take a brief break.
- Batch Dip: Don’t try to dip all the truffles at once. I find it easiest to take out one baking sheet of frozen truffles at a time. This keeps the remaining truffles super cold while you work, ensuring they maintain their shape during dipping.
- Thin Your Chocolate Wisely: The coconut oil or shortening is key for a smooth, thin coating. If your chocolate is still too thick after melting, you can add another half teaspoon of coconut oil, stirring well, until it reaches your desired consistency. Just be careful not to add too much, or your coating might be too thin and crack easily.
- Get Creative with Decorations: The possibilities are endless! Beyond what I’ve suggested, consider crushing up some extra graham crackers, finely chopped candied ginger, or even a tiny pinch of coarse sea salt flakes for a sweet and salty twist on your Pumpkin Cheesecake Truffles.
- Storage is Key: Always store these in an airtight container in the refrigerator. They’re best enjoyed chilled, but letting them sit at room temperature for about 5-10 minutes before serving can allow their wonderful pumpkin and spice flavors to really shine through.
Enjoy every delightful bite of these incredible Pumpkin Cheesecake Truffles! They’re perfect for holiday gatherings, a cozy fall evening, or just because you deserve a little pumpkin-spiced bliss.
Conclusion:
So, there you have it – my absolute favorite recipe, and one I truly believe everyone needs in their life. These aren’t just any treats; they are little bites of pure, unadulterated joy. We’ve journeyed through the simple steps to create something truly magical, a dessert that perfectly encapsulates the cozy warmth of autumn while offering a sophisticated twist on classic flavors. The creamy, spiced pumpkin cheesecake filling, enveloped in a crisp, sweet chocolate shell, creates a textural and flavor experience that is simply irresistible. This recipe is a must-try because it delivers incredible gourmet taste with surprisingly little effort, making you look like a culinary genius without spending hours in the kitchen. It’s the perfect balance of richness and delicate spice, a harmonious blend that will leave you craving just one more. Whether you’re a seasoned baker or just dipping your toes into the world of homemade desserts, I promise you, these will be a resounding success.
Once your delectable creations are chilled and ready, the possibilities for enjoying them are endless. Imagine serving these elegant morsels as the crowning glory on a holiday dessert platter, nestled amongst cookies and other confections. They are absolutely divine paired with a steaming mug of coffee or a glass of chilled dessert wine, offering a sophisticated end to any meal. For a more casual setting, simply arrange them artfully on a small plate for an afternoon pick-me-up that feels incredibly indulgent. They also make truly thoughtful and impressive edible gifts. Package a handful in a beautiful box with a festive ribbon, and you’ve got a homemade present that will surely bring smiles and appreciative nods. Gifting these shows a level of care and effort that store-bought treats simply can’t match, making them ideal for hostess gifts, teacher appreciation, or just to brighten someone’s day.
But the fun doesn’t stop there! While the base recipe for these Pumpkin Cheesecake Truffles is spectacular on its own, I encourage you to unleash your creativity and experiment with variations to truly make them your own. For a different visual and flavor profile, consider coating them in white chocolate for a striking contrast, perhaps drizzled with a thin line of melted dark chocolate for an artistic flourish. Or, for those who adore a classic autumnal spice, try rolling a batch in a mixture of cinnamon sugar after they’ve set slightly but before the chocolate fully hardens – it adds a delightful textural crunch and an extra burst of warmth. You could also experiment with the spices in the cheesecake filling itself. A pinch more ginger, a whisper of ground cloves, or a touch of allspice can subtly shift the flavor profile, allowing you to tailor them precisely to your preference. Another wonderful idea is to press crushed pecans or walnuts onto the wet chocolate coating for added nuttiness and crunch. For a truly decadent twist, a tiny sprinkle of flaky sea salt on top of the chocolate before it sets can enhance all the sweet flavors, creating a gourmet experience that rivals any confectionery shop. If you’re feeling extra adventurous, you could even try incorporating a tiny drop of a high-quality rum or bourbon extract into the pumpkin mixture for an adult-friendly version, adding another layer of complexity to these already amazing treats. Don’t limit yourself to just truffles either; the cheesecake mixture could be pressed into a small square pan, chilled, and then cut into bars, coated, and served like a delicious no-bake fudge, offering another delightful presentation option.
Seriously, I cannot recommend this recipe enough. It’s a game-changer. Take the leap, gather your ingredients, and devote a little time to creating these unforgettable bites. You’ll be so glad you did. There’s something incredibly satisfying about making something so delicious from scratch, and the reward of biting into one of these perfectly crafted treats is absolutely worth every moment. Once you’ve made them, I would absolutely love to hear about your experience! Did you stick to the original recipe, or did you try one of the variations? What was your favorite part of the process, or the most surprising flavor note? Please don’t hesitate to share your thoughts, your tips, or even photos of your beautiful creations. Your feedback not only brings me joy but also helps inspire others in our wonderful cooking community. Happy baking, and get ready to fall in love with your new favorite fall dessert!
Pumpkin Cheesecake Truffles
Easy, no-bake Pumpkin Cheesecake Truffles, combining creamy cheesecake with autumn pumpkin spice flavors in a convenient, bite-sized dessert, perfect for fall indulgences.
Ingredients
-
4 ounces cream cheese, softened
-
½ cup canned pumpkin puree
-
1 (14-ounce) can sweetened condensed milk
-
½ cup graham cracker crumbs
-
⅓ cup white chocolate chips
Instructions
-
Step 1
In a large bowl, beat softened cream cheese until smooth. Add pumpkin puree and sweetened condensed milk; mix until fully combined. Stir in graham cracker crumbs until well incorporated. -
Step 2
Cover the mixture and refrigerate for at least 2-3 hours, or until firm enough to roll. -
Step 3
Scoop the chilled mixture into 1-inch balls and roll them gently between your palms to form smooth spheres. Place them on a parchment-lined baking sheet. -
Step 4
Freeze the rolled truffles for 30-60 minutes until they are very firm. -
Step 5
Melt the white chocolate chips in a microwave-safe bowl (stirring every 30 seconds) or using a double boiler until smooth and completely melted. -
Step 6
Dip each frozen truffle into the melted white chocolate, ensuring it’s fully coated. Gently tap off any excess chocolate. Place the coated truffles back onto the parchment-lined baking sheet. Refrigerate for at least 30 minutes, or until the chocolate coating is completely set. Store finished truffles in an airtight container in the refrigerator.
Important Information
Nutrition Facts (Per Serving)
It is important to consider this information as approximate and not to use it as definitive health advice.
Allergy Information
Please check ingredients for potential allergens and consult a health professional if in doubt.
Leave a Comment