
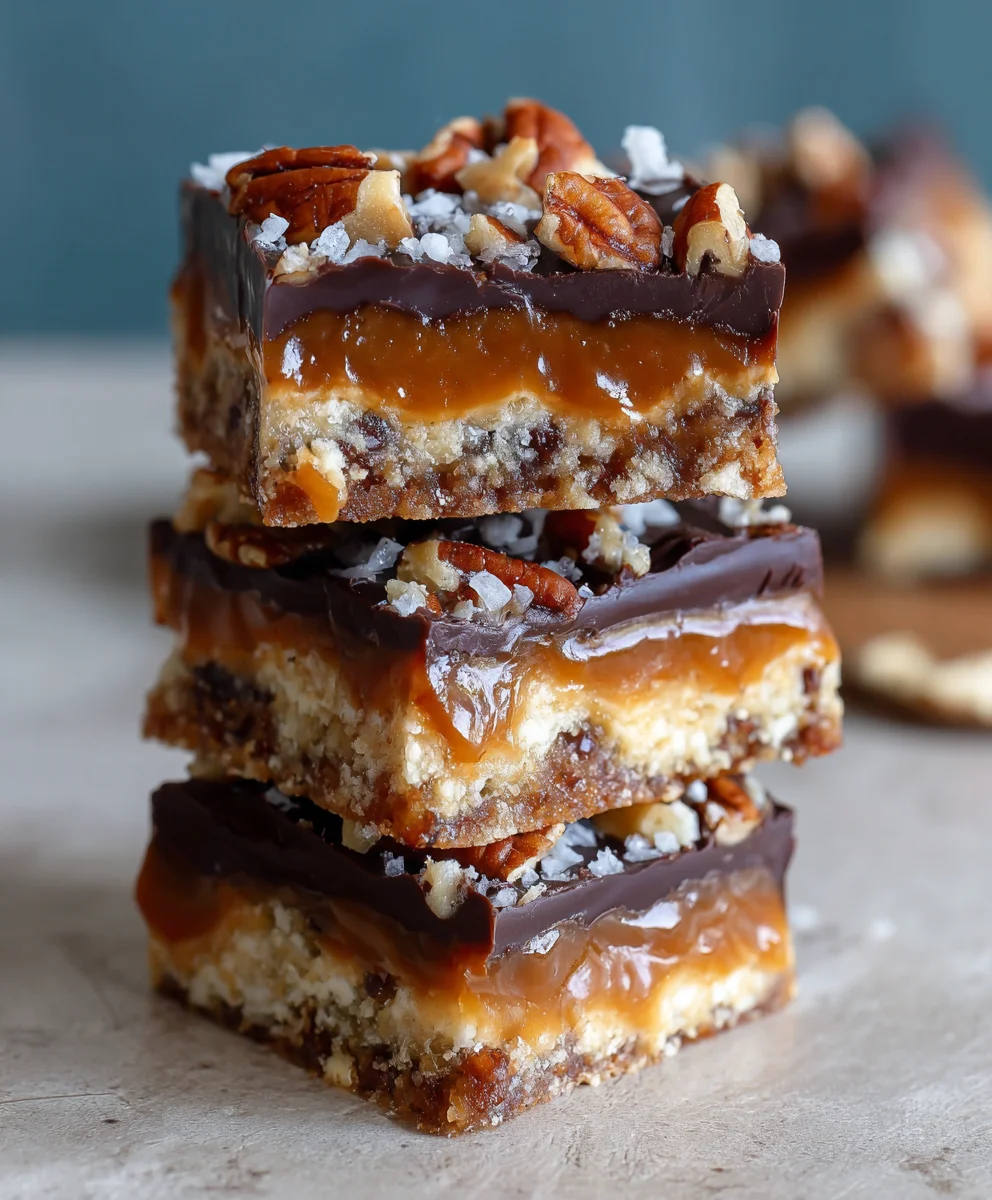
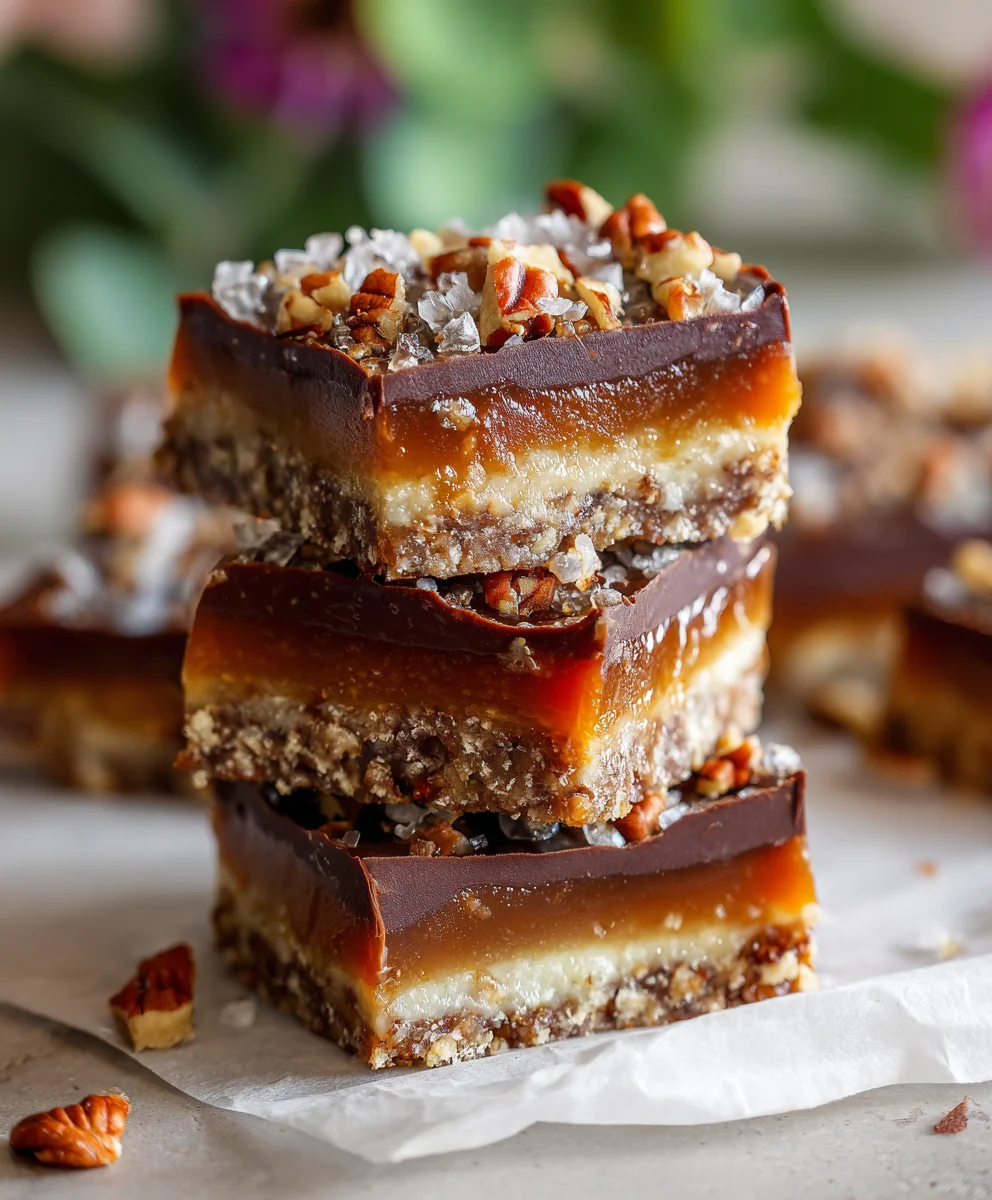
Easy Turtle Bars are a delightful culinary creation that truly embodies the magic of classic confectionery in a conveniently shareable form. Imagine biting into a harmonious symphony of flavors and textures: a buttery, golden shortbread crust providing the perfect foundation, generously layered with rich, chewy caramel, and studded with crunchy toasted pecans. All of this is then crowned with a smooth, luxurious blanket of melted chocolate. It’s an irresistible combination that has captivated dessert lovers for generations, taking inspiration from the beloved “turtle” candies – those iconic clusters of pecans, caramel, and chocolate named for their distinct shell-like appearance.
I find that people absolutely adore these bars not only for their decadent taste profile – that perfect balance of sweet, salty, and nutty – but also for their incredibly satisfying interplay of textures, from the crispness of the pecans to the chewiness of the caramel and the tender crust. But perhaps the most compelling reason to fall in love with this dessert is the promise of its simplicity. This recipe for Easy Turtle Bars delivers all that gourmet appeal with surprisingly little effort, making it an ideal choice for busy hosts, impromptu gatherings, or simply treating yourself to something truly special without spending hours in the kitchen. Get ready to experience pure dessert bliss!

Ingredients:
-
For the Buttery Shortbread Crust:
- 2 cups (240g) all-purpose flour: I always use unbleached for the best flavor and texture.
- ½ cup (100g) granulated sugar: Just enough to give our crust a lovely sweetness without overpowering it.
- ½ teaspoon salt: A little touch to enhance all the other flavors.
- 1 cup (226g) unsalted butter: This is two sticks, folks! Make sure it’s very cold and cut into small cubes. This is crucial for a tender, flaky crust.
-
For the Silky Caramel Filling:
- 1 cup (226g) unsalted butter: Yes, another two sticks! This helps create that rich, decadent caramel.
- 1 cup (200g) light brown sugar: Packed tightly, please! This gives our caramel its signature chewiness and depth.
- ½ cup (120ml) heavy cream: The secret to a smooth, luscious caramel.
- 1 teaspoon pure vanilla extract: A splash of warmth and aroma to finish it off.
- ¼ teaspoon salt: Balances the sweetness beautifully and really makes the caramel pop.
-
For the Decadent Topping:
- 1 ½ cups (about 170g) pecan halves: Fresh and fragrant pecans are a must for authentic Easy Turtle Bars!
- 1 ½ cups (about 250g) semi-sweet chocolate chips: You can use dark chocolate chips too if you prefer a less sweet bar. Good quality chocolate makes a difference here.
Getting Started: Gather Your Tools for the Best Easy Turtle Bars
Before we dive into creating these irresistible Easy Turtle Bars, let’s make sure we have all our equipment ready. This makes the entire process so much smoother and more enjoyable. You’ll need a 9×13-inch baking pan, preferably a light-colored metal one for even baking. I always line mine with parchment paper, leaving an overhang on the sides. This little trick makes lifting the finished bars out of the pan an absolute breeze, ensuring clean edges and no sticking. You’ll also want a large mixing bowl for the crust, a medium saucepan (heavy-bottomed is best for caramel!), a rubber spatula or wooden spoon, a whisk, and a cooling rack. A sharp knife is essential for cutting, and I sometimes keep a small bowl of hot water nearby to clean the knife between cuts. Having everything prepped before you start truly sets you up for success with these delightful Easy Turtle Bars!
Phase 1: Crafting the Perfect Shortbread Crust for Your Easy Turtle Bars
- Preheat and Prepare: First things first, let’s get our oven ready. Preheat your oven to 350°F (175°C). While that’s heating up, grab your trusty 9×13-inch baking pan. Line it completely with parchment paper, making sure to leave an overhang on two opposite sides. This “sling” is your best friend when it comes to easily lifting the baked bars out of the pan later on. A little bit of non-stick spray under the parchment can help hold it in place if it’s being fussy. This simple prep step is vital for your Easy Turtle Bars.
- Combine Dry Ingredients: In a large mixing bowl, measure out your 2 cups of all-purpose flour, ½ cup of granulated sugar, and ½ teaspoon of salt. Give them a good whisk together. This ensures all the dry ingredients are evenly distributed, so you don’t end up with pockets of just flour or salt in your crust. I like to use a balloon whisk for this, it’s quick and effective.
- Cut in the Cold Butter: Now for the magic! Add your 1 cup (two sticks) of very cold unsalted butter, cut into small cubes, to the dry mixture. You can use a pastry blender, two knives, or even your fingertips for this step. The key here is to work quickly so the butter doesn’t get too warm. You want to cut the butter into the flour mixture until it resembles coarse crumbs, almost like wet sand, with some pea-sized pieces of butter still visible. These tiny pieces of butter are what will create a wonderfully tender and flaky crust as they melt and create steam during baking. This is what makes the base of our Easy Turtle Bars so delicious!
- Press into the Pan: Once your butter and flour mixture has reached that perfect crumbly consistency, gently press it evenly into the bottom of your prepared 9×13-inch baking pan. I like to start by spreading it loosely and then use the bottom of a flat glass or my clean hands to press it down firmly and uniformly across the entire base. Make sure it’s packed tightly and reaches all the corners. A dense crust will hold up better to the caramel and chocolate topping.
- Pre-Bake the Crust: Pop the pan into your preheated oven and bake for 18-22 minutes, or until the edges are lightly golden brown and the center looks set. This pre-baking step ensures that your shortbread crust is perfectly cooked through and maintains its crispness even after the caramel is added. Once baked, remove the pan from the oven and place it on a wire rack to cool slightly while you prepare the caramel. You want it to still be warm when the caramel goes on, but not scorching hot. This initial bake is foundational for great Easy Turtle Bars.
Phase 2: Whipping Up the Irresistible Caramel Filling
- Melt the Butter: While your crust is cooling down a bit, let’s get started on the star of the show: the rich, chewy caramel. In a medium, heavy-bottomed saucepan (a heavy bottom helps prevent scorching!), melt 1 cup (two sticks) of unsalted butter over medium heat. Keep a close eye on it, we just want it melted, not browned.
- Add Brown Sugar and Cream: Once the butter is fully melted, stir in the 1 cup of packed light brown sugar and ½ cup of heavy cream. Give everything a good stir with a rubber spatula or a wooden spoon until it’s well combined and the sugar starts to dissolve.
- Bring to a Gentle Boil: Increase the heat slightly to medium-high and bring the mixture to a gentle boil. It’s important to stir constantly during this phase to prevent the sugar from sticking to the bottom of the pan and burning. We’re looking for a smooth, bubbling consistency.
- Simmer and Thicken: Once it reaches a boil, reduce the heat to medium-low and continue to boil gently for 5-7 minutes, stirring constantly. This simmering process allows the caramel to thicken and develop its deep, rich flavor. You’ll notice it starts to take on a more golden hue and becomes noticeably thicker as you stir. For those who like precision, you can use a candy thermometer; it should reach 235-240°F (113-116°C), which is the soft-ball stage. However, you can absolutely rely on visual cues for these Easy Turtle Bars – just look for that beautiful golden color and a thick, syrupy consistency that coats the back of your spoon.
- Finish with Vanilla and Salt: Once your caramel has thickened to perfection, remove the saucepan from the heat. Stir in the 1 teaspoon of pure vanilla extract and ¼ teaspoon of salt. The vanilla adds a wonderful aromatic depth, while the salt perfectly balances the sweetness, enhancing that classic turtle flavor we all love. Give it a final stir until everything is well incorporated and wonderfully fragrant. This rich, warm caramel is the gooey heart of our Easy Turtle Bars.
Phase 3: Assembling Your Easy Turtle Bars
- Scatter the Pecans: Now that your pre-baked crust is slightly warm and your caramel is ready, it’s time to bring it all together! Evenly sprinkle your 1 ½ cups of pecan halves over the warm shortbread crust in the pan. Don’t be shy here; make sure they are well distributed across the entire surface. These crunchy pecans are absolutely essential for that authentic turtle bar experience.
- Pour the Luscious Caramel: Carefully and slowly pour the warm caramel filling over the pecans and crust. Use a spatula to spread it gently and evenly, ensuring that every pecan gets a generous coating of that golden goodness. The warmth of the caramel will help it settle beautifully into the nooks and crannies of the pecans and crust, creating a seamless layer. Try to get it as uniform as possible for consistent bars.
- Sprinkle the Chocolate Chips: Immediately after pouring the caramel, sprinkle your 1 ½ cups of semi-sweet chocolate chips evenly over the hot caramel layer. The residual heat from the caramel will begin to melt the chocolate chips almost instantly. This is part of the magic of these Easy Turtle Bars!
- Optional Chocolate Swirl: If you desire a beautifully marbled look, wait about 5 minutes for the chocolate chips to soften fully on the hot caramel. Then, using an offset spatula or the back of a spoon, gently spread the softened chocolate over the caramel layer, creating swirls or an even coating, whatever your heart desires. This step not only looks beautiful but ensures every bite has that perfect balance of caramel and chocolate.
Phase 4: Baking and Cooling for Ultimate Easy Turtle Bar Perfection
- Final Bake: Carefully return your assembled Easy Turtle Bars to the oven, which should still be set at 350°F (175°C). Bake for an additional 15-20 minutes. During this time, the caramel will set further, the pecans will toast a bit more, and the chocolate will meld perfectly into the layers. You’ll know they’re done when the caramel is bubbly around the edges and appears set in the center. The chocolate should be melted and glossy. Keep an eye on them, as ovens can vary.
- Cool Completely at Room Temperature: This step is perhaps the most crucial for perfect Easy Turtle Bars! Once baked, remove the pan from the oven and place it on a wire rack. It is absolutely essential to let the bars cool completely at room temperature for at least 2-3 hours. During this time, the caramel will continue to set and firm up. Resist the urge to cut into them while they are still warm – you’ll end up with a delicious, but very messy, puddle of caramel. Patience is a virtue here!
- Chill for Clean Cuts: For the cleanest, most precise cuts, I highly recommend chilling the completely cooled bars in the refrigerator for an additional 1-2 hours. This firming-up period makes them much easier to slice without any sticky disasters, ensuring each Easy Turtle Bar looks as good as it tastes. You can even pop them into the freezer for 30 minutes if you’re in a hurry, but keep an eye on them so they don’t freeze solid.
Phase 5: Finishing Touches and Storage for Your Easy Turtle Bars
- Lift and Prepare for Cutting: Once your Easy Turtle Bars are thoroughly chilled and firm, use the parchment paper overhangs as a sling to carefully lift the entire slab out of the baking pan and onto a clean cutting board. This makes cutting so much easier and prevents scratching your pan.
- Slice with Precision: For neat, professional-looking bars, use a large, sharp chef’s knife. Before each cut, I like to run my knife under hot water and then wipe it dry. This warms the blade slightly, allowing it to glide through the caramel and chocolate without dragging or sticking. Cut the slab into your desired size – typically 24 squares (about 2×2 inches) or smaller rectangles. Wipe your knife clean after every cut for the cleanest edges. This attention to detail will make your Easy Turtle Bars truly shine!
- Storage: These delicious Easy Turtle Bars are best stored in an airtight container at room temperature for up to 5 days, or in the refrigerator for up to 1 week. If storing in the refrigerator, I recommend bringing them to room temperature for about 15-20 minutes before serving, as the caramel will soften slightly and become wonderfully chewy again. They also freeze beautifully for up to 3 months; just thaw them at room temperature before enjoying.
Why You’ll Fall in Love with These Easy Turtle Bars
These Easy Turtle Bars aren’t just a dessert; they’re an experience! Every bite delivers a symphony of textures and flavors that truly captivates. You’ll adore the buttery, tender shortbread crust that forms the perfect foundation, providing a delightful crispness to contrast the gooey richness. Then comes the star: a homemade, silky-smooth caramel that’s both sweet and perfectly balanced with a hint of salt. This isn’t your average store-bought caramel; it’s luscious, chewy, and utterly irresistible. Nestled within this golden caramel are crunchy pecan halves, adding that essential nutty bite and classic turtle bar authenticity. Finally, a generous layer of melted semi-sweet chocolate completes the ensemble, providing a decadent finish that ties all the flavors together. What makes these “Easy Turtle Bars” truly special is their straightforward process despite their gourmet appeal. They look impressive, taste incredible, and are surprisingly simple to make, making them ideal for holiday gifting, potlucks, or simply treating yourself to something truly extraordinary. They’re a guaranteed crowd-pleaser that will have everyone asking for the recipe!
Pro Tips for Perfect Easy Turtle Bars Every Time
To ensure your Easy Turtle Bars turn out absolutely perfect, every single time, I’ve gathered a few extra tips from my kitchen. First, use high-quality ingredients. Since there are so few components, the quality of your butter, chocolate, and pecans truly shines through. Opt for pure vanilla extract and fresh pecans for the best flavor. Second, when making the shortbread crust, remember that cold butter is your best friend. It helps create a tender, flaky crust rather than a tough one. If your kitchen is warm, you can even pop the flour-butter mixture into the freezer for 10-15 minutes before pressing it into the pan. Third, for the caramel, don’t rush the boiling process. Stir constantly and let it simmer for the full recommended time to ensure it thickens properly and achieves that perfect chewy texture. If it’s undercooked, your bars will be too gooey; if overcooked, it can become too hard. A good rule of thumb is that it should coat the back of a spoon. Fourth, patience with cooling is paramount for these Easy Turtle Bars. I cannot stress this enough! Allowing the bars to cool completely at room temperature, followed by a good chill in the refrigerator, is what guarantees clean, precise slices and prevents the caramel from oozing out. Finally, for those picture-perfect slices, always use a sharp knife and wipe it clean between each cut. A little bit of extra effort in these areas will elevate your Easy Turtle Bars from good to absolutely glorious!
Conclusion:
So, there you have it – my go-to recipe for a dessert that consistently wows. These aren’t just any ordinary sweet treat; they are a symphony of flavors and textures, meticulously balanced to deliver pure indulgence in every single bite. We’re talking about a golden, buttery shortbread crust that provides the perfect foundation, a delightful crunch that gives way to a decadent, gooey caramel layer, generously studded with toasted pecans, all crowned with a luscious blanket of melted chocolate. It’s a classic combination, yes, but executed with such simplicity and incredible flavor that it truly stands out. What makes these particular treats truly exceptional, and frankly, a game-changer for anyone who loves baking but perhaps doesn’t always have hours to spend in the kitchen, is just how effortless the entire process is. I often find myself reaching for this recipe when I need something impressive for a potluck, a family gathering, or even just a cozy night in, because I know it delivers on both taste and ease. This is precisely why I call them my ultimate Easy Turtle Bars.
They represent the perfect marriage of convenience and gourmet taste, proving that you don’t need a culinary degree to create something truly spectacular. Imagine the joy of pulling a pan of these beauties from the oven, the aroma of toasted nuts and rich chocolate filling your home, promising warmth and comfort. The golden-brown edges of the crust, the shimmering caramel, the perfectly melted chocolate – it’s a visual feast even before the first bite. And the best part? They are incredibly forgiving. Even if you’re a novice baker, you’ll find the steps straightforward and the results consistently fantastic. There’s a certain magic in preparing a dessert that looks like it took hours of painstaking effort, yet in reality, came together with minimal fuss. These bars are not just a dessert; they are an experience, a moment of pure, unadulterated bliss that lingers long after the last crumb is gone. They satisfy that deep craving for something rich, sweet, and utterly comforting, without overwhelming your palate with excessive sweetness. The saltiness from the caramel or butter balances the richness beautifully, making each bite a harmonious blend of sweet and savory notes. For anyone seeking a reliable, crowd-pleasing dessert that never disappoints, this recipe is, without a doubt, a shining star.
Now, while these bars are absolutely divine just as they are, straight from the pan (once cooled, of course!), I have a few suggestions to elevate your experience or put your own spin on them.
Creative Ways to Enjoy Your Turtle Bars:
For a truly indulgent dessert, try serving a warm square of these bars with a scoop of premium vanilla bean ice cream. The cold, creamy ice cream melting into the warm, gooey bar is simply heavenly. A drizzle of extra caramel sauce or a sprinkle of sea salt flakes over the top can also add an extra layer of gourmet appeal. If you’re feeling a bit adventurous, consider chopping up some leftover bars and folding them into homemade ice cream for a unique, turtle-inspired frozen treat. They also make fantastic edible gifts; simply wrap individual bars in parchment paper and tie with a pretty ribbon – your friends and family will adore them!
Variations to Explore:
Don’t be afraid to experiment with the type of nuts you use. While pecans are traditional, walnuts or a mix of nuts can be equally delicious. For a slightly different flavor profile, you could try adding a hint of espresso powder to your chocolate layer to deepen its richness, or a touch of cinnamon to the shortbread crust for a warm, spicy note. Some people enjoy a mix of milk and dark chocolate chips for a nuanced chocolate flavor, or even a sprinkle of white chocolate for visual contrast and an extra layer of sweetness. If you want to make them even more decadent, a sprinkle of flaky sea salt on top of the chocolate layer just after it sets adds a wonderful contrast that cuts through the sweetness beautifully. You could even swap out the caramel layer for a homemade dulce de leche for a slightly different, but equally delicious, depth of flavor. The beauty of this recipe lies in its adaptability, allowing you to tailor it to your specific tastes or whatever ingredients you have on hand.
I genuinely hope you’ll give this recipe a try. It’s more than just a recipe; it’s an invitation to create something truly special and share it with those you love. There’s immense satisfaction in baking a homemade treat, and these bars deliver that satisfaction in spades. Don’t be intimidated; the process is designed to be enjoyable and rewarding. I promise you, the smiles and compliments you’ll receive will make every minute you spent in the kitchen absolutely worth it. So, preheat your oven, gather your ingredients, and prepare to embark on a delightful baking adventure. And once you’ve experienced the sheer deliciousness of these bars, I would absolutely love to hear from you! Please come back and share your experiences, your successes, and even your own creative twists in the comments section below. What did you love most about them? Did you try any of the variations? Your feedback and shared joy are what make this baking community so wonderful. Happy baking, my friends, and get ready to fall in love with your new favorite dessert!
Quick & Easy Turtle Bars: Chewy Chocolate Caramel Pecan Dessert
Easy Turtle Bars are a delightful dessert featuring a buttery shortbread crust, rich chewy caramel, crunchy toasted pecans, and a smooth layer of melted chocolate. This recipe delivers gourmet appeal with surprisingly little effort, perfect for any occasion.
Ingredients
-
2 cups (240g) all-purpose flour
-
½ cup (100g) granulated sugar
-
½ teaspoon salt
-
1 cup (226g) cold unsalted butter, cubed
-
1 cup (226g) unsalted butter
-
1 cup (200g) packed light brown sugar
-
½ cup (120ml) heavy cream
-
1 teaspoon pure vanilla extract
-
¼ teaspoon salt
-
1 ½ cups (about 170g) pecan halves
-
1 ½ cups (about 250g) semi-sweet chocolate chips
Instructions
-
Step 1
Preheat oven to 350°F (175°C). Line a 9×13-inch baking pan with parchment paper, leaving an overhang on two sides. In a large bowl, whisk together flour, granulated sugar, and ½ teaspoon salt. Cut in 1 cup cold, cubed unsalted butter until mixture resembles coarse crumbs with some pea-sized pieces. Press evenly and firmly into the bottom of the prepared pan. -
Step 2
Bake crust for 18-22 minutes, or until edges are lightly golden. Remove from oven and let cool slightly on a wire rack while preparing caramel. -
Step 3
In a medium, heavy-bottomed saucepan, melt 1 cup unsalted butter over medium heat. Stir in light brown sugar and heavy cream until well combined. Bring mixture to a gentle boil over medium-high heat, stirring constantly. Reduce heat to medium-low and simmer gently for 5-7 minutes, stirring constantly, until caramel thickens and turns golden (235-240°F / soft-ball stage on a candy thermometer). Remove from heat and stir in vanilla extract and ¼ teaspoon salt. -
Step 4
Evenly sprinkle pecan halves over the warm, pre-baked shortbread crust. Carefully pour the warm caramel filling over the pecans, spreading gently and evenly. Immediately sprinkle semi-sweet chocolate chips evenly over the hot caramel layer. (Optional: After 5 minutes, gently spread softened chocolate over caramel for a swirl or even coating). -
Step 5
Return the pan to the 350°F (175°C) oven and bake for an additional 15-20 minutes, or until the caramel is bubbly around the edges and appears set. Remove from oven. -
Step 6
Place the pan on a wire rack and let cool completely at room temperature for at least 2-3 hours until caramel is firm. For cleanest cuts, chill in the refrigerator for an additional 1-2 hours (or freezer for 30 minutes). -
Step 7
Once thoroughly chilled and firm, use the parchment paper overhangs to lift the entire slab onto a cutting board. Using a large, sharp knife (wiping clean between cuts), slice into 24 squares or desired size. Store in an airtight container at room temperature for up to 5 days, or in the refrigerator for up to 1 week. Freeze up to 3 months.
Important Information
Nutrition Facts (Per Serving)
It is important to consider this information as approximate and not to use it as definitive health advice.
Allergy Information
Please check ingredients for potential allergens and consult a health professional if in doubt.


Leave a Comment