
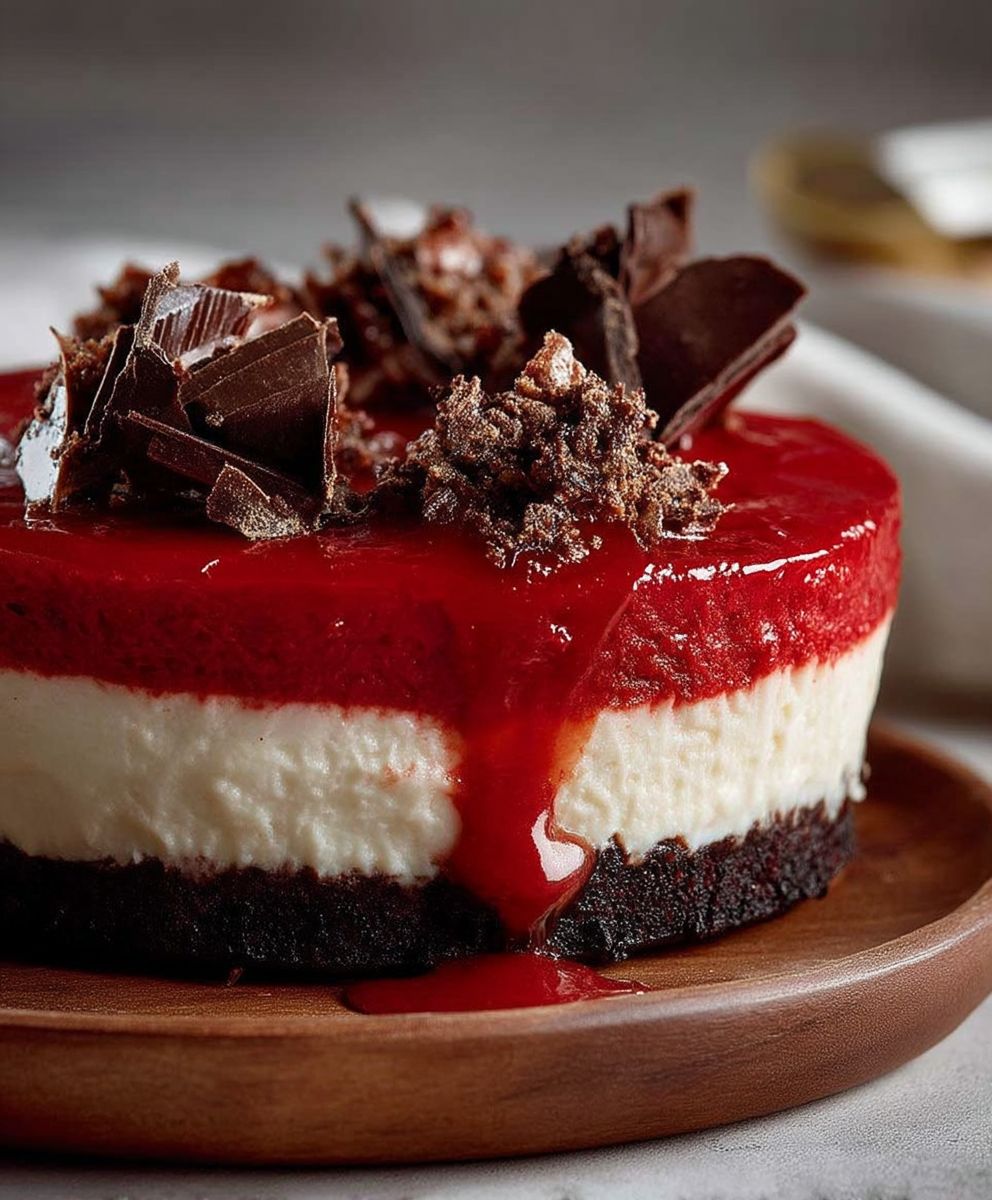
Red Velvet Cheesecake: just the name alone conjures images of decadent indulgence, doesn’t it? Imagine sinking your fork into a creamy, dreamy dessert that perfectly marries the tangy richness of cheesecake with the subtle cocoa notes and vibrant color of red velvet cake. This isn’t just a dessert; it’s an experience!
While the exact origins of red velvet cake are debated, its popularity soared in the mid-20th century, often associated with upscale hotels and restaurants. The distinctive red hue, originally achieved through a chemical reaction between cocoa and acidic ingredients, became a symbol of luxury and sophistication. Now, we’re taking that classic flavor profile and elevating it to a whole new level by combining it with the universally loved cheesecake.
What makes red velvet cheesecake so irresistible? It’s the perfect balance of flavors and textures. The smooth, velvety cheesecake filling contrasts beautifully with the slightly tangy red velvet base, creating a symphony of sensations in every bite. Plus, let’s be honest, the striking visual appeal of the crimson layers against the creamy white is simply stunning. Whether you’re looking to impress guests at a dinner party or simply treat yourself to something special, this recipe is guaranteed to be a showstopper. Get ready to bake a dessert that’s as beautiful as it is delicious!

Ingredients:
- For the Red Velvet Cake Layers:
- 2 ½ cups all-purpose flour
- 2 cups granulated sugar
- 1 teaspoon baking soda
- 1 teaspoon baking powder
- 1 teaspoon salt
- 1 cup buttermilk
- 1 cup vegetable oil
- 2 large eggs
- 2 tablespoons unsweetened cocoa powder
- 1 ounce red food coloring
- 1 teaspoon white vinegar
- 1 teaspoon vanilla extract
- For the Cheesecake Layer:
- 3 (8 ounce) packages cream cheese, softened
- 1 ½ cups granulated sugar
- 3 large eggs
- 1 teaspoon vanilla extract
- ½ cup sour cream
- For the Cream Cheese Frosting:
- 1 cup (2 sticks) unsalted butter, softened
- 8 ounces cream cheese, softened
- 4 cups powdered sugar
- 1 teaspoon vanilla extract
- Pinch of salt
Preparing the Red Velvet Cake Layers:
- Preheat and Prepare Pans: First things first, preheat your oven to 350°F (175°C). Grease and flour two 9-inch round cake pans. You can also line the bottoms with parchment paper rounds for extra insurance against sticking. I find this makes removing the cakes a breeze!
- Combine Dry Ingredients: In a large bowl, whisk together the flour, sugar, baking soda, baking powder, and salt. Make sure everything is evenly distributed. This ensures a consistent rise and texture.
- Combine Wet Ingredients: In a separate bowl, whisk together the buttermilk, oil, eggs, cocoa powder, red food coloring, vinegar, and vanilla extract. Don’t be alarmed by the amount of red food coloring; it’s what gives red velvet its signature hue!
- Combine Wet and Dry: Gradually add the wet ingredients to the dry ingredients, mixing on low speed until just combined. Be careful not to overmix! Overmixing can lead to a tough cake.
- Divide and Bake: Divide the batter evenly between the prepared cake pans. Bake for 25-30 minutes, or until a toothpick inserted into the center comes out clean. Keep a close eye on them; baking times can vary depending on your oven.
- Cool Completely: Let the cakes cool in the pans for 10 minutes before inverting them onto a wire rack to cool completely. This prevents them from sticking and allows them to cool evenly.
Preparing the Cheesecake Layer:
- Preheat and Prepare Pan: Preheat your oven to 325°F (160°C). Wrap the bottom of a 9-inch springform pan tightly with aluminum foil. This will prevent water from seeping in during the water bath.
- Cream Cheese and Sugar: In a large bowl, beat the softened cream cheese and sugar together until smooth and creamy. It’s crucial that the cream cheese is softened to avoid lumps in your cheesecake.
- Add Eggs: Beat in the eggs one at a time, mixing well after each addition. Again, be careful not to overmix.
- Add Vanilla and Sour Cream: Stir in the vanilla extract and sour cream until just combined. The sour cream adds a lovely tang and helps to create a smooth texture.
- Pour into Pan: Pour the cheesecake batter into the prepared springform pan.
- Water Bath: Place the springform pan inside a larger roasting pan. Carefully pour hot water into the roasting pan until it reaches about halfway up the sides of the springform pan. The water bath helps to ensure even baking and prevents the cheesecake from cracking.
- Bake: Bake for 55-70 minutes, or until the edges are set but the center still has a slight jiggle. Don’t worry if it seems a little underdone; it will continue to set as it cools.
- Cool Gradually: Turn off the oven and let the cheesecake sit in the oven with the door slightly ajar for 1 hour. This gradual cooling process helps to prevent cracking.
- Chill: Remove the cheesecake from the water bath and let it cool completely on a wire rack. Then, cover it with plastic wrap and refrigerate for at least 4 hours, or preferably overnight. This allows the cheesecake to fully set and develop its flavor.
Assembling the Red Velvet Cheesecake:
- Level the Cake Layers: If your cake layers are uneven, use a serrated knife to level them. This will ensure a flat and even cheesecake.
- Place First Cake Layer: Place one red velvet cake layer on a serving plate or cake stand.
- Add Cheesecake Layer: Carefully remove the cheesecake from the springform pan. You can run a thin knife around the edges to loosen it if needed. Place the cheesecake layer on top of the red velvet cake layer.
- Place Second Cake Layer: Place the second red velvet cake layer on top of the cheesecake layer.
Preparing the Cream Cheese Frosting:
- Cream Butter and Cream Cheese: In a large bowl, beat the softened butter and cream cheese together until smooth and creamy. Make sure both are at room temperature for the best results.
- Add Powdered Sugar: Gradually add the powdered sugar, beating on low speed until combined. Then, increase the speed to medium and beat until light and fluffy.
- Add Vanilla and Salt: Stir in the vanilla extract and salt.
Frosting the Red Velvet Cheesecake:
- Frost the Cake: Generously frost the top and sides of the red velvet cheesecake with the cream cheese frosting. You can use an offset spatula for a smooth finish or create swirls for a more rustic look.
- Garnish (Optional): If desired, garnish the cheesecake with red velvet cake crumbs, chocolate shavings, or fresh berries. I sometimes like to reserve a little bit of the cake scraps from leveling the layers and crumble them on top.
- Chill (Optional): Chill the frosted cheesecake for at least 30 minutes before serving. This will help the frosting to set and make it easier to slice.
- Serve and Enjoy: Slice and serve your delicious red velvet cheesecake! It’s best enjoyed with a cup of coffee or tea.
Conclusion:
Okay, friends, let’s be honest: you’ve scrolled this far because something about this Red Velvet Cheesecake recipe has captivated you. And trust me, it should! This isn’t just another dessert; it’s a showstopper, a conversation starter, and a guaranteed crowd-pleaser. The rich, slightly tangy red velvet cake base perfectly complements the creamy, decadent cheesecake filling, creating a symphony of flavors and textures that will leave you wanting more. It’s the perfect marriage of two beloved desserts, resulting in something truly extraordinary.
Why is this a must-try? Because it’s surprisingly easy to make! Don’t let the impressive appearance fool you. I’ve broken down each step to be as clear and straightforward as possible, so even if you’re a novice baker, you can confidently create this masterpiece. Plus, the wow factor is off the charts! Imagine presenting this gorgeous cake at your next gathering the gasps of admiration will be worth every minute spent in the kitchen.
But the best part? The taste! The subtle cocoa notes of the red velvet, the creamy tang of the cheesecake, and the smooth, velvety texture all come together in perfect harmony. It’s a dessert that’s both comforting and sophisticated, familiar and exciting. Its a flavor explosion that will dance on your taste buds and leave you utterly satisfied.
Now, let’s talk serving suggestions and variations. While this Red Velvet Cheesecake is divine on its own, a few simple additions can elevate it even further. A dollop of freshly whipped cream is always a welcome touch, adding a light and airy counterpoint to the richness of the cake. A drizzle of chocolate ganache can add an extra layer of decadence for the true chocolate lovers out there. Or, for a festive touch, sprinkle some red velvet cake crumbs on top for added texture and visual appeal.
Feeling adventurous? Try these variations! For a more intense red velvet flavor, add a tablespoon of cocoa powder to the cheesecake filling. If you’re a fan of cream cheese frosting, consider swirling a layer of it on top of the cheesecake before baking. And for a truly decadent treat, add a layer of chocolate chips to the red velvet cake base before pouring in the cheesecake filling. The possibilities are endless!
I truly believe this Red Velvet Cheesecake recipe is something special. It’s a dessert that’s both beautiful and delicious, easy to make and guaranteed to impress. So, what are you waiting for? Gather your ingredients, preheat your oven, and get ready to embark on a baking adventure. I promise you won’t regret it!
And most importantly, I want to hear about your experience! Did you try the recipe? Did you make any variations? What did your friends and family think? Share your photos and stories in the comments below. I can’t wait to see your creations and hear all about your baking triumphs. Happy baking!
I’m confident that this will become a staple in your recipe collection. It’s the perfect dessert for any occasion, from birthdays and holidays to casual get-togethers and everything in between. So go ahead, give it a try, and prepare to be amazed by the magic of Red Velvet Cheesecake!
Red Velvet Cheesecake: The Ultimate Guide to Baking Perfection
Moist red velvet cake layered with creamy cheesecake and topped with tangy cream cheese frosting. The perfect dessert for any special occasion!
Ingredients
- 2 ½ cups all-purpose flour
- 2 cups granulated sugar
- 1 teaspoon baking soda
- 1 teaspoon baking powder
- 1 teaspoon salt
- 1 cup buttermilk
- 1 cup vegetable oil
- 2 large eggs
- 2 tablespoons unsweetened cocoa powder
- 1 ounce red food coloring
- 1 teaspoon white vinegar
- 1 teaspoon vanilla extract
- 3 (8 ounce) packages cream cheese, softened
- 1 ½ cups granulated sugar
- 3 large eggs
- 1 teaspoon vanilla extract
- ½ cup sour cream
- 1 cup (2 sticks) unsalted butter, softened
- 8 ounces cream cheese, softened
- 4 cups powdered sugar
- 1 teaspoon vanilla extract
- Pinch of salt
Instructions
- Preheat and Prepare Pans: Preheat your oven to 350°F (175°C). Grease and flour two 9-inch round cake pans. You can also line the bottoms with parchment paper rounds for extra insurance against sticking.
- Combine Dry Ingredients: In a large bowl, whisk together the flour, sugar, baking soda, baking powder, and salt.
- Combine Wet Ingredients: In a separate bowl, whisk together the buttermilk, oil, eggs, cocoa powder, red food coloring, vinegar, and vanilla extract.
- Combine Wet and Dry: Gradually add the wet ingredients to the dry ingredients, mixing on low speed until just combined. Be careful not to overmix!
- Divide and Bake: Divide the batter evenly between the prepared cake pans. Bake for 25-30 minutes, or until a toothpick inserted into the center comes out clean.
- Cool Completely: Let the cakes cool in the pans for 10 minutes before inverting them onto a wire rack to cool completely.
- Preheat and Prepare Pan: Preheat your oven to 325°F (160°C). Wrap the bottom of a 9-inch springform pan tightly with aluminum foil.
- Cream Cheese and Sugar: In a large bowl, beat the softened cream cheese and sugar together until smooth and creamy.
- Add Eggs: Beat in the eggs one at a time, mixing well after each addition.
- Add Vanilla and Sour Cream: Stir in the vanilla extract and sour cream until just combined.
- Pour into Pan: Pour the cheesecake batter into the prepared springform pan.
- Water Bath: Place the springform pan inside a larger roasting pan. Carefully pour hot water into the roasting pan until it reaches about halfway up the sides of the springform pan.
- Bake: Bake for 55-70 minutes, or until the edges are set but the center still has a slight jiggle.
- Cool Gradually: Turn off the oven and let the cheesecake sit in the oven with the door slightly ajar for 1 hour.
- Chill: Remove the cheesecake from the water bath and let it cool completely on a wire rack. Then, cover it with plastic wrap and refrigerate for at least 4 hours, or preferably overnight.
- Level the Cake Layers: If your cake layers are uneven, use a serrated knife to level them.
- Place First Cake Layer: Place one red velvet cake layer on a serving plate or cake stand.
- Add Cheesecake Layer: Carefully remove the cheesecake from the springform pan. You can run a thin knife around the edges to loosen it if needed. Place the cheesecake layer on top of the red velvet cake layer.
- Place Second Cake Layer: Place the second red velvet cake layer on top of the cheesecake layer.
- Cream Butter and Cream Cheese: In a large bowl, beat the softened butter and cream cheese together until smooth and creamy.
- Add Powdered Sugar: Gradually add the powdered sugar, beating on low speed until combined. Then, increase the speed to medium and beat until light and fluffy.
- Add Vanilla and Salt: Stir in the vanilla extract and salt.
- Frost the Cake: Generously frost the top and sides of the red velvet cheesecake with the cream cheese frosting. You can use an offset spatula for a smooth finish or create swirls for a more rustic look.
- Garnish (Optional): If desired, garnish the cheesecake with red velvet cake crumbs, chocolate shavings, or fresh berries.
- Chill (Optional): Chill the frosted cheesecake for at least 30 minutes before serving.
- Serve and Enjoy: Slice and serve your delicious red velvet cheesecake!
Notes
- Make sure your cream cheese and butter are properly softened for the cheesecake and frosting to avoid lumps.
- Don’t overmix the cake or cheesecake batter, as this can lead to a tough texture.
- A water bath is crucial for baking the cheesecake to prevent cracking and ensure even cooking.
- Chilling the cheesecake and frosted cake is essential for the best flavor and texture.
- For a more intense red velvet flavor, you can add a tablespoon of brewed coffee to the cake batter.
Leave a Comment