
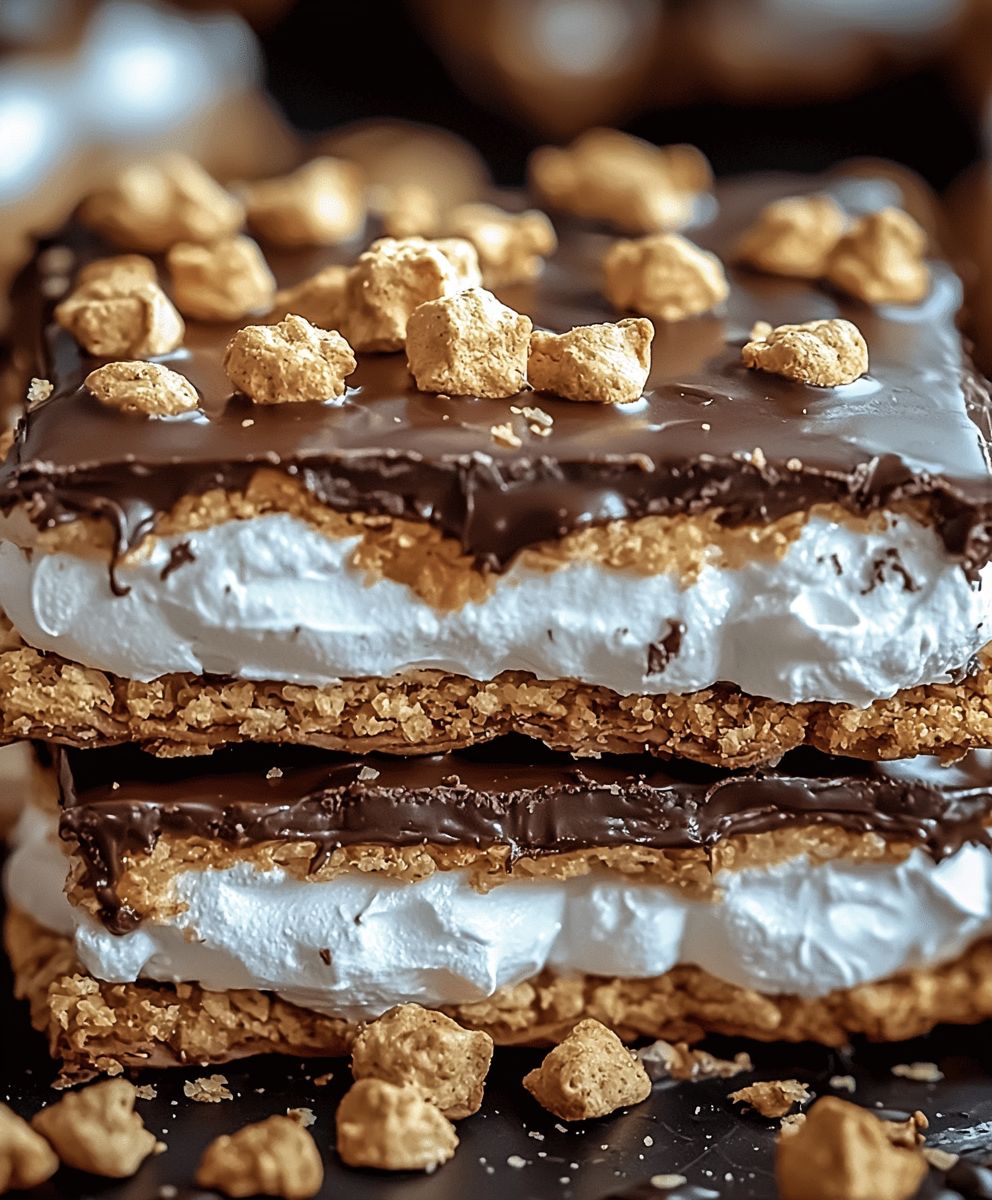
S’mores crack bars: Prepare to meet your new favorite dessert! Imagine the gooey, chocolatey, marshmallowy goodness of a classic s’more, but amplified and transformed into an addictively delicious bar. These aren’t just any dessert bars; they’re a symphony of textures and flavors that will have everyone begging for more. Trust me, one bite and you’ll understand why they’re called “crack bars” they’re simply irresistible!
While the exact origins of s’mores crack bars are shrouded in mystery (likely born from a late-night craving and a well-stocked pantry!), the inspiration is clear: the beloved s’more. S’mores themselves have a rich history, dating back to the Girl Scouts in the 1920s. This campfire treat quickly became a quintessential part of American culture, evoking memories of summer nights and shared laughter around a crackling fire.
But what makes s’mores crack bars so universally appealing? It’s the perfect combination of textures the crisp graham cracker base, the melty chocolate, and the soft, pillowy marshmallows. The taste is equally delightful, a harmonious blend of sweet, slightly salty, and undeniably comforting. Plus, they’re incredibly easy to make, requiring minimal effort and readily available ingredients. Whether you’re looking for a crowd-pleasing dessert for a party or a simple treat to satisfy your sweet tooth, these bars are guaranteed to be a hit. So, let’s get baking and create some s’mores magic!

Ingredients:
- 1 cup (2 sticks) unsalted butter, softened
- 1 cup granulated sugar
- 1 cup packed light brown sugar
- 2 large eggs
- 1 teaspoon vanilla extract
- 2 cups all-purpose flour
- 1 teaspoon baking soda
- 1/2 teaspoon salt
- 1 1/2 cups graham cracker crumbs (about 12 full graham crackers, finely crushed)
- 1 1/2 cups semi-sweet chocolate chips
- 1 1/2 cups mini marshmallows
- 1/2 cup coarsely chopped graham crackers, for topping (optional)
- Sea salt flakes, for sprinkling (optional)
Preparing the Base:
- Cream the Butter and Sugars: In a large bowl (or the bowl of your stand mixer), cream together the softened butter, granulated sugar, and brown sugar until light and fluffy. This usually takes about 3-5 minutes. Make sure to scrape down the sides of the bowl occasionally to ensure everything is evenly mixed. The mixture should be pale and airy.
- Incorporate the Eggs and Vanilla: Beat in the eggs one at a time, mixing well after each addition. Then, stir in the vanilla extract. The vanilla enhances all the other flavors, so don’t skip it!
- Combine Dry Ingredients: In a separate medium bowl, whisk together the flour, baking soda, and salt. Whisking ensures that the baking soda and salt are evenly distributed throughout the flour, which is crucial for proper leavening and flavor.
- Gradually Add Dry Ingredients to Wet Ingredients: Gradually add the dry ingredients to the wet ingredients, mixing on low speed until just combined. Be careful not to overmix, as this can lead to tough bars. Overmixing develops the gluten in the flour, resulting in a denser, chewier texture than desired.
- Stir in Graham Cracker Crumbs: Stir in the graham cracker crumbs until evenly distributed throughout the dough. The graham cracker crumbs add that signature “S’mores” flavor and texture to the base of the bars.
Assembling the S’mores Crack Bars:
- Prepare the Baking Pan: Preheat your oven to 350°F (175°C). Grease and flour a 9×13 inch baking pan. Alternatively, you can line the pan with parchment paper, leaving an overhang on the sides for easy removal. This is my preferred method, as it makes it super easy to lift the bars out of the pan after baking.
- Press Half of the Dough into the Pan: Press half of the graham cracker dough evenly into the prepared baking pan. Use your fingers or the back of a spoon to create a smooth, even layer. This forms the base of our S’mores Crack Bars.
- Sprinkle with Chocolate Chips: Sprinkle the chocolate chips evenly over the dough base. Don’t be shy with the chocolate it’s what makes these bars so decadent!
- Top with Mini Marshmallows: Spread the mini marshmallows evenly over the chocolate chips. Make sure to cover the entire surface, as the marshmallows will melt and create a gooey, delicious layer.
- Crumble Remaining Dough on Top: Crumble the remaining graham cracker dough evenly over the marshmallows. It’s okay if it’s not a perfect layer; the unevenness will add to the rustic charm of the bars.
- Optional Toppings: If desired, sprinkle the coarsely chopped graham crackers over the top for added texture and visual appeal. A sprinkle of sea salt flakes also adds a nice salty-sweet contrast.
Baking and Cooling:
- Bake the Bars: Bake in the preheated oven for 25-30 minutes, or until the top is golden brown and the marshmallows are melted and slightly toasted. Keep a close eye on them towards the end of the baking time to prevent burning.
- Cool Completely: Remove the pan from the oven and let the bars cool completely in the pan before cutting. This is crucial! If you try to cut them while they’re still warm, they’ll be too gooey and will fall apart. I usually let them cool for at least 2-3 hours, or even overnight.
- Cut and Serve: Once the bars are completely cool, cut them into squares or rectangles. Use a sharp knife and wipe it clean between cuts for neat edges.
Tips and Variations:
Ingredient Substitutions:
- Chocolate: Feel free to experiment with different types of chocolate chips. Milk chocolate, dark chocolate, or even white chocolate would all be delicious. You could also use chopped chocolate bars instead of chocolate chips.
- Marshmallows: If you don’t have mini marshmallows, you can use regular-sized marshmallows, but you’ll need to cut them into smaller pieces.
- Graham Crackers: If you can’t find graham crackers, you can use digestive biscuits or other similar crackers.
- Nuts: Add chopped nuts, such as pecans or walnuts, to the dough for added crunch and flavor.
Flavor Variations:
- Peanut Butter: Add 1/2 cup of peanut butter to the dough for a peanut butter S’mores flavor.
- Salted Caramel: Drizzle salted caramel sauce over the baked bars for an extra decadent treat.
- Espresso: Add 1 teaspoon of instant espresso powder to the dry ingredients for a mocha S’mores flavor.
- Cinnamon: Add 1/2 teaspoon of ground cinnamon to the dry ingredients for a warm, spiced flavor.
Tips for Success:
- Use Softened Butter: Make sure your butter is softened to room temperature before creaming it with the sugars. This will ensure that the mixture is light and fluffy.
- Don’t Overmix the Dough: Overmixing the dough can lead to tough bars. Mix until just combined.
- Cool Completely Before Cutting: This is the most important tip! The bars need to cool completely before you cut them, or they will be too gooey and will fall apart.
- Storage: Store the S’mores Crack Bars in an airtight container at room temperature for up to 3 days.
Making Ahead:
- Dough: The dough can be made ahead of time and stored in the refrigerator for up to 2 days. Bring to room temperature before pressing into the pan.
- Baked Bars: The baked bars can be stored in an airtight container at room temperature for up to 3 days.
Serving Suggestions:
- Warm: For an extra gooey treat, warm the bars slightly in the microwave before serving.
- With Ice Cream: Serve the bars with a scoop of vanilla ice cream for a decadent dessert.
- With Coffee: Enjoy the bars with a cup of coffee or hot chocolate for a cozy treat.
Conclusion:
So, there you have it! These S’mores Crack Bars are truly something special, and I genuinely believe they deserve a spot on your baking rotation. Why? Because they deliver that irresistible s’mores flavor we all crave, but in a form that’s incredibly easy to make and even easier to share (or not share, I won’t judge!). The combination of the buttery, salty cracker base, the gooey marshmallow center, and the rich chocolate topping is simply divine. It’s a symphony of textures and tastes that will have everyone begging for more. This isn’t just a dessert; it’s an experience, a nostalgic trip back to campfires and carefree summer nights, all wrapped up in a convenient, portable bar. But the best part? It’s so adaptable! Feel free to get creative with your toppings. While I’m a purist at heart and love the classic milk chocolate, you could easily swap it out for dark chocolate for a richer, more intense flavor. Or, how about adding a sprinkle of sea salt on top to enhance the sweetness and create a delightful salty-sweet contrast? For a truly decadent treat, drizzle some caramel sauce over the finished bars. And the serving suggestions are endless! These S’mores Crack Bars are perfect for potlucks, bake sales, or even just a cozy night in. Serve them warm with a scoop of vanilla ice cream for an extra special dessert. Or, cut them into smaller squares and package them up as adorable little gifts for friends and family. They’re also fantastic for road trips or picnics a guaranteed crowd-pleaser wherever you go. If you’re feeling adventurous, try using different types of crackers for the base. Graham crackers are the classic choice, but you could also experiment with Ritz crackers for a slightly sweeter and more buttery flavor. Or, for a gluten-free option, use your favorite gluten-free crackers. The possibilities are truly endless! I’ve poured my heart into perfecting this recipe, and I’m so excited for you to try it. I truly believe that once you make these S’mores Crack Bars, they’ll become a staple in your household. They’re that good! So, what are you waiting for? Gather your ingredients, preheat your oven, and get ready to create some magic in the kitchen. I promise you won’t regret it. And most importantly, don’t forget to have fun! Baking should be a joyful experience, so crank up your favorite tunes, put on your apron, and let your creativity flow. Once you’ve made these delectable bars, I would absolutely love to hear about your experience! Did you make any variations? Did you serve them with ice cream? Did your family devour them in minutes? Share your photos and stories in the comments below. I can’t wait to see your creations and hear all about your baking adventures. Happy baking! I hope you enjoy these as much as I do! PrintSmores Crack Bars: The Ultimate No-Bake Dessert Recipe

Gooey S’mores Crack Bars with graham cracker, chocolate, and marshmallows. Sweet, salty, and irresistible!
- Prep Time: 20 minutes
- Cook Time: 25 minutes
- Total Time: 145 minutes
- Yield: 24 bars 1x
Ingredients
- 1 cup (2 sticks) unsalted butter, softened
- 1 cup granulated sugar
- 1 cup packed light brown sugar
- 2 large eggs
- 1 teaspoon vanilla extract
- 2 cups all-purpose flour
- 1 teaspoon baking soda
- 1/2 teaspoon salt
- 1 1/2 cups graham cracker crumbs (about 12 full graham crackers, finely crushed)
- 1 1/2 cups semi-sweet chocolate chips
- 1 1/2 cups mini marshmallows
- 1/2 cup coarsely chopped graham crackers, for topping (optional)
- Sea salt flakes, for sprinkling (optional)
Instructions
- Cream the Butter and Sugars: In a large bowl (or the bowl of your stand mixer), cream together the softened butter, granulated sugar, and brown sugar until light and fluffy (3-5 minutes). Scrape down the sides of the bowl occasionally.
- Incorporate the Eggs and Vanilla: Beat in the eggs one at a time, mixing well after each addition. Stir in the vanilla extract.
- Combine Dry Ingredients: In a separate medium bowl, whisk together the flour, baking soda, and salt.
- Gradually Add Dry Ingredients to Wet Ingredients: Gradually add the dry ingredients to the wet ingredients, mixing on low speed until just combined. Be careful not to overmix.
- Stir in Graham Cracker Crumbs: Stir in the graham cracker crumbs until evenly distributed throughout the dough.
- Prepare the Baking Pan: Preheat oven to 350°F (175°C). Grease and flour a 9×13 inch baking pan or line with parchment paper.
- Press Half of the Dough into the Pan: Press half of the graham cracker dough evenly into the prepared baking pan.
- Sprinkle with Chocolate Chips: Sprinkle the chocolate chips evenly over the dough base.
- Top with Mini Marshmallows: Spread the mini marshmallows evenly over the chocolate chips.
- Crumble Remaining Dough on Top: Crumble the remaining graham cracker dough evenly over the marshmallows.
- Optional Toppings: If desired, sprinkle the coarsely chopped graham crackers and sea salt flakes over the top.
- Bake the Bars: Bake in the preheated oven for 25-30 minutes, or until the top is golden brown and the marshmallows are melted and slightly toasted.
- Cool Completely: Remove the pan from the oven and let the bars cool completely in the pan before cutting (at least 2-3 hours, or overnight).
- Cut and Serve: Once the bars are completely cool, cut them into squares or rectangles.
Notes
- Ingredient Substitutions:
- Chocolate: Use milk chocolate, dark chocolate, or white chocolate chips. Chopped chocolate bars can also be used.
- Marshmallows: Use regular-sized marshmallows, cut into smaller pieces, if you don’t have mini marshmallows.
- Graham Crackers: Use digestive biscuits or similar crackers if you can’t find graham crackers.
- Nuts: Add chopped nuts, such as pecans or walnuts, to the dough.
- Flavor Variations:
- Peanut Butter: Add 1/2 cup of peanut butter to the dough.
- Salted Caramel: Drizzle salted caramel sauce over the baked bars.
- Espresso: Add 1 teaspoon of instant espresso powder to the dry ingredients.
- Cinnamon: Add 1/2 teaspoon of ground cinnamon to the dry ingredients.
- Tips for Success:
- Use softened butter.
- Don’t overmix the dough.
- Cool completely before cutting.
- Storage: Store in an airtight container at room temperature for up to 3 days.
- Making Ahead:
- The dough can be made ahead and stored in the refrigerator for up to 2 days.
- The baked bars can be stored in an airtight container at room temperature for up to 3 days.
- Serving Suggestions:
- Warm slightly in the microwave before serving.
- Serve with a scoop of vanilla ice cream.
- Enjoy with coffee or hot chocolate.

Leave a Comment