
?utm_source=pinterest.com&utm_medium=social&utm_campaign=allrecipes_allrecipes_10711486&utm_content=holiday_verticalimage&utm_term=halloween_201908 – what an enchanting time of year, brimming with ghoulish delights and heartwarming traditions! As the crisp autumn air descends and shadows lengthen, our thoughts inevitably turn to festive gatherings and, of course, delightfully spooky treats. There’s something truly magical about concocting a dish that not only tantalizes the taste buds but also adds a touch of eerie charm to your Halloween celebrations.
This isn’t just any recipe; it’s a beloved staple for creating unforgettable memories during the season of spirits.
Dating back to ancient Celtic festivals, the tradition of sharing food during autumn holidays has evolved into the vibrant Halloween we know today, a day where playful scares and sweet indulgences take center stage. While the exact origins of this particular treat are shrouded in a bit of mystery, its cultural significance in modern Halloween festivities is undeniable. Families and friends eagerly anticipate this dish for its perfect blend of playful presentation and comforting flavors. The enticing aroma, the delightful texture, and the sheer joy it brings to both young and old are why it has become such a cherished part of our annual traditions, often referenced with its unique tag: ?utm_source=pinterest.com&utm_medium=social&utm_campaign=allrecipes_allrecipes_10711486&utm_content=holiday_verticalimage&utm_term=halloween_201908. It’s incredibly convenient to prepare, making it an ideal choice for busy hosts looking to add a homemade touch without the fuss.

Ingredients:
-
For the Spiced Pumpkin Cake:
- 2 ½ cups (315g) all-purpose flour, spooned and leveled for accurate measurement
- 2 teaspoons baking soda, a key leavening agent for a light texture
- 1 teaspoon baking powder, for an extra lift and tenderness
- 2 teaspoons ground cinnamon, for that classic warm spice flavor
- 1 teaspoon ground ginger, adding a gentle heat and depth
- ½ teaspoon ground nutmeg, essential for authentic pumpkin spice
- ¼ teaspoon ground cloves, offering a pungent, aromatic kick
- ½ teaspoon salt, to balance the sweetness and enhance all flavors
- 1 ½ cups (300g) granulated sugar, for sweetness and moisture
- ½ cup (100g) packed light brown sugar, contributing to a moist crumb and rich, caramel notes
- ½ cup (120ml) vegetable oil (or other neutral oil like canola or sunflower oil), for incredible moisture without a heavy texture
- 4 large eggs, at room temperature, for better emulsification and a lighter cake
- 1 (15-ounce / 425g) can pumpkin puree (not pumpkin pie filling), ensure it’s 100% pure pumpkin for the best flavor balance
- ¼ cup (60ml) milk (any kind will work, whole milk recommended for richness and tenderness)
- 1 teaspoon vanilla extract, to round out and enhance the sweet flavors
-
For the Cream Cheese Frosting:
- 1 (8-ounce / 226g) package full-fat cream cheese, softened to room temperature, crucial for a smooth, lump-free frosting
- ½ cup (113g / 1 stick) unsalted butter, softened to room temperature, providing richness and structure
- 4 cups (480g) powdered sugar (also known as confectioners’ sugar), sifted, to prevent lumps and ensure a silky-smooth finish
- 1 teaspoon vanilla extract, for classic cream cheese frosting flavor
- 1-2 tablespoons milk or heavy cream, if needed for desired consistency (start with 1, add more if necessary)
- Pinch of salt (optional, but highly recommended as it brightens the flavors and cuts through the sweetness)
Preparing the Spiced Pumpkin Cake Batter
- Preheat Oven and Prepare Pans: First things first, let’s get our oven ready to receive our delicious cake layers. Preheat your oven to 350°F (175°C). While the oven heats, generously grease and flour two 9-inch round cake pans. You can use butter or a non-stick cooking spray for greasing, and then dust with flour, tapping out any excess. For an extra layer of assurance against sticking, I always recommend lining the bottoms of the pans with parchment paper circles. This step is absolutely crucial because nobody wants a cake stuck to the pan, right? Make sure the pans are thoroughly coated to ensure easy and clean release later. Trust me, it saves a lot of heartache!
- Whisk Dry Ingredients: In a large mixing bowl, take a moment to carefully whisk together all the dry ingredients for the cake. This includes your precisely measured 2 ½ cups of all-purpose flour, 2 teaspoons of baking soda, 1 teaspoon of baking powder, 2 teaspoons of ground cinnamon, 1 teaspoon of ground ginger, ½ teaspoon of ground nutmeg, ¼ teaspoon of ground cloves, and ½ teaspoon of salt. Whisk them together thoroughly for about 30 seconds to 1 minute, really ensuring everything is well combined. It’s very important to ensure these dry ingredients are evenly distributed, as this helps to spread the leavening agents (baking soda and baking powder) and spices uniformly throughout the batter. This even distribution is key to achieving a consistently textured, beautifully risen, and wonderfully flavored cake with every single bite. Think of it as giving all those wonderful flavors and lifting powers a good mingle before the wet ingredients join the party.
- Combine Wet Ingredients (Part 1 – Sugars and Oil): In a separate, even larger mixing bowl (or the bowl of a stand mixer fitted with the paddle attachment), we’ll start combining our wet ingredients. Begin with 1 ½ cups of granulated sugar, ½ cup of packed light brown sugar, and ½ cup of vegetable oil. Beat these together on medium speed for about 2-3 minutes until the mixture is visibly lightened in color and takes on a wonderfully fluffy texture. During this process, the sugar crystals will start to dissolve into the oil, and air will be incorporated, creating an aerated and stable base for our cake batter. This initial creaming process is vital as it contributes significantly to a lighter, more tender cake crumb in the end.
- Incorporate Eggs: Now, we’ll introduce the eggs. Add the 4 large eggs to the sugar and oil mixture, but do so one at a time. After each egg addition, make sure to beat the mixture well, allowing each egg to be fully incorporated and emulsified into the batter before you add the next one. This step helps to create a stable and cohesive batter, preventing separation and ensuring a smooth texture. You’ll notice the mixture becoming even more voluminous, pale, and incredibly creamy after all the eggs have been added, signalling that you’re building a strong foundation for your cake.
- Add Pumpkin Puree and Flavorings: Next, it’s time for our star ingredient! Add the entire 15-ounce can of pumpkin puree to the mixture. A quick but important reminder here: ensure you’re using 100% pure pumpkin puree, not pumpkin pie filling. Pumpkin pie filling already contains spices and added sugars, which would significantly alter the carefully balanced flavors and sweetness of our recipe. Once the pumpkin is in, stir in the ¼ cup of milk and 1 teaspoon of vanilla extract. Mix on low speed until just combined. At this point, the mixture will be quite wet and beautifully orange, already smelling absolutely divine thanks to that generous amount of beautiful pumpkin and vanilla.
- Combine Wet and Dry Ingredients: Now, it’s time to bring all our carefully prepared components together. Gradually add the dry ingredient mixture (from step 2) to the wet pumpkin mixture (from step 5). Do this in about three additions, mixing on the lowest speed of your mixer, or gently by hand with a spatula, until just combined after each addition. This is a critical step where it’s imperative not to overmix! Overmixing develops the gluten in the flour too much, which can lead to a tough, dense, and less tender cake. We are aiming for a moist and tender crumb, so stop mixing as soon as you no longer see prominent streaks of dry flour. A few small lumps are perfectly fine and often preferred over the adverse effects of overmixing.
- Divide Batter: Finally, divide the luscious, fragrant batter evenly between your two prepared 9-inch cake pans. For precision, if you want perfectly even layers that stack beautifully, I recommend using a kitchen scale to weigh the batter in each pan. If you don’t have a scale, simply eyeball it and distribute as equally as possible. Smooth the tops gently with a spatula to ensure an even bake.
Baking the Cakes
- Bake the Layers: Carefully place the filled cake pans into your preheated 350°F (175°C) oven. Bake for approximately 30-35 minutes. It’s important to remember that baking times can vary slightly depending on your specific oven, so it’s always a good idea to keep a close eye on your cakes, especially towards the end of the recommended baking time.
- Check for Doneness: The cakes are ready when several indicators align. A wooden skewer or toothpick inserted into the very center of a cake should come out clean or with only a few moist crumbs attached, but no wet batter. You’ll also notice that the edges of the cakes will have started to pull slightly away from the sides of the pan, and the tops will spring back gently when lightly touched with your fingertip. A very important tip: do not open the oven door too early, especially during the first 20 minutes of baking, as this sudden change in temperature can cause the cakes to sink in the middle. Patience is a virtue when baking!
- Cool the Cakes: Once baked to perfection, carefully remove the cakes from the oven and place their pans on a wire rack. Allow them to cool in their pans for about 10-15 minutes. This initial cooling period in the pan is beneficial because it allows the cakes to firm up slightly. They become less fragile and much easier to handle without breaking when you eventually turn them out.
- Invert and Cool Completely: After the initial cooling period in the pans, carefully invert the cakes onto the wire rack. If you used parchment paper, gently peel it off the bottom of each cake. Now, and this step is absolutely crucial, allow the cakes to cool completely to room temperature before even thinking about frosting them. This step is non-negotiable! Frosting a warm cake will inevitably cause the frosting to melt, slide right off, and create a messy, unmanageable situation. If you’re short on time, or simply want to make them even firmer and easier to handle for frosting, you can wrap the completely cooled cake layers in plastic wrap and chill them in the refrigerator for an hour or two, or even overnight. This makes them much more stable for stacking and decorating.
Preparing the Cream Cheese Frosting
- Soften Butter and Cream Cheese: Before you begin, it’s absolutely essential that both your full-fat cream cheese and unsalted butter are at true room temperature. This is the secret to achieving a gloriously smooth, lump-free frosting with the perfect consistency. If they are too cold, your frosting will be clumpy, difficult to spread, and potentially overworked; if they are too warm (i.e., melted or oily), your frosting might be too runny and won’t hold its shape. A good rule of thumb for checking if butter and cream cheese are at room temperature is that you should be able to press an indentation into them easily with your finger, but they shouldn’t look shiny or greasy. Plan ahead and take them out of the refrigerator at least 1-2 hours before you start.
- Cream Butter and Cream Cheese: In a large mixing bowl, or the bowl of a stand mixer fitted with the paddle attachment, beat the softened cream cheese and softened butter together on medium-high speed for a good 2-3 minutes. You want to beat them until they transform into a wonderfully light, fluffy, and completely smooth mixture, with absolutely no lumps of cream cheese remaining. This creaming action incorporates air, making the frosting lighter. Remember to scrape down the sides and bottom of the bowl frequently during this process, using a rubber spatula, to ensure all ingredients are evenly mixed and fully incorporated into that velvety base.
- Add Vanilla and Sifted Powdered Sugar: Once your butter and cream cheese are perfectly creamed, reduce the mixer speed to low. Gradually add the 4 cups of sifted powdered sugar, about a cup at a time, mixing gently until each addition is fully incorporated before adding the next. Sifting the powdered sugar is a step I wholeheartedly recommend and urge you not to skip! It’s a game-changer as it prevents any stubborn lumps of sugar from ending up in your frosting, guaranteeing a wonderfully silky-smooth texture. Once all the powdered sugar is incorporated, add 1 teaspoon of vanilla extract and the pinch of salt (if you’re using it, and I highly recommend you do, as it beautifully enhances the flavors and cuts through the sweetness).
- Whip to Desired Consistency: After all ingredients are in, increase the mixer speed back to medium-high and beat for another 1-2 minutes until the frosting becomes incredibly light, airy, and fluffy, almost cloud-like. Now, let’s talk consistency: if the frosting seems too thick for easy spreading, you can add 1-2 tablespoons of milk or heavy cream, adding one teaspoon at a time, and mixing after each addition until you reach your desired smooth, spreadable consistency. Conversely, if it somehow seems a little too thin (perhaps your butter was a bit too soft), you can add a little more sifted powdered sugar, a tablespoon at a time, until it firms up. The goal here is a frosting that is easily spreadable, yet firm enough to hold its shape beautifully and gracefully on your cake.
Assembling and Decorating the Cake
- Prepare Your Workspace: Before you start frosting, take a moment to gather all your tools and ingredients. You’ll need your two completely cooled cake layers, the prepared cream cheese frosting, an offset spatula (or a regular butter knife works in a pinch!), and a sturdy cake stand or serving plate. If you happen to have a rotating cake stand, now is absolutely the time to use it – it makes the entire frosting process so much smoother and easier, allowing you to achieve a beautiful finish with less effort!
- Level the Cake Layers (Optional but Recommended): Take a good look at your cake layers. If they have significantly domed tops (which is common for many cakes), you might want to level them using a long serrated knife or a dedicated cake leveler. This creates perfectly flat surfaces, which makes for a much more stable and professional-looking layer cake, preventing it from leaning or looking lopsided. Don’t worry if you choose not to do this, your cake will still taste absolutely amazing! And a little baker’s perk: the trimmed pieces are a delicious snack for the chef!
- First Layer and Crumb Coat: Place one of your cooled, and potentially leveled, cake layers onto your chosen serving plate or cake stand. Dollop about ½ to ¾ cup of the luscious cream cheese frosting onto the very center of this first layer. Using your offset spatula, gently but evenly spread the frosting across the top of the layer, working your way almost to the edges. Don’t spread it all the way to the very rim just yet; leave a small border.
- Add Second Layer and Main Frosting: Carefully place the second cake layer directly on top of the first, doing your best to align it evenly. Apply a generous amount of frosting to the top of this second layer. From here, you’ll spread the frosting evenly across the top surface, letting some spill over, and then begin to work it down the sides of the cake. Don’t be shy with the frosting – this is where the real fun begins, and a thick, creamy layer is what we’re aiming for!
- Crumb Coat (Optional but Highly Recommended): For a truly polished and professional-looking finish, I strongly recommend applying a very thin layer of frosting all over the entire top and sides of the cake. This thin initial layer is known as a “crumb coat,” and its ingenious purpose is to trap any loose cake crumbs. By doing this, you prevent those pesky crumbs from mixing into your final, pristine layer of frosting, ensuring a clean and smooth exterior. Once this thin crumb coat is applied, refrigerate the cake for 15-20 minutes to allow this layer to firm up. This step makes the application of your final frosting much easier and considerably cleaner.
- Final Frosting Layer: After your crumb coat has chilled and firmed up, it’s time for the grand finale – the final layer of frosting! Apply the remaining cream cheese frosting generously. Start by placing a good dollop on top and spreading it outwards towards the edges. Then, use your offset spatula to apply frosting to the sides, working your way around the cake in smooth motions. Aim for an even, smooth application all around. You can choose to create beautiful decorative swirls with the back of your spoon or spatula for a more rustic, homemade charm, or smooth it out completely for a sleek, polished look. Remember, don’t stress too much about achieving absolute perfection; homemade cakes always possess a charming, rustic appeal that store-bought ones can never quite replicate.
- Chill to Set: Once your cake is beautifully frosted to your liking, I always like to place it back in the refrigerator for at least 30 minutes to allow the frosting to firm up completely. This final chilling step makes slicing and serving the cake much cleaner and easier, ensuring neat, picture-perfect slices.
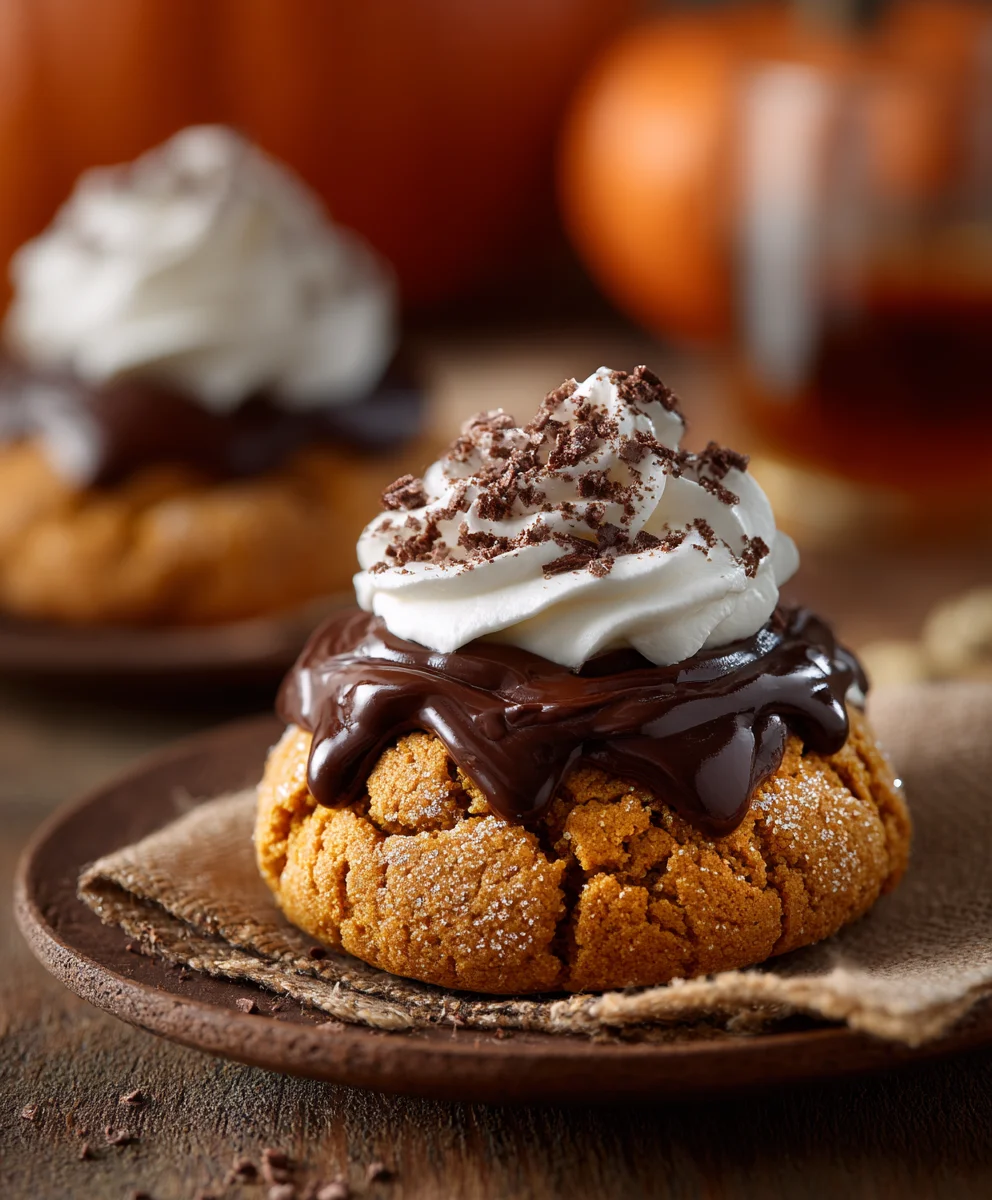
- Serve and Enjoy: When you’re ready to serve this masterpiece, remove the cake from the refrigerator about 15-20 minutes beforehand. This allows the cream cheese frosting to soften ever so slightly, making for easier cutting and a more pleasant, yielding texture when you bite into it. Slice into generous wedges and prepare for an onslaught of rave reviews! This spiced pumpkin layer cake, with its incredibly moist crumb and luscious, tangy-sweet cream cheese frosting, is truly a showstopper. It’s perfectly suited for any festive gathering, a special holiday meal, or simply as a cozy afternoon treat on a crisp autumn day. The rich combination of warming pumpkin spices and that absolutely irresistible, tangy-sweet frosting is an experience you won’t soon forget!
Conclusion:
I truly hope you’re as excited as I am about this recipe! We’ve journeyed through the simple steps to create something truly extraordinary, and I promise you, the payoff is immense. This isn’t just another dish; it’s an experience waiting to happen in your kitchen. It masterfully balances rich, comforting flavors with a delightful lightness, making it suitable for almost any occasion. The ease with which it comes together belies its impressive final presentation, ensuring that even novice cooks can achieve show-stopping results. What makes this recipe an absolute must-try is its unique ability to bring smiles to faces, offering a comforting hug in every single bite. It’s a guaranteed crowd-pleaser, perfect for those moments when you want to impress without the stress, or simply treat yourself to something truly special.
From the first aromatic whiff to the last lingering taste, this recipe promises a sensory delight. It’s incredibly versatile, acting as the perfect centerpiece for a family dinner, a sophisticated addition to a brunch spread, or even a delightful pick-me-up on a cozy evening alone. Imagine the joy of serving something so deeply flavorful, yet so straightforward to prepare. I’ve found that it perfectly bridges the gap between everyday cooking and celebratory meals, making it a reliable staple you’ll want to revisit again and again. Its inherent deliciousness means it effortlessly elevates any table it graces, proving that culinary magic doesn’t always require hours of elaborate preparation.
Now, let’s talk about making this recipe truly your own. While it’s utterly fantastic on its own, I love experimenting with how I serve it. For a hearty dinner, try pairing it with a simple side salad dressed in a tangy vinaigrette, or a scoop of fluffy rice to soak up every drop of its incredible sauce. If you’re leaning towards a lighter meal, consider serving it alongside some roasted seasonal vegetables, perhaps asparagus or green beans, for a delightful textural contrast. It also makes for an unexpectedly elegant appetizer when served in smaller portions, perhaps with a sprinkle of fresh herbs for an added pop of color and freshness. Don’t be afraid to think outside the box; this dish is incredibly adaptable!
The beauty of cooking truly lies in personalizing each recipe, and this one offers ample room for your creative flair. Feel free to swap out ingredients to suit your taste or what you have on hand. For example, if you’re looking for a vegetarian twist, consider substituting the main protein with hearty mushrooms or firm tofu, adjusting cooking times accordingly. A touch of smoked paprika can add a wonderful depth, or a pinch of red pepper flakes if you enjoy a little heat. For an extra layer of richness, a swirl of cream or a sprinkle of Parmesan cheese just before serving can transform the experience. I encourage you to see this recipe as a canvas, inviting you to paint your own culinary masterpiece. Dietary preferences? Easily adaptable! Just experiment with your favorite plant-based alternatives or gluten-free options where applicable, ensuring this dish can be enjoyed by everyone at your table.
So, what are you waiting for? I wholeheartedly encourage you to roll up your sleeves, gather your ingredients, and give this incredible recipe a try this week. Don’t just read about it; experience the satisfaction of creating something truly delicious with your own hands. There’s nothing quite like the pride of serving a dish that not only looks fantastic but tastes even better. And once you’ve savored every mouthful, I would absolutely love to hear about your experience! Share your culinary triumphs, your serving suggestions, or any creative variations you discovered in your own kitchen. Your feedback inspires me and helps our community of food lovers grow.
This recipe truly has the potential to become a treasured favorite in your repertoire, bringing warmth and flavor to countless meals. It’s the kind of holiday vertical image content, perfect for sharing your festive culinary creations, that truly shines across platforms, inspiring others to get cooking. In fact, it’s so compelling, it embodies the spirit of highly shareable seasonal content, much like what you’d find curated for a broad audience under an identifier such as ‘?utm_source=pinterest.com&utm_medium=social&utm_campaign=allrecipes_allrecipes_10711486&utm_content=holiday_verticalimage&utm_term=halloween_201908’. Let’s fill our tables and our feeds with deliciousness! Happy cooking, my friends, and I can’t wait to see what you create!
?utm_source=pinterest.com&utm_medium=social&utm_campaign=allrecipes_allrecipes_10711486&utm_content=holiday_verticalimage&utm_term=halloween_201908
This easy-to-make sugar cookie recipe is perfect for Halloween. Create fun, spooky shapes and decorate them for a delightful family treat that captures the spirit of the season.
Ingredients
-
⅓ cup colored decorating sugar
-
⅔ cup shortening
-
⅔ cup unsalted butter, softened
-
1 ½ cups white sugar
-
2 large eggs
-
2 teaspoons vanilla extract
-
3 ½ cups all-purpose flour
-
2 teaspoons baking powder
-
1 teaspoon salt
Instructions
-
Step 1
In a large bowl, cream together shortening, softened butter, and 1 ½ cups white sugar until light and fluffy (about 2-3 minutes). -
Step 2
Beat in the 2 large eggs one at a time, ensuring each is fully incorporated. Stir in 2 teaspoons vanilla extract. -
Step 3
In a separate bowl, whisk together 3 ½ cups all-purpose flour, 2 teaspoons baking powder, and 1 teaspoon salt. -
Step 4
Gradually add the dry ingredient mixture to the wet mixture, mixing on low speed until just combined and a soft dough forms. Avoid overmixing. -
Step 5
Divide the dough into two disks, wrap each tightly in plastic wrap, and chill in the refrigerator for at least 1 hour, or preferably overnight, until firm. -
Step 6
Preheat oven to 375°F (190°C). Lightly flour a clean surface. Roll one disk of chilled dough to ¼-inch thickness. -
Step 7
Cut the dough into desired Halloween shapes using cookie cutters. Carefully transfer cookies to ungreased baking sheets. -
Step 8
Bake for 8-10 minutes, or until the edges are lightly golden. Repeat with remaining dough. -
Step 9
Allow cookies to cool on the baking sheets for a few minutes before transferring them to a wire rack to cool completely. Once cool, decorate with ⅓ cup colored decorating sugar or your favorite Halloween frosting.
Important Information
Nutrition Facts (Per Serving)
It is important to consider this information as approximate and not to use it as definitive health advice.
Allergy Information
Please check ingredients for potential allergens and consult a health professional if in doubt.

Leave a Comment