
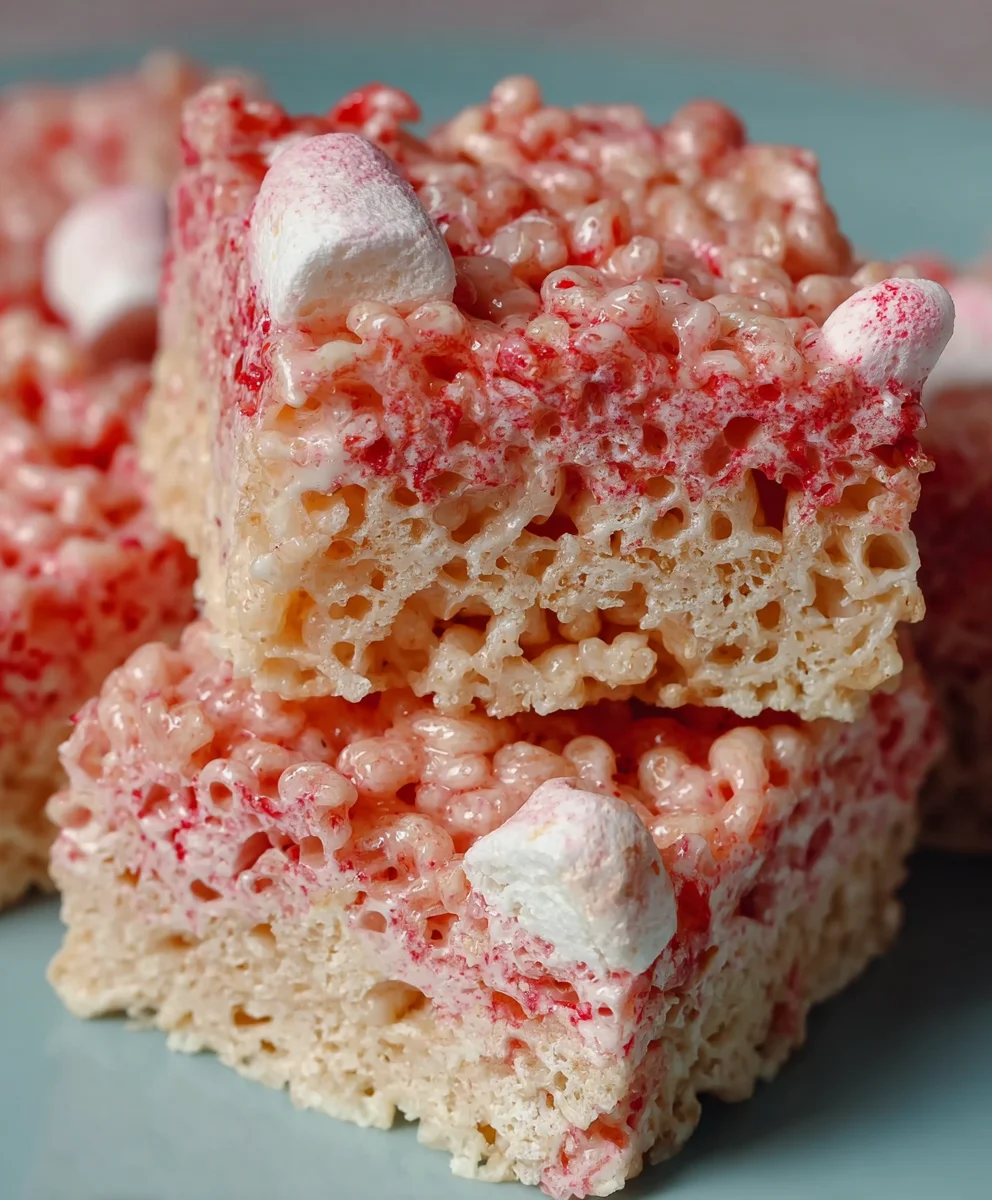
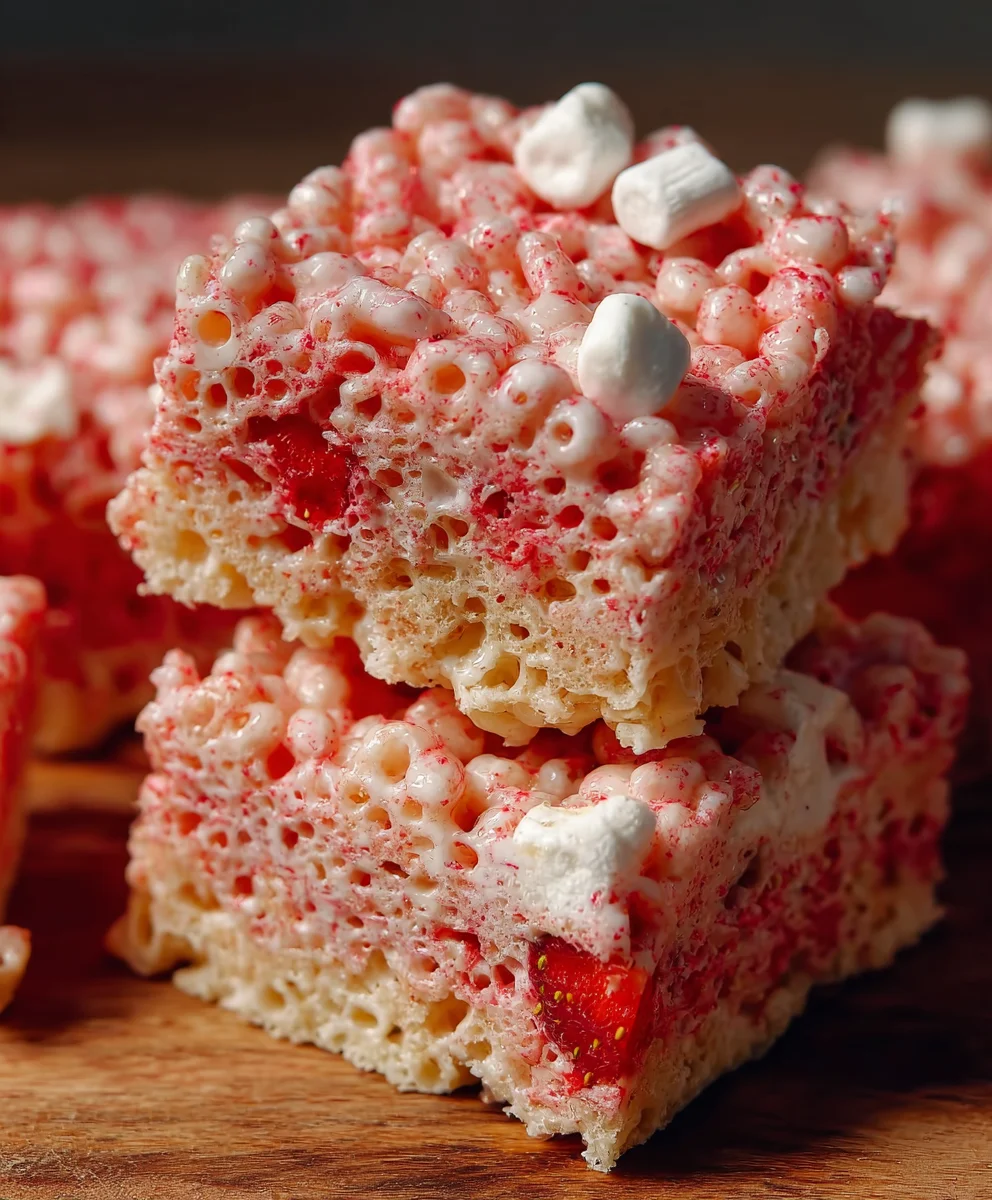
Easy Strawberry Crunch Rice Krispie Treats are poised to become your new favorite no-bake delight, offering a vibrant twist on a beloved classic. Imagine sinking your teeth into a treat that perfectly marries the nostalgic, chewy-crispy texture of traditional Rice Krispie Treats with an unexpected burst of luscious strawberry flavor and an utterly irresistible, sweet crunch. This isn’t just another dessert; it’s a culinary celebration that transforms a simple, comforting staple into something truly extraordinary, echoing the joy of popular dessert toppings while adding its own unique charm.
We understand the universal appeal of a quick, satisfying treat, and this recipe elevates that experience beautifully. People adore this dish for countless reasons: its captivating, cheerful pink hue makes it a visual feast, but it’s the incredible symphony of textures and tastes that truly makes it unforgettable. The creamy, soft marshmallow base provides the perfect counterpoint to the crisp rice cereal, while the homemade strawberry crunch topping introduces a delightful layer of fruity sweetness and a wonderfully satisfying textural contrast that beckons for another bite. Whether preparing for a gathering, a special occasion, or simply to indulge a sweet craving, this recipe for Easy Strawberry Crunch Rice Krispie Treats promises maximum delight with minimal fuss. Prepare to fall in love with this extraordinary, effortless dessert!

Ingredients:
-
For the Strawberry Crunch Topping:
- 2 cups (approximately 24 cookies) Golden Oreo cookies (or similar vanilla sandwich cookies), crushed
- 1/2 cup (approximately 1/2 oz or 14g) Freeze-dried strawberries, crushed
- 1/4 cup (4 tablespoons) Unsalted butter, melted
- 1 tablespoon Granulated sugar (optional, for extra sweetness and sparkle)
-
For the Easy Strawberry Crunch Rice Krispie Treats Base:
- 3 tablespoons Unsalted butter
- 1 (10-ounce) bag Mini marshmallows (about 5 1/2 cups)
- 1 teaspoon Pure vanilla extract
- 6 cups Rice Krispies cereal
- Pinch of salt (optional, but it really balances the sweetness!)
Preparing the Strawberry Crunch Topping:
My absolute favorite part of these “Easy Strawberry Crunch Rice Krispie Treats” is that delightful, vibrant topping. Let’s get started on creating that irresistible texture and flavor combination.
- Crush the Golden Oreo Cookies: First, I like to take my Golden Oreo cookies and prepare them for crushing. You have a couple of options here, depending on the tools you have available and your preferred crunch texture for these “Easy Strawberry Crunch Rice Krispie Treats”. If you have a food processor, that’s my go-to for speed and consistency. I usually pulse the cookies in batches, aiming for a fine crumb, but I also like to leave a few slightly larger pieces for extra texture and visual appeal. It’s a balance! If you don’t have a food processor, no worries at all! You can place the cookies in a large, sturdy zip-top bag, squeeze out any excess air, and then use a rolling pin or the flat bottom of a heavy pan to smash them. This method can be quite satisfying, and it often results in a more rustic, varied crumb, which is fantastic for adding character to our “Easy Strawberry Crunch Rice Krispie Treats”. Just make sure the bag is sturdy so it doesn’t tear. Once crushed, transfer these beautiful golden crumbs to a medium-sized mixing bowl. This step is foundational for our delicious topping, so take your time to get the texture just right!
- Prepare the Freeze-Dried Strawberries: Next up are the freeze-dried strawberries, which give our “Easy Strawberry Crunch Rice Krispie Treats” their signature berry flavor and gorgeous pink hue. Similar to the cookies, you’ll want to crush these. Freeze-dried strawberries are quite delicate, so they’re usually easier to break down. If you’re using a food processor, you can add them to the crushed cookie crumbs and give it a few more pulses until they’re incorporated and broken down into smaller pieces, some powdery and some slightly larger. This creates a wonderful blend. If you’re doing it by hand, you can place them in a separate zip-top bag and gently crush them with your hands or a rolling pin. They’ll break apart much more easily than the cookies. Once crushed, add them directly to the bowl with your Golden Oreo crumbs. I absolutely love how the natural tartness of the strawberries cuts through the sweetness of the cookies.
- Melt the Butter and Combine: Now, for the binder that brings our crunch together. In a small microwave-safe bowl or a small saucepan, I’ll melt the unsalted butter. If using the microwave, heat it in 15-second intervals, stirring in between, until it’s completely liquid. Be careful not to overheat it to avoid splattering. Once melted, pour this beautiful golden liquid over your mixture of crushed cookies and freeze-dried strawberries. At this point, if I’m feeling like an extra touch of sweetness and a little sparkle, I sometimes sprinkle in a tablespoon of granulated sugar. It’s optional, but it really makes the topping pop! Use a spatula or a spoon to thoroughly mix everything together. You want every crumb to be coated with butter, ensuring a cohesive and wonderfully textured topping. It should resemble coarse, moist crumbs. This mixture is going to provide that incredible “crunch” in our “Easy Strawberry Crunch Rice Krispie Treats”!
- Set Aside: Once combined, simply set your gorgeous strawberry crunch mixture aside. We’ll be using this a little later to adorn our “Easy Strawberry Crunch Rice Krispie Treats”. It’s important to have it ready to go when our Rice Krispie treat base is fresh out of the pan. This topping is truly the star that makes these treats unforgettable.
Preparing the Easy Strawberry Crunch Rice Krispie Treats Base:
Now that our vibrant strawberry crunch is ready, let’s move on to the classic, chewy, and utterly delightful Rice Krispie Treat base. This is the foundation of our “Easy Strawberry Crunch Rice Krispie Treats” and getting it just right is key!
- Prepare Your Baking Pan: Before I even think about melting butter, I always get my baking pan ready. This is crucial because once the Rice Krispie treat mixture is ready, you’ll want to work quickly! I use a standard 9×13-inch baking pan, which is perfect for these treats. My preferred method is to line it with parchment paper, leaving an overhang on the sides. This creates convenient “handles” that make it incredibly easy to lift the entire slab of treats out of the pan once they’re set, making cutting a breeze. If you don’t have parchment paper, you can generously spray the pan with non-stick cooking spray, or even butter it, making sure to get into all the corners. Some people also like to butter their rubber spatula or hands for pressing the treats, which helps prevent sticking. Having this ready ensures a smooth process for our “Easy Strawberry Crunch Rice Krispie Treats”.
- Melt the Butter: Next, in a large non-stick pot or Dutch oven, I like to melt my 3 tablespoons of unsalted butter over low to medium heat. It’s really important not to rush this process, as burnt butter can impart an unpleasant flavor to our “Easy Strawberry Crunch Rice Krispie Treats”. I usually let it melt slowly, watching carefully to ensure it doesn’t brown too quickly, just until it’s completely liquid and shimmering. This usually takes about 2-3 minutes, depending on your stovetop heat and the pot you’re using. Keep an eye on it! The goal is just melted, not browned.
- Add Marshmallows: Once the butter is fully melted, it’s time for the stars of the show: the marshmallows! I pour in the entire 10-ounce bag of mini marshmallows. It might seem like a lot, but trust me, they’ll shrink down beautifully. I continue to stir constantly with a rubber spatula over low heat. The key here is low heat and constant stirring. This prevents the marshmallows from burning on the bottom of the pot, which can make your treats taste bitter and create a tough, rubbery texture instead of that soft, chewy goodness we’re aiming for. It usually takes about 5-8 minutes for the marshmallows to fully melt into a smooth, gooey, wonderfully sticky mixture. They’ll transform from individual puffs into a thick, uniform liquid.
- Stir in Vanilla Extract and Salt: As soon as the marshmallows are completely melted and gloriously smooth, I remove the pot from the heat immediately. At this point, I stir in my 1 teaspoon of pure vanilla extract. Vanilla adds a beautiful depth of flavor that complements the sweetness and elevates our “Easy Strawberry Crunch Rice Krispie Treats” from good to absolutely fantastic. Don’t add it too early, as the heat can cause the flavor to dissipate. This is also when I like to add a tiny pinch of salt. While optional, a pinch of salt really does wonders for balancing out the sweetness and enhancing all the other flavors, giving the treats a more complex and satisfying taste. Give everything a good stir until the vanilla and salt are fully incorporated.
- Incorporate the Rice Krispies Cereal: This is where the “Rice Krispie Treats” truly come to life! Immediately add the 6 cups of Rice Krispies cereal to the marshmallow mixture. Using your rubber spatula, gently but quickly fold the cereal into the marshmallow goo. Work efficiently to coat every single piece of cereal evenly. It’s important not to overmix, as this can crush the cereal and lead to a less airy, crisp treat. You want to mix just until all the cereal is coated and no dry spots remain. The mixture will be incredibly sticky and slightly difficult to stir, but that’s perfectly normal! This sticky, sweet mixture is the heart of our “Easy Strawberry Crunch Rice Krispie Treats”.
- Press into the Prepared Pan: Now, quickly transfer the entire mixture into your prepared 9×13-inch baking pan. This is where those parchment paper handles come in handy! Once it’s in the pan, it’s time to press it down. I find it easiest to lightly butter my hands or lightly spray a piece of wax paper or parchment paper with non-stick spray and use that to press the mixture evenly into the pan. You can also use the back of a buttered spoon or spatula. The goal is to press firmly but gently, ensuring the treats are compacted but not overly dense. We’re looking for an even layer from edge to edge. Don’t press too hard, as this can make your “Easy Strawberry Crunch Rice Krispie Treats” tough. Just enough pressure to create a flat, uniform surface.
Assembling and Finishing Your Easy Strawberry Crunch Rice Krispie Treats:
We’re almost at the finish line! This final stage is where our “Easy Strawberry Crunch Rice Krispie Treats” truly get their signature look and incredible, layered texture.
- Apply the Strawberry Crunch Topping: As soon as you’ve pressed the Rice Krispie treat mixture evenly into the pan, while it’s still warm and slightly tacky, it’s time to generously sprinkle our prepared Strawberry Crunch Topping all over the top. I love to ensure every inch of the surface is covered with this vibrant, delicious crumble. Don’t be shy with it! The warmth of the Rice Krispie treat base will help the topping adhere beautifully, creating a seamless and incredibly appealing finish for our “Easy Strawberry Crunch Rice Krispie Treats”. The contrast of the soft, chewy treat with the crisp, flavorful topping is truly what makes these stand out.
- Gently Press the Topping: Once you’ve scattered the entire topping over the warm treats, I recommend very gently pressing it down. You can use the back of your clean, buttered spatula, a piece of wax paper, or even your fingertips (lightly buttered or sprayed with non-stick spray) to do this. The goal isn’t to embed the topping deep into the treats, but just to ensure it adheres well and doesn’t fall off when you cut or pick up your “Easy Strawberry Crunch Rice Krispie Treats”. A light, even pressure is all that’s needed to secure that delicious crunch in place. This step really locks in all that amazing flavor and texture.
- Allow to Cool and Set: This step requires a little patience, but it’s essential for perfect “Easy Strawberry Crunch Rice Krispie Treats”. Once the topping is applied and lightly pressed, let the entire pan of treats cool completely at room temperature. This usually takes about 1 to 2 hours, depending on the temperature and humidity in your kitchen. Resist the urge to cut into them too early! Allowing them to cool and set properly ensures that the treats firm up, become perfectly chewy, and the crunch topping stays in place beautifully. If you’re in a hurry, you can place them in the refrigerator for about 30-45 minutes, but I generally prefer room temperature cooling for the best texture.
- Cut into Squares: Once the “Easy Strawberry Crunch Rice Krispie Treats” are completely cool and set, it’s time to slice them! This is where those parchment paper overhangs really shine. I like to lift the entire slab of treats out of the pan and place it on a clean cutting board. This makes cutting much easier and cleaner. Using a sharp, lightly buttered knife, cut the treats into your desired square or rectangular sizes. I typically go for 12 or 16 squares from a 9×13-inch pan, but you can make them as large or small as you like. Cleaning your knife periodically with a warm, damp cloth or by re-buttering it will help prevent sticking and ensure clean cuts.
- Serve and Enjoy: And there you have it! Your beautiful, “Easy Strawberry Crunch Rice Krispie Treats” are ready to be served. I absolutely love seeing the vibrant pink and golden hues, knowing that each bite will deliver that satisfying crunch and chewy goodness. These are perfect for parties, lunchboxes, or just a delightful treat for yourself. I find they’re best enjoyed the same day they’re made, as that’s when the Rice Krispies are at their crispiest.
- Storage Instructions: If by some miracle you have any “Easy Strawberry Crunch Rice Krispie Treats” left over, they can be stored in an airtight container at room temperature for up to 3 days. While they might lose a tiny bit of their initial crispness over time, they’ll still be wonderfully delicious and chewy. I don’t recommend storing them in the refrigerator for extended periods as it can make them quite hard, and you lose some of that classic Rice Krispie Treat softness. Keep them away from direct sunlight or excessive heat to prevent melting. Enjoy every single bite of your homemade deliciousness!
Conclusion:
And there you have it, friends! We’ve journeyed through the simple, delightful process of creating something truly special. What we’ve crafted isn’t just another dessert; it’s a vibrant, textural masterpiece that truly stands out from the crowd. If you’ve been searching for that perfect sweet treat that combines convenience with an explosion of flavor and an irresistible crunch, then look no further. This recipe, I promise you, is an absolute game-changer in your kitchen repertoire. It takes the beloved familiarity of a classic and elevates it to an entirely new level, making it a memorable experience for anyone who takes a bite.
I know what you might be thinking – “Are they really that good?” And my answer, with full confidence, is a resounding YES! The magic lies in that perfect harmony: the chewy, sweet base of marshmallow-bound cereal, perfectly complemented by the bright, fruity burst of strawberry, and, of course, that signature crunch that gives these treats their name. It’s not just a subtle whisper of strawberry; it’s a bold, joyous declaration that will awaken your taste buds. This is precisely why these are a must-try. They’re visually appealing with their lovely pink hue, a delight to bite into with their varied textures, and utterly satisfying in their sweetness and fruitiness. They manage to be both nostalgically comforting and excitingly new all at once.
Now, let’s talk about how to truly make these your own, or how to enjoy them in different ways. While they are utterly fantastic straight off the cooling rack, there are so many possibilities to explore. For a truly decadent experience, imagine serving a square of your freshly made treat alongside a scoop of vanilla bean ice cream, allowing the cold, creamy goodness to meld with the chewy, crunchy strawberry delight. A light drizzle of melted white chocolate over the top just before they set can add an extra layer of sweetness and visual appeal – imagine a delicate artistic swirl across the pink surface! You could even chop them into smaller, bite-sized pieces and serve them on a dessert platter at your next gathering; they’re guaranteed to be a conversation starter and disappear incredibly quickly. Think about packaging them individually in cute little bags with a ribbon for party favors, or tucking them into lunchboxes for a delightful midday surprise that will surely put a smile on anyone’s face.
Feeling adventurous? Consider some delightful variations! While the strawberry flavor is paramount to this specific recipe, you could experiment with other freeze-dried fruits for different flavor profiles. How about raspberry crunch, or even a mixed berry version? You could also play with the “crunch” component; perhaps a sprinkle of toasted shredded coconut for a tropical twist, or even a very fine sprinkle of crushed pretzels for a sweet and salty kick. For those who adore chocolate, a light dusting of cocoa powder mixed into the strawberry crunch, or even some mini chocolate chips folded into the marshmallow mix, could create an incredible strawberry chocolate crunch fusion. The beauty of a recipe like this is its inherent flexibility – once you master the core technique, the world of flavor combinations truly opens up to your imagination. These aren’t just one-trick ponies; they’re a foundation for endless delicious creativity.
Ready to Dive In?
I genuinely hope you feel inspired to whip up a batch of these incredible treats for yourself and your loved ones. Trust me, the minimal effort involved yields maximum satisfaction. There’s something truly rewarding about creating something so delicious from scratch, especially when it’s as foolproof and fun as this recipe. It’s the kind of treat that brings joy to both the maker and the eater.
Don’t Forget to Share!
Once you’ve experienced the sheer deliciousness of making and tasting these Easy Strawberry Crunch Rice Krispie Treats, I would absolutely love to hear all about it! Did you try any of the serving suggestions? Did you come up with your own brilliant variation? Please, please, please share your experiences in the comments section below. Your feedback, your photos, and your stories are what make this culinary community so vibrant and exciting. There’s nothing more inspiring than seeing how you bring these recipes to life in your own kitchens. So go ahead, get crunchy, get fruity, and get sharing! Happy baking!
Strawberry Crunch Rice Krispie Treats: Quick & Easy
Easy Strawberry Crunch Rice Krispie Treats are poised to become your new favorite no-bake delight, offering a vibrant twist on a beloved classic. Imagine sinking your teeth into a treat that perfectly marries the nostalgic, chewy-crispy texture of traditional Rice Krispie Treats with an unexpected burst of luscious strawberry flavor and an utterly irresistible, sweet crunch.
Ingredients
-
2 cups (24 cookies) Golden Oreo cookies, crushed
-
1/2 cup (14g) Freeze-dried strawberries, crushed
-
1/4 cup Unsalted butter, melted
-
1 tablespoon Granulated sugar (optional)
-
3 tablespoons Unsalted butter
-
1 (10-ounce) bag Mini marshmallows (5 1/2 cups)
-
1 teaspoon Pure vanilla extract
-
6 cups Rice Krispies cereal
-
Pinch of salt (optional)
Instructions
-
Step 1
Crush 2 cups Golden Oreo cookies and 1/2 cup freeze-dried strawberries (using a food processor or a bag/rolling pin) until fine, leaving some larger pieces for texture. -
Step 2
Melt 1/4 cup unsalted butter. Pour over the crushed cookies and strawberries. Add 1 tablespoon granulated sugar (optional). Mix thoroughly until all crumbs are coated. Set aside. -
Step 3
Line a 9×13-inch baking pan with parchment paper, leaving an overhang, or generously spray with non-stick cooking spray. -
Step 4
In a large non-stick pot, melt 3 tablespoons unsalted butter over low heat. Add 1 (10-ounce) bag mini marshmallows and stir constantly until completely melted and smooth (about 5-8 minutes). -
Step 5
Remove the pot from heat. Stir in 1 teaspoon pure vanilla extract and a pinch of salt (optional) until combined. Quickly add 6 cups Rice Krispies cereal and gently fold until all cereal is evenly coated with the marshmallow mixture. -
Step 6
Transfer the mixture immediately into the prepared 9×13-inch pan. Using lightly buttered hands, a buttered spatula, or wax paper, gently but firmly press the mixture into an even layer from edge to edge. -
Step 7
While the Rice Krispie treat base is still warm and tacky, generously sprinkle the entire prepared Strawberry Crunch Topping over the surface, ensuring even coverage. -
Step 8
Gently press the topping down to ensure it adheres. Allow the treats to cool completely at room temperature for 1 to 2 hours, or refrigerate for 30-45 minutes to speed up setting. -
Step 9
Once completely cool and set, lift the slab from the pan using the parchment paper overhangs. Cut into 12 to 16 squares using a sharp, lightly buttered knife. Serve and enjoy! -
Step 10
Store any leftover treats in an airtight container at room temperature for up to 3 days. Avoid refrigeration for extended periods as it can harden the treats.
Important Information
Nutrition Facts (Per Serving)
It is important to consider this information as approximate and not to use it as definitive health advice.
Allergy Information
Please check ingredients for potential allergens and consult a health professional if in doubt.


Leave a Comment