
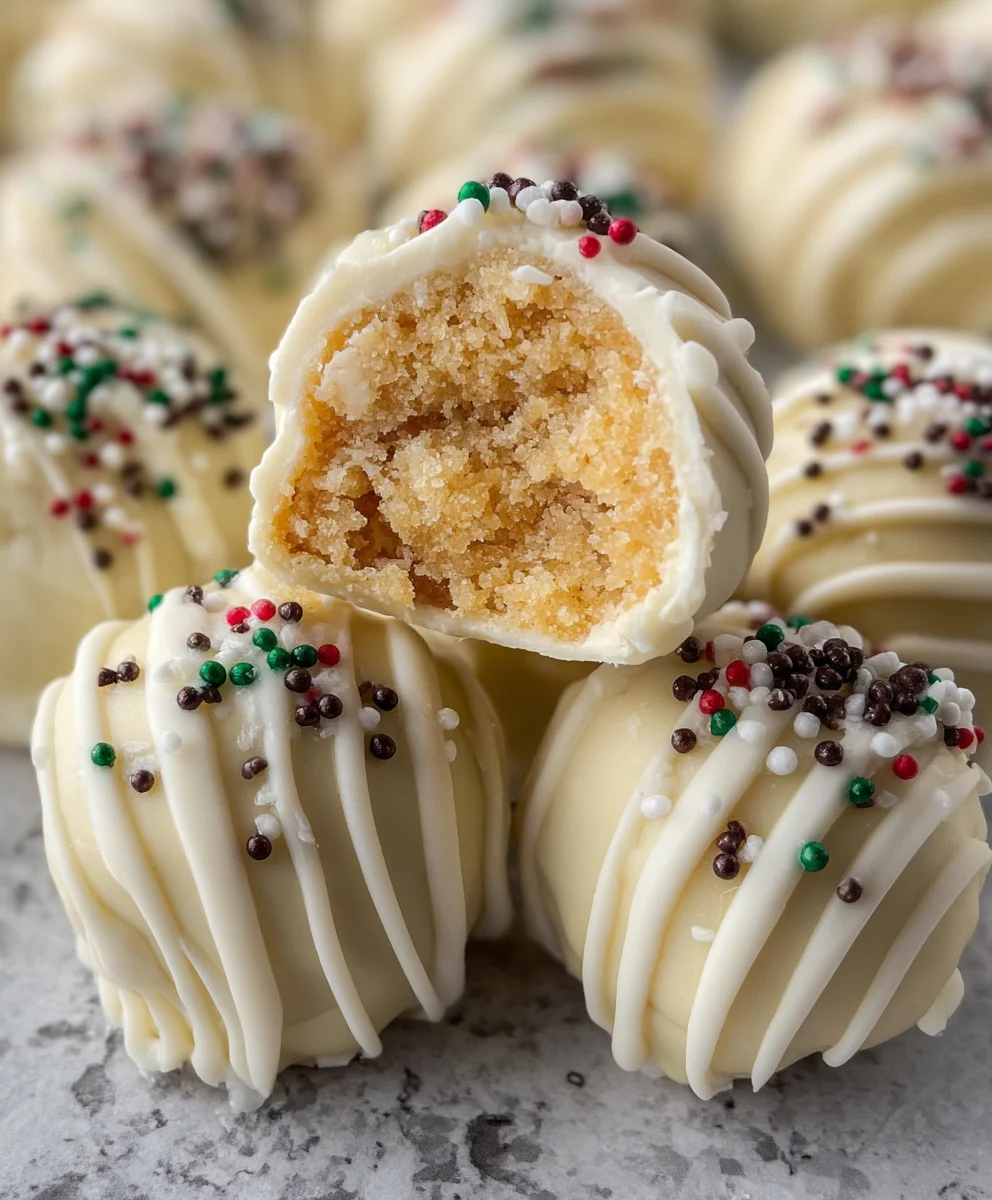
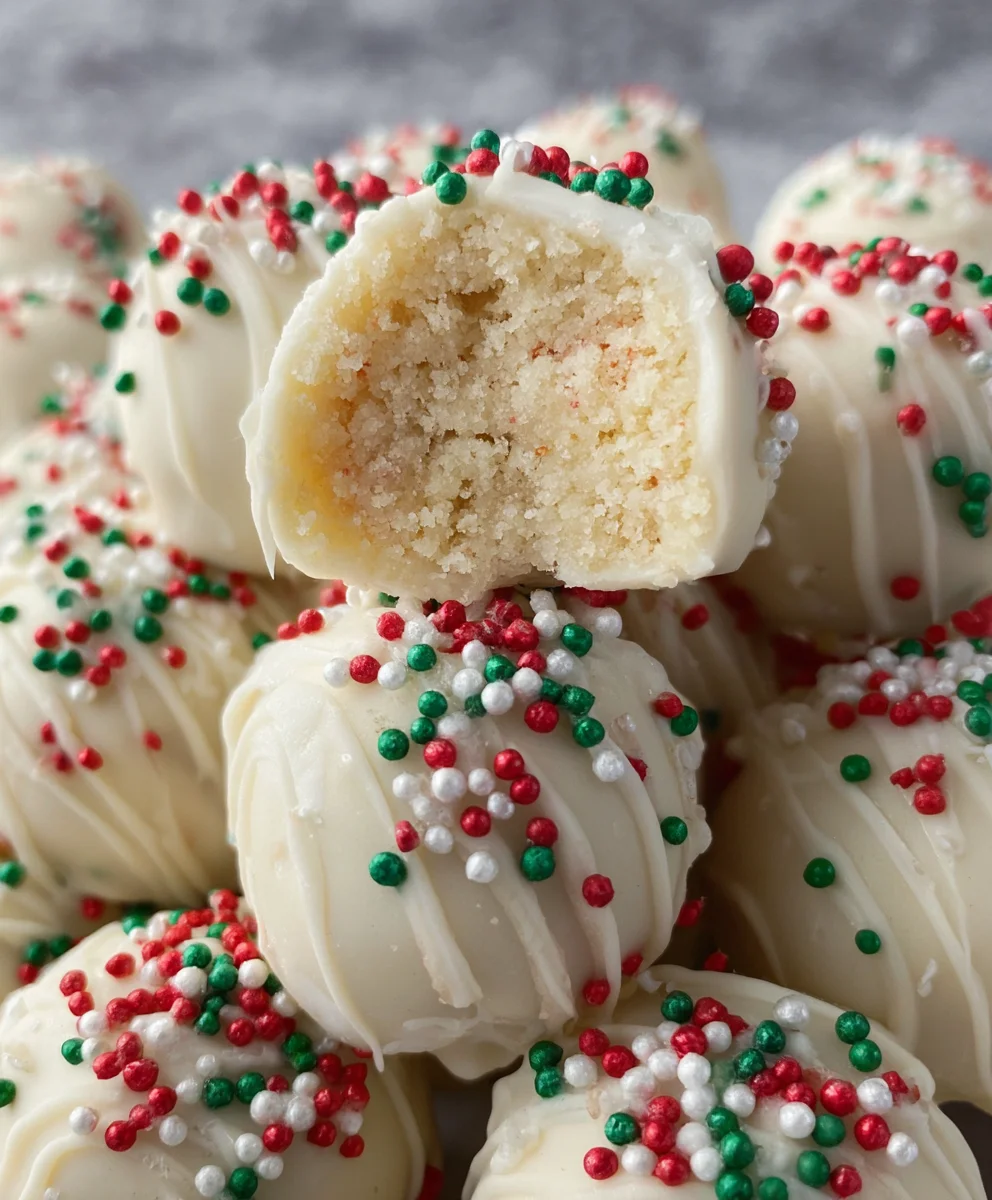
Sugar Cookie Truffles are more than just a sweet treat; they’re a miniature explosion of pure joy, a delightful bite-sized embodiment of everything we adore about classic sugar cookies, elevated to an irresistible confection. Imagine the comforting, familiar taste of a perfectly baked sugar cookie, that delicate balance of buttery sweetness and subtle vanilla, now transformed into a creamy, melt-in-your-mouth truffle. It’s no wonder these little gems have captured hearts everywhere! People love them because they offer the essence of a beloved childhood favorite in a sophisticated, no-bake package, perfect for parties, holidays, or simply as a decadent afternoon pick-me-up. What truly makes Sugar Cookie Truffles special is their versatility; they’re a blank canvas for your creativity, easily adaptable with different coatings and decorations to suit any occasion, making them a guaranteed crowd-pleaser that’s as beautiful as it is delicious.

Ingredients:
- 2 cups crushed sugar cookies (about 10-12 standard-sized sugar cookies)
- 4 ounces cream cheese (softened to room temperature)
- 1 bag (10 oz) vanilla flavored melting wafers
- Red & green sprinkles (for decoration)
Making the Sugar Cookie Truffle Base
The foundation of these delightful Sugar Cookie Truffles is a simple yet incredibly delicious combination of crushed sugar cookies and cream cheese. The trick here is to get your sugar cookies crushed as finely as possible. You can achieve this by placing them in a zip-top bag and using a rolling pin to break them down into fine crumbs. Alternatively, a food processor works wonderfully for this task, ensuring a consistent texture. Aim for a consistency similar to breadcrumbs. Once your cookies are crushed, combine them in a medium-sized bowl with the softened cream cheese.
Now, it’s time to get your hands in there and really mix it up. The softened cream cheese is crucial here; if it’s too cold, it will be difficult to incorporate evenly, and you might end up with pockets of unmixed cream cheese. So, be sure to leave your cream cheese out on the counter for at least 30 minutes to an hour before you start. You want to knead and mix the cream cheese into the cookie crumbs until the mixture comes together into a cohesive dough. It should be moist enough to hold its shape when rolled, but not overly sticky. If it feels a little too dry and crumbly, you can add another teaspoon or two of softened cream cheese. Conversely, if it feels too wet and sticky, you can add a tablespoon or two more of crushed cookie crumbs. The goal is a dough that you can easily roll into balls without it sticking excessively to your hands.
Forming and Chilling the Truffles
Once you have a well-combined and pliable mixture, it’s time to form your Sugar Cookie Truffles. Using a tablespoon or a small cookie scoop, portion out the dough and roll it into small, bite-sized balls. Aim for uniform size so they all cook and set evenly. Place these rolled balls onto a baking sheet lined with parchment paper. The parchment paper is important as it prevents the truffles from sticking to the baking sheet, making them easier to transfer later. You’ll want to make sure there’s a little space between each truffle on the baking sheet.
After you’ve rolled all your truffles, it’s essential to chill them. This step is non-negotiable for the best results. Pop the baking sheet into the refrigerator for at least 30 minutes, or even up to an hour. Chilling solidifies the cream cheese, making the truffles firm and much easier to dip into the melting wafers. If you try to dip them while they are still soft, the melting chocolate will have a harder time coating them evenly, and you might end up with misshapen truffles.
Melting and Coating the Truffles
While your truffles are chilling, you can prepare your vanilla flavored melting wafers. These are a fantastic ingredient because they melt smoothly and set up beautifully, giving your Sugar Cookie Truffles that professional finish. Follow the package instructions for melting. Typically, this involves placing the wafers in a microwave-safe bowl and microwaving them in short intervals (30 seconds at a time), stirring well after each interval, until they are completely smooth and pourable. Alternatively, you can use a double boiler method for a more controlled melt. Be careful not to overheat the wafers, as this can cause them to seize and become unusable.
Once your melting wafers are smooth and fluid, and your truffles are nicely chilled and firm, it’s time for the coating process. Working with a few chilled truffles at a time (so the others don’t warm up too much), carefully drop them into the melted vanilla wafers. Use a fork or a dipping tool to gently roll the truffle around, ensuring it is fully coated. Lift the coated truffle out of the melting wafers, allowing any excess chocolate to drip back into the bowl. You can gently tap the fork on the side of the bowl to help remove excess.
Decorating Your Sugar Cookie Truffles
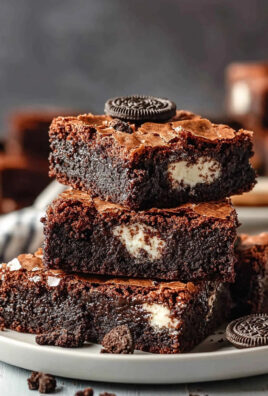
After coating each truffle, carefully place it back onto the parchment-lined baking sheet. This is where the magic happens and you can get creative with your decorations! While the vanilla coating is still wet, immediately sprinkle your red & green sprinkles over the top of each truffle. The wet coating will help the sprinkles adhere perfectly. If you want a more intricate design, you can allow the initial coating to set slightly before drizzling with a contrasting melted chocolate (like dark or white chocolate) and then adding sprinkles. However, for these Sugar Cookie Truffles, a simple sprinkle of festive red and green is absolutely charming and perfect for any occasion, especially holidays.
Once all your Sugar Cookie Truffles are coated and decorated, place the entire baking sheet back into the refrigerator to allow the melting wafers to set completely. This usually takes about 15-20 minutes. You’ll know they are ready when the coating is firm to the touch and no longer sticky. For the best storage and to maintain their texture, it’s recommended to keep your finished Sugar Cookie Truffles in an airtight container in the refrigerator. They are best enjoyed chilled, offering a delightful burst of sugary sweetness in every bite.
Conclusion:
And there you have it – your step-by-step guide to creating delightful Sugar Cookie Truffles! These little bites of heaven are surprisingly simple to make, yet they taste absolutely gourmet. We’ve covered everything from the perfect cookie base to that irresistible frosting coating and the fun of decorating. The beauty of these Sugar Cookie Truffles lies in their versatility. They are perfect for holidays, birthdays, bake sales, or simply as a sweet treat to brighten your day. I encourage you to give them a try; the process is rewarding, and the results are undeniably delicious. Don’t be afraid to get creative with your decorations – sprinkles, drizzles, or even edible glitter can elevate these truffles to a whole new level of festive. Enjoy sharing these with loved ones, or better yet, savoring them yourself!
Frequently Asked Questions:
Q1: Can I make these Sugar Cookie Truffles ahead of time?
Absolutely! These Sugar Cookie Truffles store exceptionally well. Once fully set, you can place them in an airtight container at room temperature for up to 3 days, or in the refrigerator for up to a week. If refrigerating, allow them to sit at room temperature for about 15-20 minutes before serving to soften slightly.
Q2: What are some other ways to flavor the cookie dough?
The base recipe is fantastic, but you can definitely play with flavors! Consider adding a teaspoon of almond extract along with the vanilla for a subtle nutty undertone, or a pinch of cinnamon for a warm spice note. For a citrus twist, try adding a tablespoon of finely grated lemon or orange zest to the dough.
Sugar Cookie Truffles – Easy Festive No-Bake Treat
Delightful and easy no-bake sugar cookie truffles perfect for any festive occasion.
Ingredients
-
2 cups crushed sugar cookies (about 10-12 standard-sized sugar cookies)
-
4 ounces cream cheese, softened to room temperature
-
1 bag (10 oz) vanilla flavored melting wafers
-
Red & green sprinkles
-
Parchment paper
Instructions
-
Step 1
Crush sugar cookies finely using a rolling pin or food processor until they resemble breadcrumbs. In a medium bowl, combine crushed cookies with softened cream cheese. Mix until a cohesive dough forms. Adjust consistency with additional cream cheese or cookie crumbs if needed. -
Step 2
Using a tablespoon or small cookie scoop, portion the dough and roll into bite-sized balls. Place the balls onto a baking sheet lined with parchment paper, ensuring some space between each truffle. -
Step 3
Chill the rolled truffles in the refrigerator for at least 30 minutes, or up to an hour, until firm. This step is crucial for easier dipping. -
Step 4
Melt the vanilla flavored melting wafers according to package instructions (microwave in short intervals or use a double boiler). Stir until smooth and pourable. Do not overheat. -
Step 5
Working with a few chilled truffles at a time, dip them into the melted vanilla wafers using a fork or dipping tool, ensuring full coverage. Lift out and allow excess chocolate to drip back into the bowl. -
Step 6
Place the coated truffles back onto the parchment-lined baking sheet. While the coating is still wet, immediately sprinkle with red & green sprinkles. Allow the coating to set completely in the refrigerator for 15-20 minutes.
Important Information
Nutrition Facts (Per Serving)
It is important to consider this information as approximate and not to use it as definitive health advice.
Allergy Information
Please check ingredients for potential allergens and consult a health professional if in doubt.
Leave a Comment