
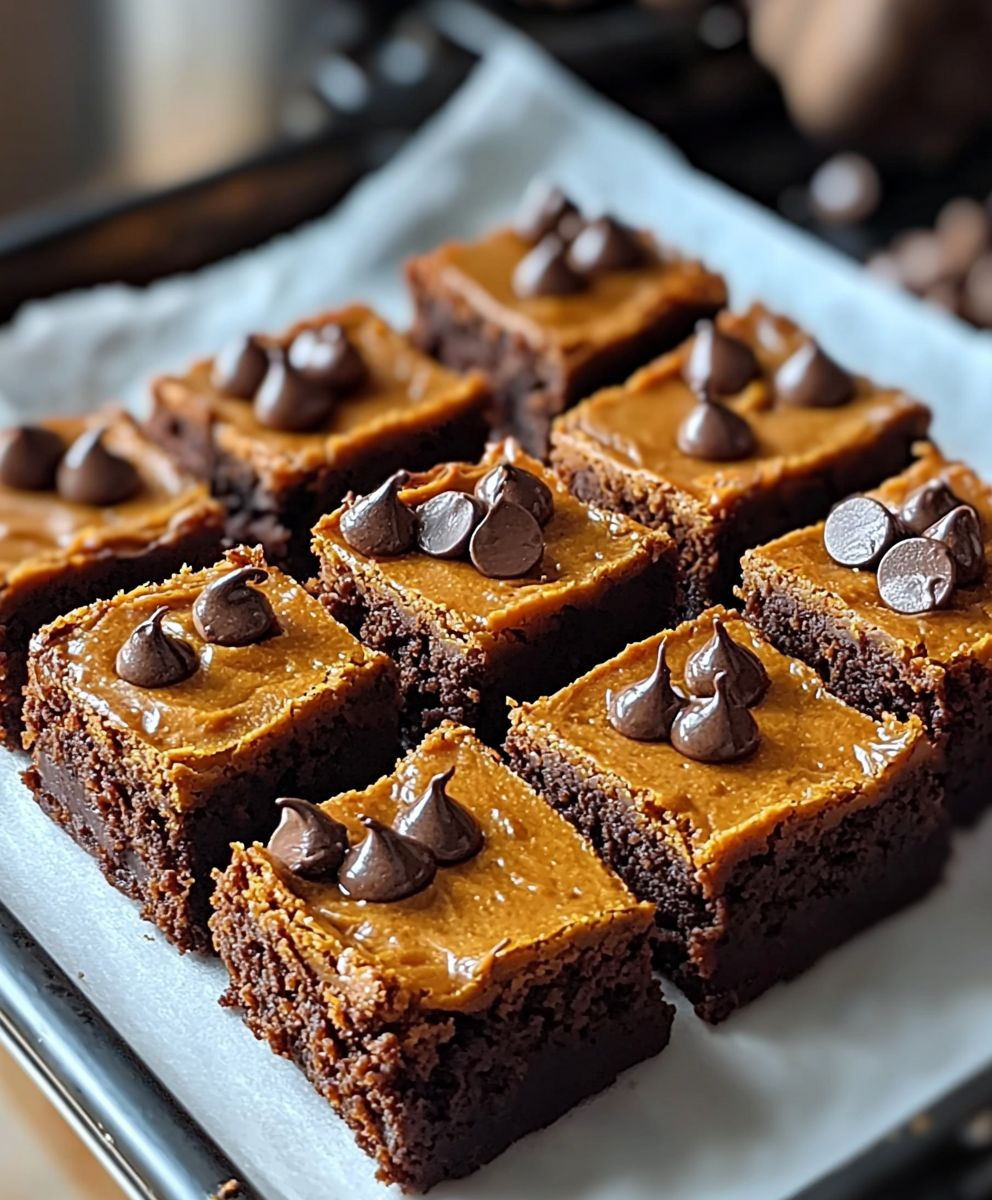
Sweet Potato Brownies: Prepare to have your dessert expectations delightfully shattered! Imagine sinking your teeth into a fudgy, intensely chocolatey brownie, only to discover a secret ingredient that elevates it to a whole new level of deliciousness. That secret? The humble sweet potato.
While the idea of adding vegetables to brownies might sound unconventional, this practice has roots in resourceful baking traditions. Throughout history, cooks have cleverly incorporated readily available ingredients to enhance flavor and texture, and sweet potatoes are a natural fit. They add moisture, sweetness, and a subtle earthy note that complements the richness of chocolate beautifully.
But why are sweet potato brownies so beloved? It’s simple: they offer the best of both worlds. You get the decadent indulgence of a classic brownie with a boost of nutrients and a surprisingly complex flavor profile. The sweet potato creates an incredibly moist and tender crumb, eliminating any dryness that can sometimes plague traditional brownies. Plus, they’re a fantastic way to sneak in some extra veggies for picky eaters (or even yourself!). The result is a guilt-free treat that satisfies your sweet tooth without compromising on nutrition. Get ready to experience a brownie revolution!

Ingredients:
- For the Sweet Potato Puree:
- 1 large sweet potato (about 1 pound), scrubbed
- For the Brownies:
- 1 cup (2 sticks) unsalted butter, melted
- 1 cup granulated sugar
- 1 cup packed light brown sugar
- 3 large eggs
- 1 teaspoon vanilla extract
- 1 cup all-purpose flour
- ½ cup unsweetened cocoa powder
- ½ teaspoon baking powder
- ¼ teaspoon salt
- 1 cup chocolate chips (semi-sweet or dark), divided
- Optional: ½ cup chopped walnuts or pecans
Preparing the Sweet Potato Puree:
Okay, let’s start with the sweet potato puree. This is the secret ingredient that makes these brownies so fudgy and delicious! Don’t skip this step; it’s easier than you think.
- Preheat the Oven: Preheat your oven to 400°F (200°C).
- Bake the Sweet Potato: Place the scrubbed sweet potato directly on the oven rack. Bake for 45-60 minutes, or until it’s very soft and easily pierced with a fork. The baking time will depend on the size of your sweet potato.
- Cool Slightly: Remove the sweet potato from the oven and let it cool slightly until you can handle it comfortably.
- Scoop out the Flesh: Cut the sweet potato in half lengthwise. Use a spoon to scoop out the flesh into a bowl. Discard the skin.
- Mash or Puree: Mash the sweet potato flesh with a fork until smooth. Alternatively, you can use a food processor or blender for an even smoother puree. You should have about 1 cup of sweet potato puree. If you have more, you can save the extra for another recipe!
Making the Brownie Batter:
Now for the fun part creating the brownie batter! This is where the magic happens, and you’ll start to see (and smell!) those delicious brownie vibes.
- Melt the Butter: In a large bowl, melt the butter completely. You can do this in the microwave in 30-second intervals, stirring in between, or in a saucepan over low heat. Be careful not to burn the butter!
- Add Sugars: Add the granulated sugar and brown sugar to the melted butter. Whisk together until well combined and the mixture is smooth. This step is important for creating that shiny, crackly top on your brownies.
- Incorporate the Eggs: Add the eggs one at a time, whisking well after each addition. Make sure each egg is fully incorporated before adding the next. This helps to create a smooth and emulsified batter.
- Add Vanilla Extract: Stir in the vanilla extract.
- Add Sweet Potato Puree: Add the prepared sweet potato puree to the batter and mix until well combined. The batter will become a beautiful orange-brown color.
- Combine Dry Ingredients: In a separate bowl, whisk together the flour, cocoa powder, baking powder, and salt. This ensures that the baking powder and salt are evenly distributed throughout the batter.
- Gradually Add Dry Ingredients to Wet Ingredients: Gradually add the dry ingredients to the wet ingredients, mixing until just combined. Be careful not to overmix the batter, as this can result in tough brownies. A few streaks of flour are okay.
- Fold in Chocolate Chips (and Nuts, if using): Fold in ¾ cup of the chocolate chips (and the chopped walnuts or pecans, if using). Reserve the remaining ¼ cup of chocolate chips for topping.
Baking the Brownies:
Almost there! Now it’s time to bake these beauties and fill your kitchen with that irresistible brownie aroma.
- Preheat the Oven: If you haven’t already, preheat your oven to 350°F (175°C).
- Prepare the Baking Pan: Grease and flour an 8×8 inch baking pan. Alternatively, you can line the pan with parchment paper, leaving an overhang on the sides for easy removal. This is my preferred method!
- Pour Batter into Pan: Pour the brownie batter into the prepared baking pan and spread it evenly.
- Sprinkle with Remaining Chocolate Chips: Sprinkle the remaining ¼ cup of chocolate chips over the top of the batter.
- Bake: Bake for 25-30 minutes, or until a toothpick inserted into the center comes out with moist crumbs attached. Be careful not to overbake the brownies, as they will become dry.
- Cool Completely: Remove the brownies from the oven and let them cool completely in the pan before cutting. This is crucial for getting clean cuts and preventing the brownies from falling apart. I know it’s tempting to dig in right away, but trust me, the wait is worth it!
Cutting and Serving:
Finally, the moment we’ve all been waiting for enjoying these delicious sweet potato brownies!
- Cut into Squares: Once the brownies are completely cool, cut them into squares. I usually cut them into 16 squares, but you can adjust the size to your preference.
- Serve and Enjoy: Serve the brownies as is, or with a scoop of vanilla ice cream, a drizzle of chocolate sauce, or a sprinkle of powdered sugar. They’re also delicious with a cup of coffee or tea.
Tips and Variations:
- Make it Gluten-Free: Substitute the all-purpose flour with a gluten-free all-purpose flour blend.
- Add a Swirl: Before baking, swirl in a spoonful of peanut butter, Nutella, or cream cheese for an extra layer of flavor.
- Spice it Up: Add a pinch of cinnamon, nutmeg, or cayenne pepper to the batter for a warm and spicy kick.
- Make it Vegan: Substitute the butter with vegan butter, the eggs with flax eggs (1 tablespoon ground flaxseed mixed with 3 tablespoons water per egg), and use vegan chocolate chips.
- Storage: Store the brownies in an airtight container at room temperature for up to 3 days, or in the refrigerator for up to a week.
Enjoy your homemade Sweet Potato Brownies!
Conclusion:
And there you have it! These Sweet Potato Brownies are so much more than just a healthier alternative; they’re a genuinely delicious and satisfying treat that I think you’ll absolutely adore. The fudgy texture, the subtle sweetness of the sweet potato, and that rich chocolate flavor all combine to create a brownie experience that’s both decadent and guilt-free. Seriously, what’s not to love? I know, I know, you might be skeptical. Sweet potato in brownies? But trust me on this one. The sweet potato adds moisture and a natural sweetness that perfectly complements the chocolate, creating a depth of flavor you won’t find in your average brownie. Plus, it’s a fantastic way to sneak in some extra nutrients without sacrificing taste. It’s a win-win! Why is this recipe a must-try? Because it’s easy, it’s relatively healthy, and most importantly, it’s incredibly delicious. It’s the perfect recipe for satisfying your sweet tooth without feeling like you’ve completely derailed your healthy eating habits. It’s also a great way to use up leftover sweet potatoes! And let’s be honest, who doesn’t love a good brownie? But the fun doesn’t stop there! These brownies are incredibly versatile.Serving Suggestions and Variations:
* Classic Style: Serve them warm with a scoop of vanilla ice cream for a classic dessert experience. A dusting of powdered sugar adds a touch of elegance. * Nutty Delight: Add chopped walnuts, pecans, or almonds to the batter for a delightful crunch. * Chocolate Chunk Heaven: Fold in some chocolate chunks or chips (dark, milk, or white your choice!) for an extra dose of chocolatey goodness. * Espresso Boost: Add a teaspoon of instant espresso powder to the batter to enhance the chocolate flavor and give your brownies a little kick. * Spice It Up: A pinch of cinnamon, nutmeg, or even a dash of cayenne pepper can add a warm and inviting flavor. * Frosting Fantasy: Top your cooled brownies with your favorite frosting. Cream cheese frosting, chocolate ganache, or even a simple glaze would be amazing. * Brownie Sundaes: Crumble the brownies and layer them with ice cream, whipped cream, chocolate sauce, and your favorite toppings for an epic brownie sundae. * Gluten-Free Option: While this recipe is already quite forgiving, you can ensure it’s completely gluten-free by using a certified gluten-free all-purpose flour blend. I truly believe that these Sweet Potato Brownies will become a new favorite in your household. They’re perfect for a weeknight treat, a weekend baking project, or even a special occasion. They’re also a great option for potlucks or bake sales, as they’re sure to be a crowd-pleaser. So, what are you waiting for? Preheat your oven, gather your ingredients, and get ready to bake up a batch of these amazing brownies. I’m confident that you’ll be pleasantly surprised by how delicious and easy they are to make. I’m so excited for you to try this recipe! Once you’ve made them, please come back and share your experience in the comments below. I’d love to hear what you think, what variations you tried, and how much you enjoyed them. Happy baking! I can’t wait to hear all about your Sweet Potato Brownie adventures! PrintSweet Potato Brownies: The Ultimate Healthy & Delicious Recipe

Fudgy brownies with a secret ingredient: sweet potato puree! Incredibly moist and rich, with a crackly top and chocolate chips.
- Prep Time: 15 minutes
- Cook Time: 55 minutes
- Total Time: 70 minutes
- Yield: 16 brownies 1x
Ingredients
- 1 large sweet potato (about 1 pound), scrubbed
- 1 cup (2 sticks) unsalted butter, melted
- 1 cup granulated sugar
- 1 cup packed light brown sugar
- 3 large eggs
- 1 teaspoon vanilla extract
- 1 cup all-purpose flour
- ½ cup unsweetened cocoa powder
- ½ teaspoon baking powder
- ¼ teaspoon salt
- 1 cup chocolate chips (semi-sweet or dark), divided
- Optional: ½ cup chopped walnuts or pecans
Instructions
- Preheat your oven to 400°F (200°C).
- Place the scrubbed sweet potato directly on the oven rack. Bake for 45-60 minutes, or until it’s very soft and easily pierced with a fork. The baking time will depend on the size of your sweet potato.
- Remove the sweet potato from the oven and let it cool slightly until you can handle it comfortably.
- Cut the sweet potato in half lengthwise. Use a spoon to scoop out the flesh into a bowl. Discard the skin.
- Mash the sweet potato flesh with a fork until smooth. Alternatively, you can use a food processor or blender for an even smoother puree. You should have about 1 cup of sweet potato puree. If you have more, you can save the extra for another recipe!
- In a large bowl, melt the butter completely. You can do this in the microwave in 30-second intervals, stirring in between, or in a saucepan over low heat. Be careful not to burn the butter!
- Add the granulated sugar and brown sugar to the melted butter. Whisk together until well combined and the mixture is smooth. This step is important for creating that shiny, crackly top on your brownies.
- Add the eggs one at a time, whisking well after each addition. Make sure each egg is fully incorporated before adding the next. This helps to create a smooth and emulsified batter.
- Stir in the vanilla extract.
- Add the prepared sweet potato puree to the batter and mix until well combined. The batter will become a beautiful orange-brown color.
- In a separate bowl, whisk together the flour, cocoa powder, baking powder, and salt. This ensures that the baking powder and salt are evenly distributed throughout the batter.
- Gradually add the dry ingredients to the wet ingredients, mixing until just combined. Be careful not to overmix the batter, as this can result in tough brownies. A few streaks of flour are okay.
- Fold in ¾ cup of the chocolate chips (and the chopped walnuts or pecans, if using). Reserve the remaining ¼ cup of chocolate chips for topping.
- Preheat your oven to 350°F (175°C).
- Grease and flour an 8×8 inch baking pan. Alternatively, you can line the pan with parchment paper, leaving an overhang on the sides for easy removal. This is my preferred method!
- Pour the brownie batter into the prepared baking pan and spread it evenly.
- Sprinkle the remaining ¼ cup of chocolate chips over the top of the batter.
- Bake for 25-30 minutes, or until a toothpick inserted into the center comes out with moist crumbs attached. Be careful not to overbake the brownies, as they will become dry.
- Remove the brownies from the oven and let them cool completely in the pan before cutting. This is crucial for getting clean cuts and preventing the brownies from falling apart. I know it’s tempting to dig in right away, but trust me, the wait is worth it!
- Once the brownies are completely cool, cut them into squares. I usually cut them into 16 squares, but you can adjust the size to your preference.
- Serve the brownies as is, or with a scoop of vanilla ice cream, a drizzle of chocolate sauce, or a sprinkle of powdered sugar. They’re also delicious with a cup of coffee or tea.
Notes
- Make it Gluten-Free: Substitute the all-purpose flour with a gluten-free all-purpose flour blend.
- Add a Swirl: Before baking, swirl in a spoonful of peanut butter, Nutella, or cream cheese for an extra layer of flavor.
- Spice it Up: Add a pinch of cinnamon, nutmeg, or cayenne pepper to the batter for a warm and spicy kick.
- Make it Vegan: Substitute the butter with vegan butter, the eggs with flax eggs (1 tablespoon ground flaxseed mixed with 3 tablespoons water per egg), and use vegan chocolate chips.
- Storage: Store the brownies in an airtight container at room temperature for up to 3 days, or in the refrigerator for up to a week.

Leave a Comment