
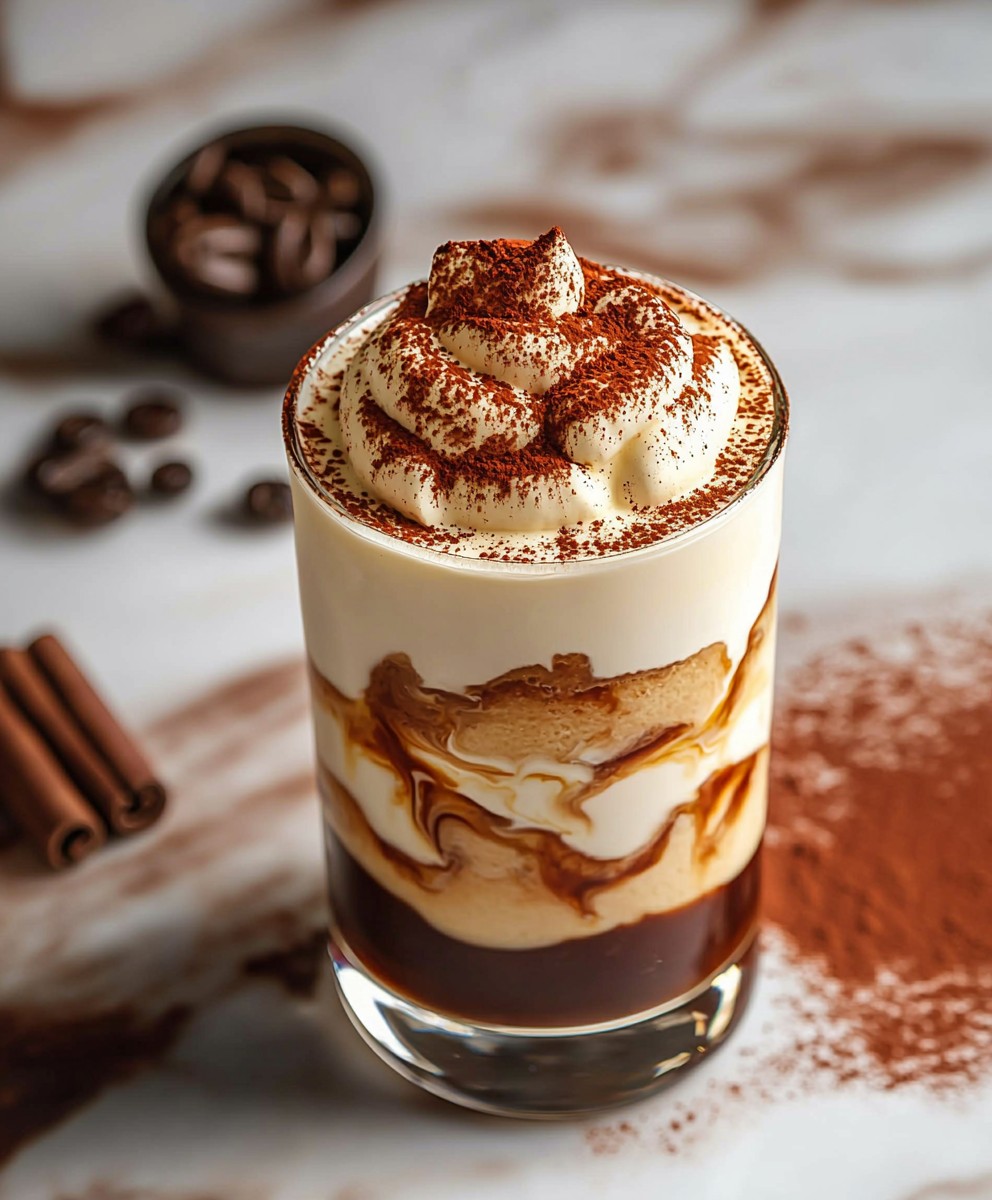
Tiramisu cold brew: the decadent coffee experience you didn’t know you needed! Imagine the rich, creamy indulgence of classic tiramisu, perfectly blended with the smooth, refreshing kick of cold brew coffee. It’s a match made in dessert heaven, and I’m so excited to share this incredible recipe with you.
Tiramisu, meaning “pick me up” or “cheer me up” in Italian, has a fascinating history, with its origins debated but generally placed in the Veneto region of Italy. While the exact details are shrouded in delicious mystery, its popularity is undeniable. This layered dessert, traditionally featuring coffee-soaked ladyfingers, mascarpone cream, and cocoa, has captured hearts worldwide. Now, we’re taking that beloved flavor profile and infusing it into a delightful cold brew.
People adore tiramisu for its exquisite balance of flavors and textures. The bitterness of the coffee, the sweetness of the cream, and the delicate crunch of the ladyfingers create a symphony in every bite. This tiramisu cold brew captures that same magic in a convenient and refreshing drink. It’s the perfect pick-me-up for a hot afternoon, a delightful dessert alternative, or simply a way to treat yourself to something special. The creamy texture, the bold coffee flavor, and the subtle hints of cocoa make it utterly irresistible. Get ready to elevate your coffee game with this easy-to-make and utterly delicious recipe!

Ingredients:
- For the Cold Brew Concentrate:
- 1 cup coarsely ground coffee beans (dark roast recommended)
- 4 cups cold, filtered water
- For the Mascarpone Cream:
- 8 ounces mascarpone cheese, softened
- 1/2 cup heavy cream, cold
- 1/4 cup granulated sugar
- 1 teaspoon vanilla extract
- 1 tablespoon coffee liqueur (optional, but highly recommended – Kahlua is a great choice!)
- For the Ladyfingers:
- Approximately 12-16 ladyfingers (savoiardi biscuits) the amount will depend on the size of your glasses
- For Assembly:
- Unsweetened cocoa powder, for dusting
- Chocolate shavings or grated chocolate (optional, for garnish)
Preparing the Cold Brew Concentrate:
Okay, let’s start with the foundation of our Tiramisu Cold Brew the cold brew itself! This is a super easy process, but it does require a little patience, as it needs to steep overnight. Trust me, the wait is worth it!
- Combine Coffee and Water: In a large jar or pitcher, combine the coarsely ground coffee beans and the cold, filtered water. Make sure all the grounds are submerged. Give it a good stir to ensure everything is well mixed.
- Steep: Cover the jar or pitcher and let it steep in the refrigerator for at least 12 hours, or even better, 18-24 hours. The longer it steeps, the stronger the coffee flavor will be. I usually aim for 20 hours.
- Strain: After steeping, it’s time to strain the coffee. Line a fine-mesh sieve with cheesecloth (or use a coffee filter if you don’t have cheesecloth). Place the sieve over a clean bowl or pitcher. Gently pour the coffee mixture through the sieve, allowing the liquid to drip through. Avoid pressing down on the grounds, as this can release bitter compounds.
- Discard Grounds: Once all the liquid has passed through, discard the coffee grounds.
- Store: Your cold brew concentrate is now ready! You can store it in an airtight container in the refrigerator for up to 2 weeks. Remember, this is a concentrate, so you’ll need to dilute it with water or milk when you’re ready to drink it. For this recipe, we’ll be using it undiluted to really pack that coffee punch.
Making the Mascarpone Cream:
Now for the creamy, dreamy mascarpone layer! This is where the “tiramisu” part really shines. It’s surprisingly simple to make, and the result is pure indulgence.
- Soften Mascarpone: Make sure your mascarpone cheese is softened. If it’s too cold, it won’t incorporate smoothly with the other ingredients. You can leave it at room temperature for about 30 minutes to an hour, or until it’s easily spreadable.
- Whip Heavy Cream: In a separate bowl, using an electric mixer (either a stand mixer or a hand mixer), whip the cold heavy cream until stiff peaks form. Be careful not to overwhip, or you’ll end up with butter! You want it to be thick and fluffy.
- Combine Mascarpone and Sugar: In a large bowl, combine the softened mascarpone cheese and granulated sugar. Use the electric mixer (or a whisk) to beat them together until smooth and creamy.
- Add Vanilla and Coffee Liqueur: Add the vanilla extract and coffee liqueur (if using) to the mascarpone mixture. Mix until well combined. The coffee liqueur adds a lovely depth of flavor that complements the cold brew perfectly.
- Fold in Whipped Cream: Gently fold the whipped cream into the mascarpone mixture. Be careful not to deflate the whipped cream. You want to maintain its light and airy texture. Use a spatula and fold from the bottom up until everything is just combined.
- Chill: Cover the mascarpone cream and refrigerate it for at least 30 minutes. This will help it firm up slightly and allow the flavors to meld together.
Assembling the Tiramisu Cold Brew:
Alright, the moment we’ve been waiting for! Let’s put everything together and create this delicious layered treat. This is where you can get creative with the presentation, so have fun with it!
- Prepare Ladyfingers: Lightly dip each ladyfinger into the cold brew concentrate. You don’t want to soak them completely, just a quick dip on each side. They should be moist but not soggy. If they get too soggy, they’ll fall apart.
- Layering: Now, let’s start layering! In a glass or jar (I like using clear glasses so you can see the beautiful layers), place a layer of the cold brew-soaked ladyfingers at the bottom. You might need to break the ladyfingers into smaller pieces to fit.
- Add Mascarpone Cream: Spoon a generous layer of the mascarpone cream over the ladyfingers. Spread it evenly to create a smooth layer.
- Repeat Layers: Repeat the layers of ladyfingers and mascarpone cream until you reach the top of the glass. I usually do two layers of each, but you can adjust it to your liking.
- Final Layer: For the final layer, make sure it’s a layer of mascarpone cream. This will provide a nice surface for the cocoa powder.
- Dust with Cocoa Powder: Generously dust the top layer of mascarpone cream with unsweetened cocoa powder. Use a fine-mesh sieve to ensure an even coating.
- Garnish (Optional): If you’re feeling fancy, you can garnish with chocolate shavings or grated chocolate. This adds a touch of elegance and extra chocolatey goodness.
- Chill: Cover the assembled Tiramisu Cold Brew and refrigerate it for at least 2 hours, or even better, overnight. This allows the flavors to meld together and the ladyfingers to soften even more.
- Serve and Enjoy!: Before serving, give it a final dusting of cocoa powder if needed. Grab a spoon and dig in! The combination of the cold brew-soaked ladyfingers, the creamy mascarpone, and the cocoa powder is simply divine.
Tips and Variations:
- Coffee Strength: Adjust the amount of coffee grounds to your liking. If you prefer a stronger coffee flavor, use more grounds. If you prefer a milder flavor, use less.
- Sweetness: Adjust the amount of sugar in the mascarpone cream to your liking. You can also use a sugar substitute if you prefer.
- Alcohol: If you’re not a fan of coffee liqueur, you can omit it altogether. Or, you can substitute it with another liqueur, such as amaretto or rum.
- Ladyfingers: If you can’t find ladyfingers, you can use sponge cake or biscotti instead. Just make sure to adjust the soaking time accordingly.
- Vegan Option: To make this recipe vegan, use vegan mascarpone cheese, vegan heavy cream, and vegan ladyfingers. You can also use a plant-based milk alternative for soaking the ladyfingers.
- Individual Servings: This recipe is perfect for individual servings, but you can also make it in a larger dish for a crowd.
- Layering Order: Feel free to experiment with the layering order. Some people prefer to start with a layer of mascarpone cream at the bottom.
- Espresso Option: If you don’t have time to make cold brew, you can use strong brewed espresso instead. Just let it cool completely before using it to soak the ladyfingers.
Enjoy your homemade Tiramisu Cold Brew! It’s the perfect pick-me-up for any time of day.
Conclusion:
Well, there you have it! I truly believe this Tiramisu Cold Brew recipe is a game-changer, and here’s why you absolutely must give it a try. First and foremost, it’s incredibly easy to make. Forget spending a fortune at coffee shops when you can whip up a barista-worthy beverage in your own kitchen with minimal effort. The rich, creamy, and subtly sweet flavor profile is simply divine. It perfectly captures the essence of classic tiramisu that irresistible combination of coffee, cocoa, and mascarpone but in a refreshing, caffeinated form that’s perfect for any time of day. But beyond the ease and incredible taste, this recipe offers a delightful twist on your everyday cold brew. It’s not just another coffee drink; it’s an experience. The layers of flavor unfold with each sip, leaving you feeling satisfied and energized. It’s the perfect pick-me-up on a hot afternoon, a delightful treat to enjoy with friends, or even a decadent dessert alternative. And the best part? It’s incredibly versatile! Feel free to experiment with different variations to suit your own preferences. For a richer, more indulgent experience, try using a higher quality cocoa powder or adding a splash of coffee liqueur. If you prefer a sweeter drink, you can adjust the amount of sweetener to your liking. You could even add a sprinkle of shaved chocolate or a dusting of cocoa powder on top for an extra touch of elegance. Serving Suggestions and Variations: * For a party: Prepare a large batch of the cold brew concentrate and let your guests customize their own drinks with different toppings and sweeteners. * As a dessert: Serve it in a fancy glass with a dollop of whipped cream and a ladyfinger cookie for dipping. * Vegan option: Use plant-based milk and mascarpone alternatives to create a delicious vegan version. * Spiked version: Add a shot of coffee liqueur or rum for an extra kick. * Iced Coffee Float: Add a scoop of coffee ice cream to your Tiramisu Cold Brew for an extra decadent treat. I’m confident that once you try this recipe, it will become a staple in your repertoire. It’s the perfect way to elevate your coffee game and impress your friends and family. It’s also a fantastic way to save money and enjoy a truly delicious and satisfying beverage without leaving the comfort of your home. So, what are you waiting for? Gather your ingredients, follow the simple steps, and prepare to be amazed by the incredible flavor of this Tiramisu Cold Brew. I’m so excited for you to try it! And most importantly, I’d love to hear about your experience! Did you make any modifications? What did you think of the flavor? Share your photos and comments in the section below. Let’s create a community of coffee lovers who appreciate the simple pleasures of a perfectly crafted cold brew. Happy brewing! I can’t wait to hear what you think! PrintTiramisu Cold Brew: The Ultimate Guide to Making It At Home
Layered dessert with cold brew-soaked ladyfingers, creamy mascarpone, and cocoa powder. A refreshing twist on classic tiramisu.
- Prep Time: 15 minutes
- Cook Time: 0 minutes
- Total Time: 165 minutes
- Yield: 4 servings 1x
Ingredients
- 1 cup coarsely ground coffee beans (dark roast recommended)
- 4 cups cold, filtered water
- 8 ounces mascarpone cheese, softened
- 1/2 cup heavy cream, cold
- 1/4 cup granulated sugar
- 1 teaspoon vanilla extract
- 1 tablespoon coffee liqueur (optional, but highly recommended – Kahlua is a great choice!)
- Approximately 12–16 ladyfingers (savoiardi biscuits)
- Unsweetened cocoa powder, for dusting
- Chocolate shavings or grated chocolate (optional, for garnish)
Instructions
- Combine Coffee and Water: In a large jar or pitcher, combine the coarsely ground coffee beans and the cold, filtered water. Make sure all the grounds are submerged. Give it a good stir to ensure everything is well mixed.
- Steep: Cover the jar or pitcher and let it steep in the refrigerator for at least 12 hours, or even better, 18-24 hours. The longer it steeps, the stronger the coffee flavor will be. I usually aim for 20 hours.
- Strain: After steeping, it’s time to strain the coffee. Line a fine-mesh sieve with cheesecloth (or use a coffee filter if you don’t have cheesecloth). Place the sieve over a clean bowl or pitcher. Gently pour the coffee mixture through the sieve, allowing the liquid to drip through. Avoid pressing down on the grounds, as this can release bitter compounds.
- Discard Grounds: Once all the liquid has passed through, discard the coffee grounds.
- Store: Your cold brew concentrate is now ready! You can store it in an airtight container in the refrigerator for up to 2 weeks. Remember, this is a concentrate, so you’ll need to dilute it with water or milk when you’re ready to drink it. For this recipe, we’ll be using it undiluted to really pack that coffee punch.
- Soften Mascarpone: Make sure your mascarpone cheese is softened. If it’s too cold, it won’t incorporate smoothly with the other ingredients. You can leave it at room temperature for about 30 minutes to an hour, or until it’s easily spreadable.
- Whip Heavy Cream: In a separate bowl, using an electric mixer (either a stand mixer or a hand mixer), whip the cold heavy cream until stiff peaks form. Be careful not to overwhip, or you’ll end up with butter! You want it to be thick and fluffy.
- Combine Mascarpone and Sugar: In a large bowl, combine the softened mascarpone cheese and granulated sugar. Use the electric mixer (or a whisk) to beat them together until smooth and creamy.
- Add Vanilla and Coffee Liqueur: Add the vanilla extract and coffee liqueur (if using) to the mascarpone mixture. Mix until well combined. The coffee liqueur adds a lovely depth of flavor that complements the cold brew perfectly.
- Fold in Whipped Cream: Gently fold the whipped cream into the mascarpone mixture. Be careful not to deflate the whipped cream. You want to maintain its light and airy texture. Use a spatula and fold from the bottom up until everything is just combined.
- Chill: Cover the mascarpone cream and refrigerate it for at least 30 minutes. This will help it firm up slightly and allow the flavors to meld together.
- Prepare Ladyfingers: Lightly dip each ladyfinger into the cold brew concentrate. You don’t want to soak them completely, just a quick dip on each side. They should be moist but not soggy. If they get too soggy, they’ll fall apart.
- Layering: Now, let’s start layering! In a glass or jar (I like using clear glasses so you can see the beautiful layers), place a layer of the cold brew-soaked ladyfingers at the bottom. You might need to break the ladyfingers into smaller pieces to fit.
- Add Mascarpone Cream: Spoon a generous layer of the mascarpone cream over the ladyfingers. Spread it evenly to create a smooth layer.
- Repeat Layers: Repeat the layers of ladyfingers and mascarpone cream until you reach the top of the glass. I usually do two layers of each, but you can adjust it to your liking.
- Final Layer: For the final layer, make sure it’s a layer of mascarpone cream. This will provide a nice surface for the cocoa powder.
- Dust with Cocoa Powder: Generously dust the top layer of mascarpone cream with unsweetened cocoa powder. Use a fine-mesh sieve to ensure an even coating.
- Garnish (Optional): If you’re feeling fancy, you can garnish with chocolate shavings or grated chocolate. This adds a touch of elegance and extra chocolatey goodness.
- Chill: Cover the assembled Tiramisu Cold Brew and refrigerate it for at least 2 hours, or even better, overnight. This allows the flavors to meld together and the ladyfingers to soften even more.
- Serve and Enjoy!: Before serving, give it a final dusting of cocoa powder if needed. Grab a spoon and dig in! The combination of the cold brew-soaked ladyfingers, the creamy mascarpone, and the cocoa powder is simply divine.
Notes
- Coffee Strength: Adjust the amount of coffee grounds to your liking. If you prefer a stronger coffee flavor, use more grounds. If you prefer a milder flavor, use less.
- Sweetness: Adjust the amount of sugar in the mascarpone cream to your liking. You can also use a sugar substitute if you prefer.
- Alcohol: If you’re not a fan of coffee liqueur, you can omit it altogether. Or, you can substitute it with another liqueur, such as amaretto or rum.
- Ladyfingers: If you can’t find ladyfingers, you can use sponge cake or biscotti instead. Just make sure to adjust the soaking time accordingly.
- Vegan Option: To make this recipe vegan, use vegan mascarpone cheese, vegan heavy cream, and vegan ladyfingers. You can also use a plant-based milk alternative for soaking the ladyfingers.
- Individual Servings: This recipe is perfect for individual servings, but you can also make it in a larger dish for a crowd.
- Layering Order: Feel free to experiment with the layering order. Some people prefer to start with a layer of mascarpone cream at the bottom.
- Espresso Option: If you don’t have time to make cold brew, you can use strong brewed espresso instead. Just let it cool completely before using it to soak the ladyfingers.


Leave a Comment