
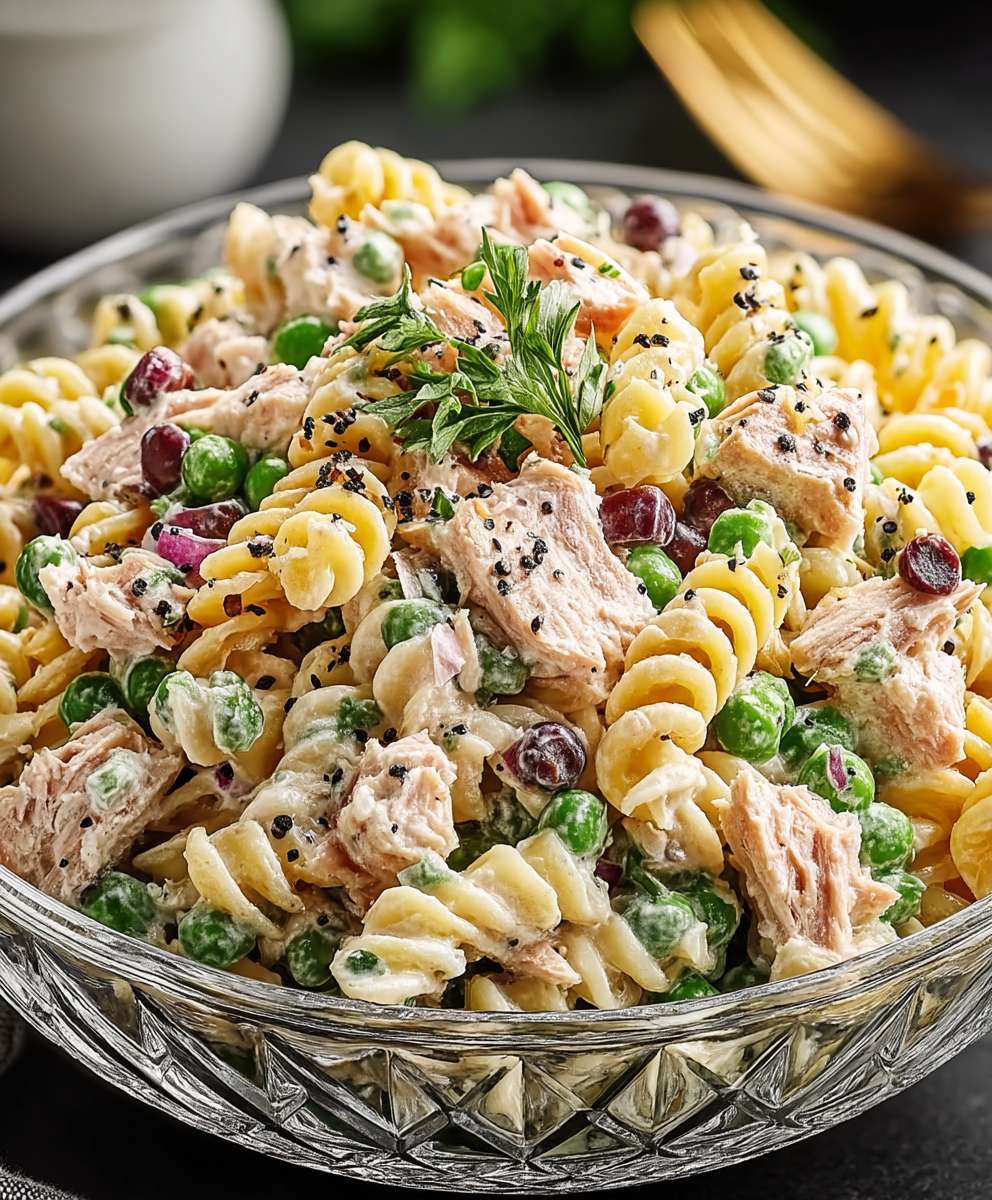
Tuna pasta salad: just the name conjures up images of sunny picnics, breezy lunches, and effortless summer gatherings, doesn’t it? But forget the gloppy, mayo-laden versions of the past! We’re about to elevate this classic to a whole new level. Imagine tender pasta shells embracing flakes of succulent tuna, vibrant vegetables adding pops of color and crunch, all tossed in a light, tangy dressing that will leave you craving more.
While its exact origins are a bit murky, tuna pasta salad likely emerged as a convenient way to utilize canned tuna, a pantry staple that gained popularity in the early 20th century. It quickly became a beloved dish across America, evolving from simple family meals to potluck favorites. The beauty of tuna pasta salad lies in its versatility. It’s a blank canvas for your culinary creativity!
People adore this dish for its incredible combination of flavors and textures. The creamy dressing perfectly complements the savory tuna, while the pasta provides a satisfying base. Plus, it’s incredibly convenient! Ready in minutes, it’s the perfect solution for busy weeknights, quick lunches, or impromptu get-togethers. Get ready to rediscover the joy of tuna pasta salad this recipe will become your new go-to!

Ingredients:
- 1 pound pasta (rotini, penne, or elbow macaroni work great!)
- 2 (5 ounce) cans tuna in water, drained
- 1/2 cup mayonnaise
- 1/4 cup red onion, finely chopped
- 1/4 cup celery, finely chopped
- 1/4 cup sweet pickle relish
- 2 tablespoons Dijon mustard
- 1 tablespoon lemon juice
- 1 teaspoon dried dill weed
- 1/2 teaspoon black pepper
- 1/4 teaspoon salt (or to taste)
- 1/4 cup frozen peas, thawed
- 2 hard-boiled eggs, peeled and chopped (optional)
- Paprika, for garnish (optional)
Cooking the Pasta:
- First things first, let’s get that pasta cooking! Fill a large pot with water and bring it to a rolling boil over high heat. Make sure you use enough water so the pasta doesn’t stick together. I usually aim for about 6 quarts of water for a pound of pasta.
- Once the water is boiling vigorously, add a generous pinch of salt. This seasons the pasta from the inside out and really enhances the flavor of the final dish. Don’t be shy with the salt!
- Now, add the pasta to the boiling water. Give it a good stir to prevent it from sticking to the bottom of the pot.
- Cook the pasta according to the package directions, but aim for al dente. This means it should be firm to the bite, not mushy. Overcooked pasta will make your salad soggy, and nobody wants that! Usually, this is about 8-10 minutes, depending on the type of pasta you’re using.
- While the pasta is cooking, prepare an ice bath. Fill a large bowl with ice and water. This will stop the cooking process immediately and prevent the pasta from becoming overcooked.
- Once the pasta is cooked to al dente, drain it immediately in a colander.
- Immediately transfer the drained pasta to the ice bath. Let it sit in the ice bath for a few minutes, stirring occasionally, until it’s completely cooled. This is a crucial step for achieving the perfect texture in your tuna pasta salad.
- Drain the pasta again thoroughly. You want to remove as much excess water as possible. I sometimes even pat it dry with paper towels to ensure it’s nice and dry.
- Transfer the cooled and drained pasta to a large mixing bowl.
Preparing the Tuna Mixture:
- While the pasta is cooking and cooling, you can prepare the tuna mixture. This is where all the delicious flavors come together!
- Open the cans of tuna and drain them well. I like to use tuna packed in water for a lighter flavor, but you can use tuna packed in oil if you prefer. Just make sure to drain the oil thoroughly.
- Flake the tuna with a fork in a medium-sized bowl. You don’t want to completely shred it, but break it up into smaller, manageable pieces.
- Add the mayonnaise to the flaked tuna. I prefer using a good quality mayonnaise for the best flavor. You can also use a light mayonnaise or even Greek yogurt for a healthier option.
- Add the finely chopped red onion and celery to the bowl. These add a nice crunch and a subtle savory flavor to the salad. Make sure the vegetables are finely chopped so they blend well with the other ingredients.
- Stir in the sweet pickle relish. This adds a touch of sweetness and tanginess that complements the tuna perfectly. If you don’t have sweet pickle relish, you can use dill pickle relish or even finely chopped sweet pickles.
- Add the Dijon mustard and lemon juice to the mixture. The Dijon mustard adds a bit of a kick, while the lemon juice brightens up the flavors and prevents the salad from being too heavy.
- Season with dried dill weed, black pepper, and salt. Adjust the seasonings to your liking. I always recommend starting with a smaller amount of salt and then adding more to taste.
- If you’re using hard-boiled eggs, gently fold them into the tuna mixture. Be careful not to overmix, as you don’t want to break up the eggs too much.
- Finally, gently fold in the thawed frozen peas. The peas add a pop of color and a touch of sweetness to the salad.
Combining and Chilling:
- Now it’s time to bring everything together! Pour the tuna mixture over the cooled pasta in the large mixing bowl.
- Gently toss the pasta and tuna mixture together until everything is well combined. Be careful not to overmix, as this can make the pasta mushy.
- Taste the salad and adjust the seasonings as needed. You might want to add more salt, pepper, lemon juice, or even a pinch of sugar to balance the flavors.
- Cover the bowl tightly with plastic wrap or transfer the salad to an airtight container.
- Refrigerate the tuna pasta salad for at least 30 minutes, or preferably longer, to allow the flavors to meld together. Chilling the salad also helps to prevent it from becoming too watery. I find it tastes best after a couple of hours in the fridge.
Serving:
- Before serving, give the tuna pasta salad a gentle stir.
- Garnish with a sprinkle of paprika, if desired. This adds a pop of color and a subtle smoky flavor.
- Serve the tuna pasta salad cold. It’s perfect as a side dish for picnics, barbecues, or potlucks. It’s also great as a light lunch or dinner.
- Store any leftover tuna pasta salad in an airtight container in the refrigerator for up to 3 days.
Conclusion:
This isn’t just another tuna pasta salad recipe; it’s a flavor explosion waiting to happen! From the creamy, tangy dressing to the satisfying textures of the pasta, tuna, and crisp vegetables, every bite is a delightful experience. I truly believe this tuna pasta salad will become a staple in your kitchen, perfect for quick lunches, potlucks, or a light and refreshing dinner on a warm evening.
Why is this a must-try? Because it’s incredibly easy to make, requires minimal ingredients, and delivers maximum flavor. Forget those bland, boring tuna salads you’ve had before. This recipe elevates the classic to a whole new level. The combination of the Dijon mustard, lemon juice, and mayonnaise creates a dressing that’s both rich and zesty, perfectly complementing the savory tuna and the sweetness of the vegetables. Plus, it’s endlessly customizable!
Serving Suggestions and Variations:
Think of this recipe as a starting point, a blank canvas for your culinary creativity. Here are a few ideas to get you started:
* Spice it up: Add a pinch of red pepper flakes or a dash of hot sauce to the dressing for a little kick.
* Go Mediterranean: Incorporate Kalamata olives, feta cheese, and sun-dried tomatoes for a Mediterranean twist.
* Add some crunch: Toasted almonds or walnuts would add a delightful crunch.
* Make it a meal: Serve it over a bed of lettuce or stuff it into a pita pocket for a complete and satisfying meal.
* Pasta Power: Feel free to experiment with different types of pasta! Rotini, farfalle (bow tie), or even gluten-free pasta work beautifully.
* Veggie Variety: Swap out or add other vegetables like bell peppers (red, yellow, or orange), celery, or even some chopped pickles for extra tang.
* Herb Heaven: Fresh herbs like dill, parsley, or chives will elevate the flavor even further.
This tuna pasta salad is also fantastic served cold, making it ideal for meal prepping. You can easily make a big batch on Sunday and enjoy it throughout the week. It’s also a crowd-pleaser, so don’t hesitate to bring it to your next potluck or barbecue. I guarantee it will be a hit!
I’m so excited for you to try this recipe! I know you’ll love it as much as I do. It’s a simple, delicious, and versatile dish that’s perfect for any occasion.
So, what are you waiting for? Gather your ingredients, put on some music, and get cooking! Once you’ve made it, I’d love to hear about your experience. Did you make any variations? What did you think of the flavor? Share your photos and comments below! I can’t wait to see what you create. Happy cooking, and enjoy your amazing tuna pasta salad!
Tuna Pasta Salad: The Ultimate Easy Recipe
Classic tuna pasta salad with a creamy, flavorful dressing, perfect for picnics, potlucks, or a quick lunch.
Ingredients
- 1 pound pasta (rotini, penne, or elbow macaroni)
- 2 (5 ounce) cans tuna in water, drained
- 1/2 cup mayonnaise
- 1/4 cup red onion, finely chopped
- 1/4 cup celery, finely chopped
- 1/4 cup sweet pickle relish
- 2 tablespoons Dijon mustard
- 1 tablespoon lemon juice
- 1 teaspoon dried dill weed
- 1/2 teaspoon black pepper
- 1/4 teaspoon salt (or to taste)
- 1/4 cup frozen peas, thawed
- 2 hard-boiled eggs, peeled and chopped (optional)
- Paprika, for garnish (optional)
Instructions
- Cook the Pasta: Fill a large pot with water and bring to a rolling boil. Add a generous pinch of salt. Add pasta and cook according to package directions for al dente (about 8-10 minutes).
- Prepare Ice Bath: While pasta cooks, prepare an ice bath (bowl with ice and water).
- Cool Pasta: Drain pasta immediately and transfer to the ice bath. Let sit for a few minutes, stirring occasionally, until completely cooled.
- Drain and Dry: Drain pasta thoroughly. Pat dry with paper towels to remove excess water. Transfer to a large mixing bowl.
- Prepare Tuna Mixture: In a medium bowl, flake drained tuna with a fork.
- Add Ingredients: Add mayonnaise, red onion, celery, sweet pickle relish, Dijon mustard, lemon juice, dill weed, black pepper, and salt to the tuna. Stir to combine.
- Add Optional Ingredients: If using, gently fold in chopped hard-boiled eggs and thawed frozen peas.
- Combine: Pour tuna mixture over the cooled pasta. Gently toss until well combined.
- Season: Taste and adjust seasonings as needed (salt, pepper, lemon juice).
- Chill: Cover the bowl tightly with plastic wrap or transfer to an airtight container. Refrigerate for at least 30 minutes (preferably longer) to allow flavors to meld.
- Serve: Before serving, stir gently. Garnish with paprika, if desired. Serve cold.
- Store: Store leftover tuna pasta salad in an airtight container in the refrigerator for up to 3 days.
Notes
- For a lighter flavor, use tuna packed in water. You can use tuna packed in oil if you prefer. Just make sure to drain the oil thoroughly.
- Use a good quality mayonnaise for the best flavor. You can also use a light mayonnaise or even Greek yogurt for a healthier option.
- Make sure the vegetables are finely chopped so they blend well with the other ingredients.
- If you don’t have sweet pickle relish, you can use dill pickle relish or even finely chopped sweet pickles.
- Adjust the seasonings to your liking. I always recommend starting with a smaller amount of salt and then adding more to taste.
- Be careful not to overmix, as this can make the pasta mushy.
- Chilling the salad also helps to prevent it from becoming too watery. I find it tastes best after a couple of hours in the fridge.

Leave a Comment