
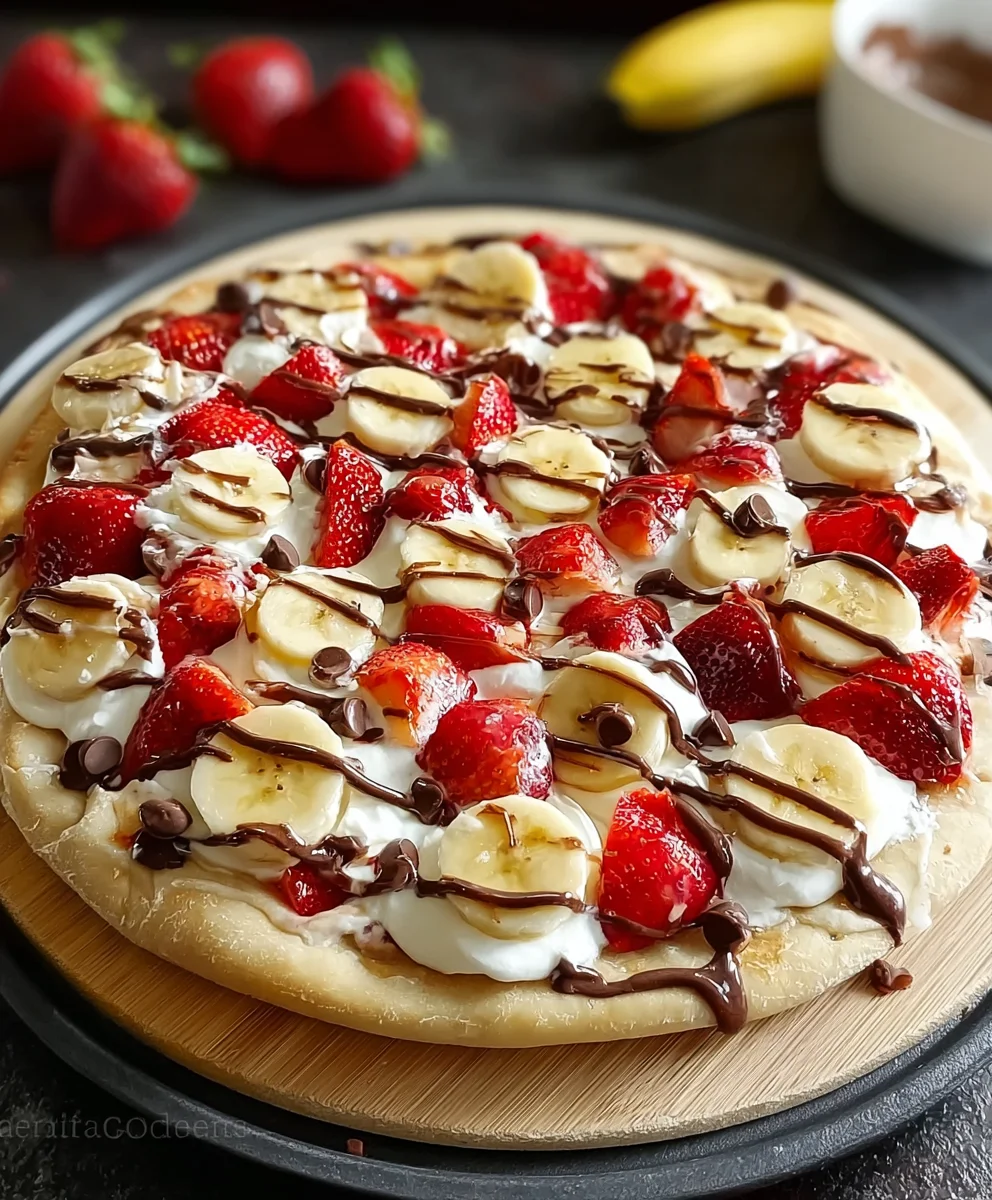
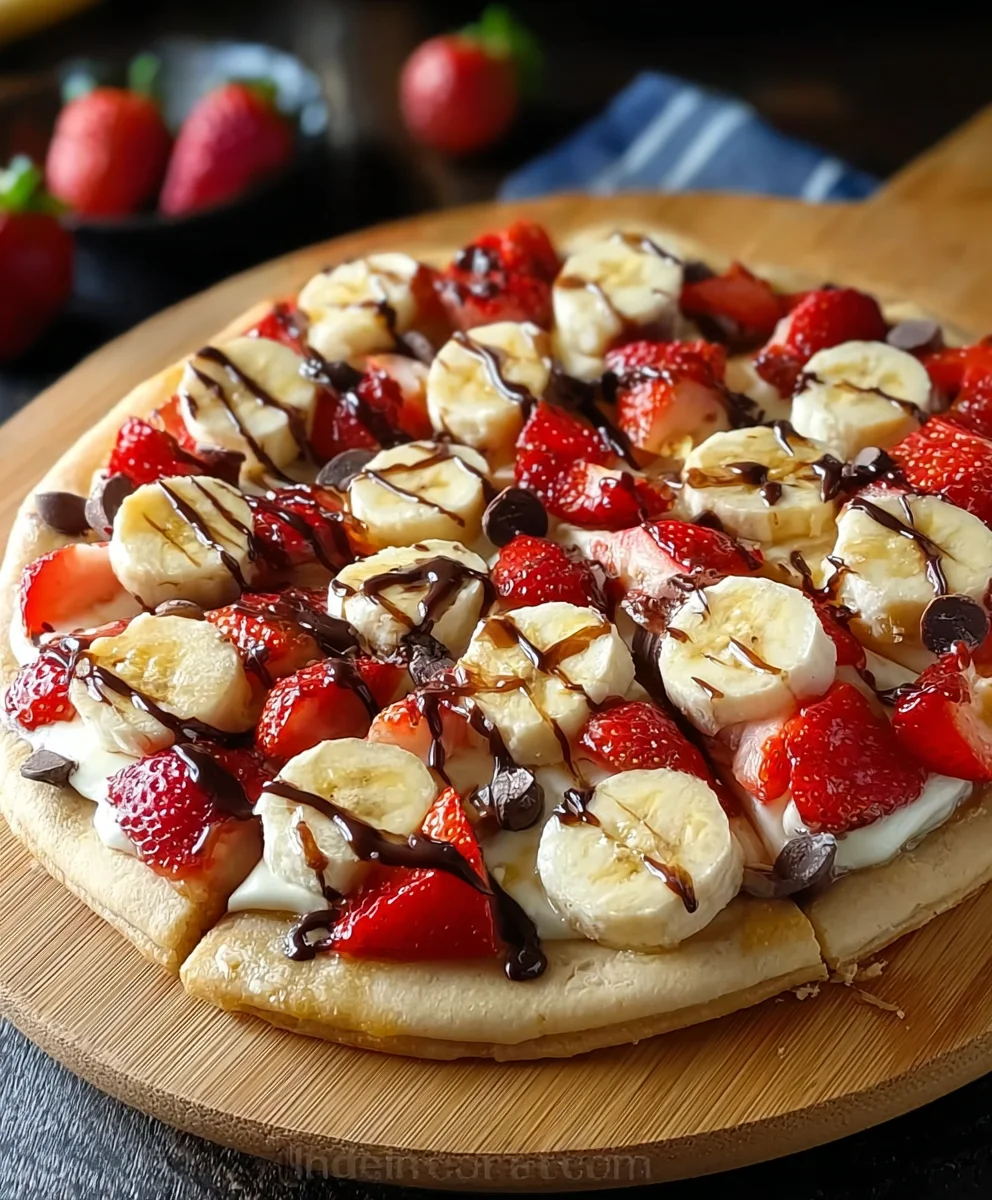
Banana Split Fruit Pizza is a revelation, transforming a beloved ice cream parlor classic into an utterly charming and shareable dessert. Imagine the iconic flavors of a banana split – the creamy sweetness of fresh bananas, the juicy burst of strawberries, and the luscious tang of pineapple – all beautifully arranged atop a tender, cookie-like crust and generously smothered with a dreamy cream cheese frosting. This delightful concoction captures the nostalgic joy of that traditional treat and elevates it into a truly stunning and versatile fruit pizza, perfect for any gathering.
While the classic banana split holds a cherished place in American dessert history, dating back to the early 20th century as a quintessential indulgence, this fruit pizza interpretation offers a remarkably fresh, convenient, and incredibly vibrant way to enjoy those familiar tastes. People adore this dish not only for its incredible taste profile – a harmonious blend of sweet, tangy, and creamy – but also for its appealing textures and its sheer practicality. It’s far less messy than individual sundaes and provides a spectacular centerpiece that’s surprisingly easy to prepare. Whether you’re hosting a celebratory party or simply craving a unique and joyful dessert, our Banana Split Fruit Pizza promises to be a memorable hit, delivering pure bliss in every colorful slice.

Ingredients:
- For the Sugar Cookie Crust:
- 1 cup (2 sticks or 226g) unsalted butter, softened to room temperature. This is crucial for a smooth, well-combined dough.
- 1 ½ cups (300g) granulated sugar. This sweetens our crust perfectly and gives it that classic cookie texture.
- 2 large eggs. They bind everything together and add richness.
- 1 teaspoon pure vanilla extract. Don’t skimp on the vanilla; it truly enhances the cookie flavor.
- 3 cups (360g) all-purpose flour. Make sure to level your flour measurements for accuracy.
- 1 teaspoon baking powder. This gives our crust a slight lift and tender crumb.
- ½ teaspoon salt. A little salt balances the sweetness and brings out the other flavors.
- For the Cream Cheese Frosting:
- 16 ounces (450g) full-fat cream cheese, softened to room temperature. It must be very soft to avoid lumps.
- ½ cup (1 stick or 113g) unsalted butter, softened to room temperature. Again, softness is key here for a silky frosting.
- 4 cups (480g) powdered sugar (confectioners’ sugar), sifted. Sifting prevents lumps and ensures a smooth frosting.
- 2 teaspoons pure vanilla extract. Enhances the creamy flavor beautifully.
- ¼ cup (60ml) heavy cream or milk, if needed, to reach desired consistency. This helps achieve that perfect spreadable texture.
- For the Fruit Toppings (the “Banana Split” part!):
- 3-4 ripe bananas. Look for firm, yellow bananas without too many brown spots.
- 2 cups fresh strawberries, hulled and sliced. The vibrant red color is essential.
- 1 cup fresh pineapple chunks, diced into smaller pieces. Adds a wonderful tropical tang.
- 1 cup fresh blueberries or raspberries. For an extra burst of color and flavor.
- Maraschino cherries, drained, for garnish. The classic “cherry on top” for our Banana Split Fruit Pizza.
- For the Optional Drizzles and Garnishes:
- ½ cup chocolate syrup or melted dark chocolate (for drizzling). A key component for that authentic banana split experience.
- ¼ cup chopped peanuts or walnuts (optional, for sprinkling). Adds a lovely crunch and nutty flavor.
- Whipped cream (optional, for serving). You can never have too much, right?
Preparing the Sugar Cookie Crust:
Get ready to create the sturdy and delicious foundation for our incredible Banana Split Fruit Pizza! This sugar cookie base is not just any crust; it’s a soft, chewy, and perfectly sweet canvas for all the delightful toppings to come. Trust me, making it from scratch is absolutely worth the effort for the superior taste and texture.
-
Preheat Your Oven and Prepare Your Pan: First things first, let’s get the oven ready. Preheat your oven to 375°F (190°C). While it’s heating up, grab a 13×9-inch baking pan. You’ll want to either lightly grease it or line it with parchment paper, leaving an overhang on the sides. The parchment paper method is my personal favorite because it makes lifting the baked cookie crust out of the pan so much easier, preventing any sticking disasters and ensuring a perfect presentation for your Banana Split Fruit Pizza.
-
Cream Together Butter and Sugar: In a large mixing bowl, using an electric mixer (either a stand mixer with the paddle attachment or a hand mixer), beat together the softened unsalted butter and granulated sugar. You want to beat them on medium-high speed for about 2-3 minutes until the mixture is light, fluffy, and pale in color. This creaming process incorporates air into the butter and sugar, which is vital for creating a tender and not-too-dense cookie crust. Don’t rush this step!
-
Add Eggs and Vanilla: Once your butter and sugar are perfectly creamed, crack in the two large eggs, one at a time, beating well after each addition. This ensures the eggs are fully incorporated into the mixture. Follow that with the pure vanilla extract. Beat until everything is just combined. Overmixing at this stage can sometimes lead to a tougher crust, so keep it brief but thorough. The aroma of vanilla starting to fill your kitchen is always a good sign!
-
Combine Dry Ingredients: In a separate medium-sized bowl, whisk together the all-purpose flour, baking powder, and salt. Whisking them together beforehand ensures that the leavening agent (baking powder) and salt are evenly distributed throughout the flour. This prevents pockets of unmixed ingredients and helps achieve a uniform texture in your cookie crust.
-
Gradually Add Dry to Wet Ingredients: With your mixer on low speed, slowly add the dry ingredient mixture to the wet ingredients, a little at a time. Mix only until just combined and no streaks of flour remain. Be careful not to overmix the dough! Overmixing develops the gluten in the flour too much, which can result in a tough, dense cookie crust rather than the soft, chewy one we’re aiming for. Stop as soon as everything comes together.
-
Press Dough into the Pan: Now for the fun part! Take your prepared sugar cookie dough and press it evenly into the bottom of your 13×9-inch baking pan. You can use your hands, a spatula, or even the bottom of a glass to get an even layer. Make sure it extends to all the edges and corners. A uniform thickness ensures even baking. This will be the sturdy base that holds all of our delicious fruit and frosting.
-
Bake the Crust: Pop the pan into your preheated oven and bake for 15-20 minutes. Baking time can vary depending on your oven, so keep an eye on it. You’re looking for the edges to be lightly golden brown and the center to be set. It should spring back slightly when gently touched. Do not overbake, as we want a soft and chewy crust, not a crispy one.
-
Cool Completely: Once baked, remove the pan from the oven and place it on a wire rack to cool completely. This step is non-negotiable! The crust must be entirely cool before you even think about adding the frosting, otherwise, your beautiful cream cheese frosting will melt and create a messy situation. Patience is a virtue here, my friends. You can even pop it in the fridge for about 30 minutes to speed up the cooling process once it’s no longer hot to the touch.
Whipping Up the Cream Cheese Frosting:
This frosting is the heart of our Banana Split Fruit Pizza, a decadent, tangy-sweet cloud that perfectly complements the rich cookie crust and the fresh, vibrant fruit. Its creaminess is what makes this dessert truly irresistible, and achieving that smooth, lump-free texture is easier than you might think!
-
Ensure Ingredients are Room Temperature: This is arguably the most important step for achieving a smooth, lump-free cream cheese frosting. Make absolutely certain that both your full-fat cream cheese and unsalted butter are softened to room temperature. This means they should be pliable to the touch, but not melted. If they’re too cold, you’ll end up with stubborn lumps in your frosting. If they’re too warm, the frosting might be too runny. Planning ahead by taking them out of the fridge an hour or two before you start is ideal.
-
Beat Cream Cheese and Butter: In a large mixing bowl, using your electric mixer (stand mixer with paddle attachment or a hand mixer), beat the softened cream cheese and softened butter together on medium-high speed. Beat them for 2-3 minutes, scraping down the sides of the bowl as needed, until the mixture is incredibly light, airy, and completely smooth. There should be no lumps of cream cheese or butter visible. This aeration process is what gives the frosting its wonderful fluffy texture.
-
Gradually Add Powdered Sugar: Once your cream cheese and butter mixture is perfectly smooth, begin to gradually add the sifted powdered sugar. Start with about half a cup at a time, mixing on low speed until just incorporated before adding more. This prevents a “powdered sugar cloud” from erupting in your kitchen! Once all the sugar is added, increase the speed to medium-high and beat for another 2-3 minutes. This final beating helps to dissolve the sugar crystals, making the frosting silky smooth, and incorporates more air for a truly light and fluffy consistency. Remember to sift your powdered sugar beforehand to avoid any lumps. It makes a significant difference.
-
Stir in Vanilla Extract: Reduce the mixer speed to low and add the pure vanilla extract. Mix until it’s just fully incorporated. Vanilla adds that classic, warm depth of flavor that makes cream cheese frosting so comforting and delicious. Taste a tiny bit to ensure the sweetness and vanilla are to your liking.
-
Adjust Consistency (If Needed): At this point, check the consistency of your frosting. It should be thick enough to hold its shape but soft enough to spread easily. If your frosting seems a bit too thick, you can add heavy cream or milk, one tablespoon at a time, mixing after each addition, until you reach your desired spreadable consistency. If, by chance, it’s a little too thin (perhaps your butter was a bit too soft), you can add a tablespoon or two more sifted powdered sugar until it thickens up. Don’t worry, a little adjustment is perfectly normal!
Assembling Your Banana Split Fruit Pizza:
Now, for the grand finale – bringing all the components together to create this vibrant, show-stopping Banana Split Fruit Pizza! This is where the magic truly happens, transforming simple ingredients into a dessert that’s as beautiful to look at as it is delicious to eat. Get ready for a burst of color and flavor!
-
Prepare the Fruits: While your cookie crust is cooling, it’s the perfect time to prepare all your fresh fruit. This ensures everything is ready for immediate assembly once the crust is cool and frosted.
- Bananas: Slice your bananas into rounds about ¼ to ½-inch thick. Here’s a crucial tip to prevent browning: as soon as you slice them, you can lightly brush them with a little lemon juice, pineapple juice, or even a very diluted solution of citric acid. This creates a barrier against oxidation and keeps them looking fresh and appealing for longer on your Banana Split Fruit Pizza. Don’t overdo it with the lemon juice, or it will alter the flavor.
- Strawberries: Hull the strawberries (remove the green tops) and slice them. You can slice them lengthwise for longer pieces or crosswise into rounds, depending on your preferred aesthetic.
- Pineapple: If using fresh pineapple, make sure it’s peeled and cored, then cut into small, bite-sized chunks. Consistency in size helps with even distribution on the pizza.
- Blueberries/Raspberries: Simply rinse and pat them dry. They’re ready to go!
- Maraschino Cherries: Drain them thoroughly on a paper towel to prevent excess liquid from bleeding into your frosting.
Having all your fruit prepared beforehand makes the assembly process smooth and enjoyable. You’ll feel like a true dessert artist!
-
Frost the Cooled Cookie Crust: Once your sugar cookie crust is completely cool (and I mean completely – no warmth at all!), carefully spread the cream cheese frosting evenly over the entire surface of the crust. Use an offset spatula or the back of a spoon to create a smooth, beautiful layer. You can make it as thick or as thin as you like, but a generous layer is always welcome in a Banana Split Fruit Pizza! The smooth white backdrop of the frosting will make your colorful fruit truly pop.
-
Arrange the Fruit in a “Banana Split” Style: Now for the artistic part! Begin arranging your prepared fresh fruits on top of the cream cheese frosting. Think about the classic banana split presentation.
- I like to start by laying down the banana slices, perhaps in two or three rows down the center, or fanned out in sections.
- Then, strategically place the strawberry slices around the bananas, creating vibrant red patches.
- Next, fill in the gaps and add bursts of yellow with the diced pineapple.
- Finally, sprinkle the blueberries or raspberries over the top for contrasting color and extra flavor dimensions. Don’t be afraid to get creative with your arrangement! The goal is to cover the frosting generously with fruit, creating a visually stunning mosaic. The more colorful, the better!
-
Add the Classic Banana Split Toppings: To truly capture the essence of a banana split, it’s time for the signature garnishes.
- Chocolate Drizzle: Generously drizzle chocolate syrup or melted dark chocolate over the top of the fruit. You can use a squeeze bottle for neat lines or a spoon for a more rustic, swirled look. The chocolate is a non-negotiable for that authentic banana split flavor profile!
- Chopped Nuts (Optional): If you’re a fan of a little crunch, sprinkle the chopped peanuts or walnuts over the fruit and chocolate. This adds a fantastic texture contrast and a lovely nutty aroma. If there are nut allergies, simply omit this step – the pizza will still be absolutely delicious.
- Maraschino Cherries: Place the drained maraschino cherries strategically on top of the fruit pizza. I usually put one on each slice or scatter them evenly. These little red jewels are the iconic “cherry on top” and complete the classic Banana Split Fruit Pizza look.
-
Chill Your Fruit Pizza: Once assembled, cover the Banana Split Fruit Pizza loosely with plastic wrap and refrigerate it for at least 1-2 hours. This chilling time is important for a few reasons: it allows the frosting to set firmly, makes the pizza easier to slice cleanly, and lets the flavors meld together beautifully. Plus, a cold fruit pizza on a warm day is just divine!
-
Serve and Enjoy: When you’re ready to serve, remove the fruit pizza from the refrigerator. If you used parchment paper with an overhang, you can gently lift the entire pizza out of the pan and transfer it to a large cutting board before slicing. Use a sharp knife to cut it into squares or rectangular slices. For an extra treat, you can even serve individual slices with a dollop of whipped cream on the side, just like a true banana split. Each bite is a delightful combination of soft cookie, creamy frosting, and fresh, sweet fruit with that hint of chocolate and nuttiness. It’s a dessert that’s sure to impress and satisfy!
Conclusion:
Wow, what a journey it’s been through the delightful creation that is our featured recipe! I truly believe this isn’t just another dessert; it’s an experience waiting to happen in your kitchen. I’ve poured my heart into sharing this with you, and I’m genuinely excited for you to discover the magic within each bite.
Why This Recipe is an Absolute Must-Try:
First and foremost, this recipe takes a beloved classic and elevates it into something truly spectacular and visually stunning. The concept of a Banana Split Fruit Pizza might sound intricate, but I promise you, the process is surprisingly straightforward, yielding results that look and taste incredibly impressive. Imagine a crisp, sweet crust – perhaps a buttery cookie or a graham cracker base – providing the perfect foundation. On top, a creamy, dreamy, slightly tangy spread, which perfectly balances the sweetness. Then comes the vibrant, fresh array of fruits, echoing the iconic banana split components: ripe banana slices, juicy strawberries, tangy pineapple, and those signature maraschino cherries. It’s a symphony of textures and flavors – the crunch of the crust, the smooth cream, and the burst of fresh fruit with every mouthful.
What makes this dessert truly stand out is its universal appeal. It’s light enough to enjoy after a hearty meal, yet indulgent enough to feel like a special treat. It’s an absolute showstopper for any gathering, from a casual family dinner to a festive party or a sunny brunch. The colorful presentation alone is enough to elicit oohs and aahs from your guests, making you the undisputed star of the culinary show. It offers a wonderful balance of sweetness and freshness, making it incredibly satisfying without feeling overly heavy. This recipe is also fantastic because it appeals to almost everyone; who can resist the charm of a banana split, especially when presented in such a novel and delicious way? It’s the kind of dessert that creates instant smiles and delightful memories, and I know you’ll find immense joy in both making and sharing it.
Moreover, the versatility embedded in this recipe means you can truly make it your own. It’s a fantastic way to incorporate more fresh fruit into your diet in a fun and exciting manner. The delightful combination of textures—from the slight crispness of the crust, to the smooth, rich cream cheese layer, and the juicy tenderness of the fresh fruit—makes every bite an adventure. This isn’t just a dessert; it’s a testament to how simple, wholesome ingredients can be transformed into something extraordinary with a little creativity and love. I find profound satisfaction in crafting something so beautiful and delicious, and I am confident you will too.
Elevate Your Experience: Serving Suggestions & Creative Variations!
Serving Suggestions:
While this dessert shines brilliantly on its own, here are a few ideas to enhance your experience:
- Serve it chilled straight from the refrigerator for the ultimate refreshing treat, especially on a warm day.
- For an extra touch of decadence, offer a light drizzle of chocolate or caramel sauce on the side, allowing guests to customize their slices.
- A dollop of freshly whipped cream or a scoop of premium vanilla bean ice cream alongside a slice can elevate this dessert to an even higher level of indulgence.
- Consider cutting it into smaller, bite-sized squares if you’re serving it as part of a larger dessert buffet or as finger food for a party – perfect for easy grazing!
- It makes an incredible centerpiece for a festive brunch, bringing vibrant colors and fresh flavors to the table.
- Don’t underestimate its potential as a delightful afternoon snack with a cup of coffee or tea.
Creative Variations:
One of the aspects I adore about this recipe is its incredible adaptability. Don’t hesitate to experiment and make it uniquely yours!
- Crust Customization: While a classic sugar cookie or graham cracker crust is fantastic, imagine a shortbread crust for a more buttery flavor, or even a gluten-free cookie crust to accommodate dietary needs. For a more sophisticated touch, try a finely ground almond crust.
- Creamy Topping Twists: Beyond the delightful cream cheese base, consider stirring in a hint of lemon zest for a brighter profile, a dash of almond extract for a nuanced flavor, or even folding in some Greek yogurt for a tangier, lighter consistency. Mascarpone cheese can also be a wonderful substitute for a richer, creamier topping.
- Fruit Frenzy: While the traditional banana split fruits are a must-try, feel free to explore other seasonal or favorite fruits! Kiwi slices, mandarin orange segments, blueberries, raspberries, blackberries, mango chunks, or even sliced peaches or grapes would all be spectacular additions. Think about contrasting colors and textures to make your pizza pop visually.
- Extra Toppings: Sprinkle with toasted coconut flakes, finely chopped nuts (walnuts, pecans, or almonds), mini chocolate chips, or colorful sprinkles for an extra festive touch. A light dusting of cocoa powder or a homemade fruit glaze can add both flavor and a beautiful sheen.
- Dietary Adjustments: This recipe is surprisingly adaptable. Opt for sugar-free cream cheese and sugar substitutes in your topping, or choose dairy-free cream cheese alternatives for a vegan-friendly version. Gluten-free crusts are readily available or can be easily made at home. The possibilities are truly endless, allowing everyone to enjoy this delightful creation.
Your Turn: Bake, Share, & Inspire!
I genuinely hope you’re feeling inspired, perhaps even a little excited, to roll up your sleeves and give this incredible recipe a try. It’s more than just a recipe; it’s an invitation to create joy in your kitchen, to experiment, and to share something truly special with those you care about. Imagine the delight on your friends’ and family’s faces when they see and taste your homemade creation, especially when they learn it’s a Banana Split Fruit Pizza! Don’t be shy about experimenting with the suggestions I’ve offered, or even coming up with your own unique twists – that’s where the real magic often happens!
I’m always so thrilled to see your culinary adventures, and nothing makes me happier than seeing the wonderful creations you bring to life. Please, when you make your version of this fruit pizza, share your experience! Let me know what fruits you chose, what kind of crust you used, or any innovative changes you made to the creamy topping. Snap a photo of your magnificent creation and share it with me, or simply drop a comment below telling me all about your baking journey. Your feedback and creativity truly inspire me and our entire cooking community. It’s through your shared experiences that we all learn, grow, and discover new culinary delights together in the kitchen. So go ahead, bake this delightful dessert, savor every single bite, and spread the deliciousness far and wide!
Ultimate Banana Split Fruit Pizza
Banana Split Fruit Pizza transforms a beloved ice cream parlor classic into a charming, shareable dessert. Featuring creamy bananas, juicy strawberries, and tangy pineapple on a tender, cookie-like crust with dreamy cream cheese frosting, this vibrant fruit pizza delivers the nostalgic joy of a traditional banana split in a stunning, easy-to-prepare format, perfect for any gathering.
Ingredients
-
1 cup (2 sticks / 226g) unsalted butter, softened
-
1 ½ cups (300g) granulated sugar
-
2 large eggs
-
1 teaspoon pure vanilla extract
-
3 cups (360g) all-purpose flour
-
1 teaspoon baking powder
-
½ teaspoon salt
-
16 ounces (450g) full-fat cream cheese, softened
-
½ cup (1 stick / 113g) unsalted butter, softened
-
4 cups (480g) powdered sugar, sifted
-
2 teaspoons pure vanilla extract
-
¼ cup (60ml) heavy cream or milk, if needed
-
3-4 ripe bananas
-
2 cups fresh strawberries, hulled and sliced
-
1 cup fresh pineapple chunks, diced
-
1 cup fresh blueberries or raspberries
-
Maraschino cherries, drained
-
½ cup chocolate syrup or melted dark chocolate (for drizzling)
-
¼ cup chopped peanuts or walnuts (optional, for sprinkling)
-
Whipped cream (optional, for serving)
Instructions
-
Step 1
Preheat oven to 375°F (190°C). Lightly grease or line a 13×9-inch baking pan with parchment. -
Step 2
In a large bowl, cream softened butter and granulated sugar with an electric mixer for 2-3 minutes until light and fluffy. Beat in eggs one at a time, then vanilla extract, until just combined. -
Step 3
In a separate bowl, whisk together flour, baking powder, and salt. Gradually add dry ingredients to wet, mixing on low speed until just combined. Do not overmix. -
Step 4
Press dough evenly into the prepared pan. Bake for 15-20 minutes, until edges are lightly golden and center is set. Do not overbake. Cool completely on a wire rack. -
Step 5
Ensure cream cheese and butter are softened to room temperature. In a large bowl, beat softened cream cheese and butter with an electric mixer for 2-3 minutes until light, airy, and completely smooth. -
Step 6
Gradually add sifted powdered sugar, mixing on low speed until incorporated, then beat on medium-high for 2-3 minutes until smooth and fluffy. Stir in vanilla. If needed, add heavy cream or milk (1 tbsp at a time) to reach desired consistency. -
Step 7
Slice bananas (lightly brush with lemon juice to prevent browning), hull and slice strawberries, dice pineapple, rinse berries, and drain maraschino cherries. -
Step 8
Once crust is completely cool, spread cream cheese frosting evenly over the surface. Arrange prepared fruits artistically on top of the frosting, covering generously. -
Step 9
Drizzle generously with chocolate syrup. Sprinkle with chopped nuts (if using). Place maraschino cherries for garnish. -
Step 10
Cover loosely and refrigerate for at least 1-2 hours to set. Slice and serve. Optionally, serve with whipped cream.
Important Information
Nutrition Facts (Per Serving)
It is important to consider this information as approximate and not to use it as definitive health advice.
Allergy Information
Please check ingredients for potential allergens and consult a health professional if in doubt.

Leave a Comment