
Vanilla Bean Frozen Custard is a delightful treat that brings a touch of nostalgia to every scoop. As a classic dessert that has been enjoyed for generations, this creamy concoction is not just a simple ice cream alternative; its a rich and velvety experience that tantalizes the taste buds. The history of frozen custard dates back to the 1910s, when it was first introduced at the St. Louis World’s Fair, quickly becoming a beloved staple in American dessert culture.
People adore Vanilla Bean Frozen Custard for its luxurious texture and the way it melts in your mouth, offering a perfect balance of sweetness and creaminess. The addition of real vanilla beans elevates this dessert, infusing it with an aromatic flavor that is simply irresistible. Whether enjoyed on a hot summer day or as a comforting indulgence during colder months, this frozen custard is incredibly convenient to make at home, allowing you to savor its delightful taste anytime. Join me as we dive into this delicious recipe that is sure to become a favorite in your household!

Ingredients:
- 2 cups heavy cream
- 1 cup whole milk
- 1 cup granulated sugar
- 1 tablespoon pure vanilla extract
- 1 vanilla bean, split and scraped
- 5 large egg yolks
- Pinch of salt
Preparing the Custard Base
1. **Combine the Dairy**: In a medium saucepan, pour in the 2 cups of heavy cream and 1 cup of whole milk. This combination will give our custard that rich and creamy texture we all love. 2. **Add Sugar and Vanilla**: Next, add 1 cup of granulated sugar to the saucepan. Then, take your vanilla bean, split it down the middle with a sharp knife, and scrape out the tiny seeds. Add both the seeds and the empty pod to the saucepan. Also, pour in 1 tablespoon of pure vanilla extract for an extra boost of flavor. 3. **Heat the Mixture**: Place the saucepan over medium heat. Stir the mixture gently until the sugar has completely dissolved and the mixture is hot but not boiling. This should take about 5-7 minutes. Keep an eye on it, as we dont want it to boil over. 4. **Prepare the Egg Yolks**: While the dairy mixture is heating, take 5 large egg yolks and place them in a separate bowl. Whisk them vigorously until they become pale and slightly thickened. This step is crucial as it will help create a smooth custard. 5. **Temper the Egg Yolks**: Once the dairy mixture is hot, we need to temper the egg yolks to prevent them from scrambling. To do this, slowly pour about a cup of the hot cream mixture into the bowl with the egg yolks while whisking constantly. This will gradually raise the temperature of the yolks. 6. **Combine and Cook**: Now, pour the tempered egg yolk mixture back into the saucepan with the remaining cream mixture. Stir continuously over medium heat until the mixture thickens enough to coat the back of a spoon. This should take about 5-10 minutes. Youll know its ready when you can run your finger through the custard on the back of the spoon, and it holds its shape. 7. **Strain the Custard**: To ensure a silky-smooth texture, strain the custard through a fine-mesh sieve into a clean bowl. This will remove any bits of cooked egg and the vanilla bean pod. 8. **Cool the Custard**: Allow the custard to cool at room temperature for about 30 minutes. After that, cover the bowl with plastic wrap, pressing it directly onto the surface of the custard to prevent a skin from forming. Refrigerate for at least 4 hours, or overnight if you have the time. The longer it chills, the better the flavors will meld together.Churning the Custard
9. **Prepare Your Ice Cream Maker**: Before you start churning, make sure your ice cream makers bowl is frozen according to the manufacturers instructions. This usually means it should be in the freezer for at least 24 hours. 10. **Churn the Custard**: Once the custard is thoroughly chilled, pour it into the ice cream maker. Turn on the machine and churn according to the manufacturers instructions. This typically takes about 20-25 minutes. Youll notice the custard thickening and becoming creamy. 11. **Check the Consistency**: When the custard has reached a soft-serve consistency, its ready to be transferred. If you prefer a firmer texture, you can place it in a container and freeze it for an additional 2-4 hours.Storing and Serving the Frozen Custard
12. **Transfer to a Container**: Using a spatula, transfer the soft custard into an airtight container. Smooth the top with the spatula, and cover it with a piece of parchment paper before sealing the lid. This will help prevent ice crystals from forming. 13. **Freeze**: Place the container in the freezer for at least 2 hours to firm up the custard. If you want to enjoy it later, it can be stored in the freezer for up to 2 weeks. Just remember to let it sit at room temperature for a few minutes before scooping, as it will be quite hard. 14. **Serve**: When youre ready to serve, scoop the frozen custard into bowls or cones. You can enjoy it plain or top it with your favorite toppings like chocolate sauce, fresh fruit, or crushed cookies.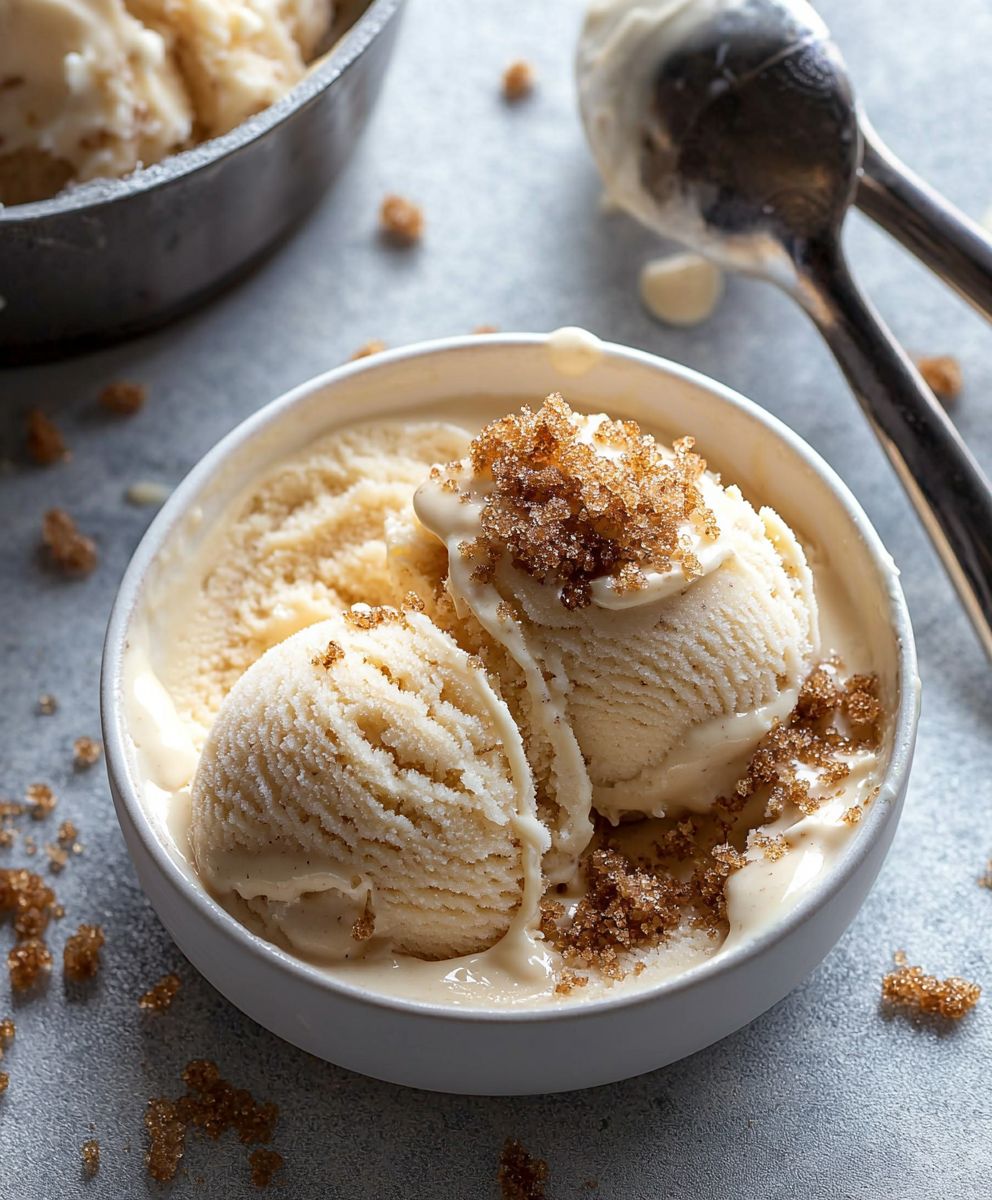
Conclusion:
In summary, this Vanilla Bean Frozen Custard recipe is an absolute must-try for anyone who loves a rich, creamy dessert thats bursting with flavor. The combination of fresh vanilla beans and the silky texture of custard creates a delightful treat thats perfect for any occasion, whether its a hot summer day or a cozy winter evening. For serving suggestions, consider pairing your frozen custard with warm brownies or a slice of pie for a delicious contrast in temperatures and textures. You can also get creative with variations by adding mix-ins like chocolate chips, crushed cookies, or fresh fruit to customize your custard to your liking. I encourage you to give this Vanilla Bean Frozen Custard a try and experience the joy of making your own frozen dessert at home. Once youve whipped up a batch, Id love to hear about your experience! Share your thoughts, any variations you tried, or even a photo of your creation. Lets celebrate the joy of homemade treats together! PrintVanilla Bean Frozen Custard: The Ultimate Guide to Making Creamy Perfection at Home

Enjoy a rich and creamy homemade vanilla custard, perfect for warm days or as a luxurious dessert year-round. Made with heavy cream, whole milk, and real vanilla, this delightful treat is easy to prepare and can be churned into a smooth frozen custard for a refreshing indulgence.
- Prep Time: 30 minutes
- Cook Time: 25 minutes
- Total Time: 270 minutes
- Yield: 1 quart (4 servings) 1x
Ingredients
- 2 cups heavy cream
- 1 cup whole milk
- 1 cup granulated sugar
- 1 tablespoon pure vanilla extract
- 1 vanilla bean, split and scraped
- 5 large egg yolks
- Pinch of salt
Instructions
- In a medium saucepan, pour in the heavy cream and whole milk.
- Add the granulated sugar, split vanilla bean (seeds and pod), and pure vanilla extract to the saucepan.
- Place the saucepan over medium heat, stirring gently until the sugar dissolves and the mixture is hot but not boiling (about 5-7 minutes).
- In a separate bowl, whisk the egg yolks until pale and slightly thickened.
- Slowly pour about a cup of the hot cream mixture into the egg yolks while whisking constantly.
- Pour the tempered egg yolk mixture back into the saucepan and stir continuously over medium heat until thickened (about 5-10 minutes).
- Strain the custard through a fine-mesh sieve into a clean bowl to remove any bits of cooked egg and the vanilla bean pod.
- Allow the custard to cool at room temperature for 30 minutes, then cover with plastic wrap and refrigerate for at least 4 hours or overnight.
- Ensure your ice cream makers bowl is frozen according to the manufacturers instructions (usually 24 hours).
- Pour the chilled custard into the ice cream maker and churn according to the manufacturers instructions (about 20-25 minutes).
- When it reaches a soft-serve consistency, transfer it to a container. For a firmer texture, freeze for an additional 2-4 hours.
- Use a spatula to transfer the soft custard into an airtight container, smoothing the top and covering with parchment paper before sealing.
- Place the container in the freezer for at least 2 hours. It can be stored for up to 2 weeks.
- Scoop the frozen custard into bowls or cones and enjoy plain or with your favorite toppings.
Notes
- For the best flavor, allow the custard to chill overnight.
- If you dont have an ice cream maker, you can freeze the custard in a container, stirring every 30 minutes for the first 2 hours to break up ice crystals.

Leave a Comment