
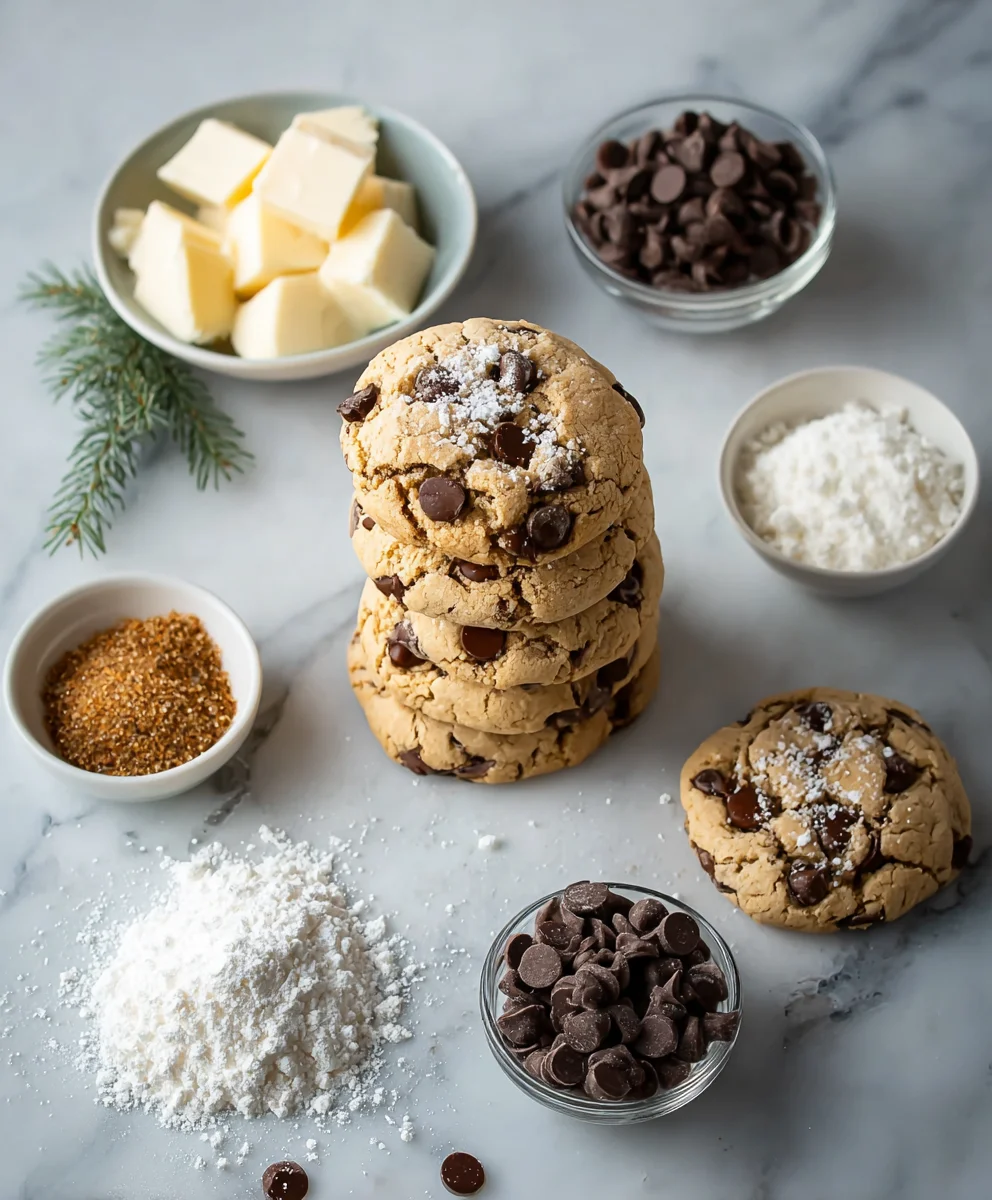
Winter Wonderland Chocolate Chip Cookies aren’t just a treat; they’re a warm hug in a frosted landscape, a sweet escape from the chilly air. Imagin extracte the joy on your loved ones’ faces as they bite into these impossibly soft, chewy cookies, studded with generous chunks of rich chocolate and a whisper of holiday spice. What is it about this particular cookie that captures our hearts and taste buds year after year? It’s the perfect balance of buttery sweetness, the satisfying melt of premium chocolate, and that extra touch that elevates them from ordinary to extraordinary. These aren’t your average chocolate chip cookies; they’re an experience. We’ve perfected a recipe that ensures a tender interior, slightly crisp edges, and a flavor profile that truly embodies the magic of the season. Get ready to create your own edible Winter Wonderland!

Ingredients:
- 1 cup unsalted butter, softened
- 3/4 cup granulated sugar
- 3/4 cup packed light brown sugar
- 2 large eggs
- 1 teaspoon pure vanilla extract
- 2 1/4 cups all-purpose flour
- 1 teaspoon baking soda
- 1/2 teaspoon salt
- 2 cups semi-sweet chocolate chips
- 1/2 cup white chocolate chips
- 1/2 cup crushed peppermint candies
Getting Started: The Dough Foundation
The journey to our Winter Wonderland Chocolate Chip Cookies begin extracts with building a solid flavor base. First, in a large mixing bowl, cream together the softened unsalted butter, granulated sugar, and packed light brown sugar. You want to beat these ingredients until they are light and fluffy. This process incorporates air into the mixture, which is crucial for creating tender cookgin extract. Imagine whipping clouds – that’s the texture you’re aiming for. You can use an electric mixer for this, which makes the job much easier and quicker, or you can roll up your sleeves and use a sturdy whisk or wooden spoon. Be patient; this step might take about 3 to 5 minutes. Once you have that lovely, creamy consistency, it’s time to add the eggs. Incorporate them one at a time, beating well after each addition. This ensures the eggs are fully integrated into the butter and sugar mixture, preventing any separation later on. Next, stir in the pure vanilla extract. The vanilla adds a wonderful warmth and depth of flavor that perfectly complements the chocolate and peppermint. Give it a good mix so the vanilla is evenly distributed throughout the batter.
The Dry Mix and Combining
Now, in a separate medium-sized bowl, whisk together the all-purpose flour, baking soda, and salt. Whisking these dry ingredients together ensures that the baking soda and salt are evenly distributed throughout the flour. This is important for consistent leavening and seasoning in every bite of your cookie. If you were to just dump the baking soda and salt directly into the wet ingredients, you might end up with pockets of saltiness or areas where the cookies don’t rise properly. Once your dry ingredients are well combined, it’s time to gradually add them to the wet ingredients. Do this in three additions, mixing on low speed or by hand until just combined after each addition. It’s important not to overmix the dough at this stage. Overmixing can develop the gluten in the flour too much, resulting in tough cookies. You want to stop mixing as soon as you no longer see any streaks of dry flour. The dough will be quite thick and a little sticky at this point.
The Winter Wonderland Inclusions
This is where the magic truly happens and our cookies earn their name! Gently fold in the semi-sweet chocolate chips and the white chocolate chips. These provide classic chocolatey goodness with a creamy contrast from the white chocolate. Then, for that festive “winter wonderland” touch, fold in the crushed peppermint candies. Ensure everything is distributed as evenly as possible throughout the dough. The crushed peppermint will add little bursts of cool, minty flavor and a delightful crunch that’s perfect for the holiday season or any time you crave a minty treat. Make sure your peppermint candies are crushed to a fine or medium texture – too large and they might feel like rocks in your cookies, too fine and the flavor might dissnon-alcoholic ipate too quickly. You can crush them by placing them in a zip-top bag and hitting them with a rolling pin or the bottom of a heavy pan.
Chilling for Perfection and Shaping
Once all the delicious additions are incorporated, cover the bowl tightly with plastic wrap and refrigerate the dough for at least 30 minutes, and up to 24 hours. Chilling the dough is a critical step for several reasons. Firstly, it solidifies the butter, which helps the cookies hold their shape better during baking and prevents them from spreading too much. This leads to thicker, chewier cookies with a more satisfying texture. Secondly, chilling allows the flavors to meld and deepen, making the cookies even more delicious. After chilling, preheat your oven to 375 degrees Fahrenheit (190 degrees Celsius) and line baking sheets with parchment paper. This prevents sticking and makes for easy cleanup. Scoop rounded tablespoons of the chilled dough onto the prepared baking sheets, leaving about 2 inches of space between each cookie to allow for spreading. For a professional look, you can use a cookie scoop. If the dough is very stiff from chilling, you can let it sit at room temperature for a few minutes to become more pliable.
Baking and Achieving That Perfect Finish
Bake the cookies in the preheated oven for 9 to 11 minutes, or until the edges are golden brown and the centers are still slightly soft. The exact baking time will depend on your oven, so keep a close eye on them, especially during the first batch. You want them to look done around the edges but still slightly underbaked in the very center, as they will continue to cook and set as they cool on the baking sheet. This is the secret to achieving that wonderfully chewy texture. Once baked, remove the baking sheets from the oven and let the cookies cool on the baking sheets for 5 to 10 minutes. This is another crucial step for texture. It allows the cookies to firm up before you attempt to move them. After the initial cooling period on the baking sheets, carefully transfer the cookies to a wire rack to cool completely. As they cool, the peppermint will intensify slightly, and the chocolate will firm up. Enjoy these delightful Winter Wonderland Chocolate Chip Cookies warm or at room temperature!
Conclusion:
And there you have it – the recipe for the most delightful Winter Wonderland Chocolate Chip Cookies you’ll ever bake! We’ve walked through each step, from creaming the butter and sugar to achieving that perfect golden-brown finish. These cookies are more than just a treat; they’re a warm hug on a chilly day, a perfect companion to a steaming mug of hot chocolate, or a thoughtful homemade gift.
I highly encourage you to give these a try. The aroma alone as they bake will fill your home with a festive and comforting scent. For serving, they are simply divine warm from the oven, perhaps with a scoop of vanilla ice cream. However, they also store beautifully in an airtight container for a few days, making them perfect for snacking or sharing. Feel free to get creative with variations! Consider adding a pinch of cinnamon or nutmeg to the dough for an extra spice kick, or perhaps some chopped pecans or walnuts for added crunch. You could even drizzle them with white chocolate for a truly enchanting finish. Don’t be afraid to experiment and make these Winter Wonderland Chocolate Chip Cookies your own!
FAQs:
Can I make these cookies ahead of time?
Absolutely! The dough can be made up to 2 days in advance and stored in the refrigerator. Just bring it to room temperature for about 30 minutes before scooping and baking. Baked cookies will stay fresh in an airtight container for up to 5 days.
What if I don’t have semi-sweet chocolate chips?
No problem at all! You can substitute with milk chocolate chips, dark chocolate chips, or even white chocolate chips. A mix of different chocolate types also works wonderfully for added depth of flavor.

Winter Wonderland Chocolate Chip Cookies-Festive Treats
Indulge in the magic of the holidays with these delightful Winter Wonderland Chocolate Chip Cookies, featuring a festive blend of chocolate and peppermint.
Ingredients
-
1 cup unsalted butter, softened
-
3/4 cup granulated sugar
-
3/4 cup packed light brown sugar
-
2 large eggs
-
1 teaspoon pure vanilla extract
-
2 1/4 cups all-purpose flour
-
1 teaspoon baking soda
-
1/2 teaspoon salt
-
2 cups semi-sweet chocolate chips
-
1/2 cup white chocolate chips
-
1/2 cup crushed peppermint candies
Instructions
-
Step 1
In a large mixing bowl, cream together the softened unsalted butter, granulated sugar, and packed light brown sugar until light and fluffy. Beat in the eggs one at a time, followed by the vanilla extract, mixing well after each addition. -
Step 2
In a separate bowl, whisk together the all-purpose flour, baking soda, and salt. Gradually add the dry ingredients to the wet ingredients in three additions, mixing on low speed or by hand until just combined. Do not overmix. -
Step 3
Gently fold in the semi-sweet chocolate chips and white chocolate chips. Then, fold in the crushed peppermint candies, ensuring even distribution throughout the dough. -
Step 4
Cover the bowl tightly with plastic wrap and refrigerate the dough for at least 30 minutes, and up to 24 hours. Preheat your oven to 375 degrees Fahrenheit (190 degrees Celsius) and line baking sheets with parchment paper. -
Step 5
Scoop rounded tablespoons of the chilled dough onto the prepared baking sheets, leaving about 2 inches of space between each cookie. -
Step 6
Bake for 9 to 11 minutes, or until the edges are golden brown and the centers are still slightly soft. Let the cookies cool on the baking sheets for 5 to 10 minutes before transferring them to a wire rack to cool completely.
Important Information
Nutrition Facts (Per Serving)
It is important to consider this information as approximate and not to use it as definitive health advice.
Allergy Information
Please check ingredients for potential allergens and consult a health professional if in doubt.
Leave a Comment