
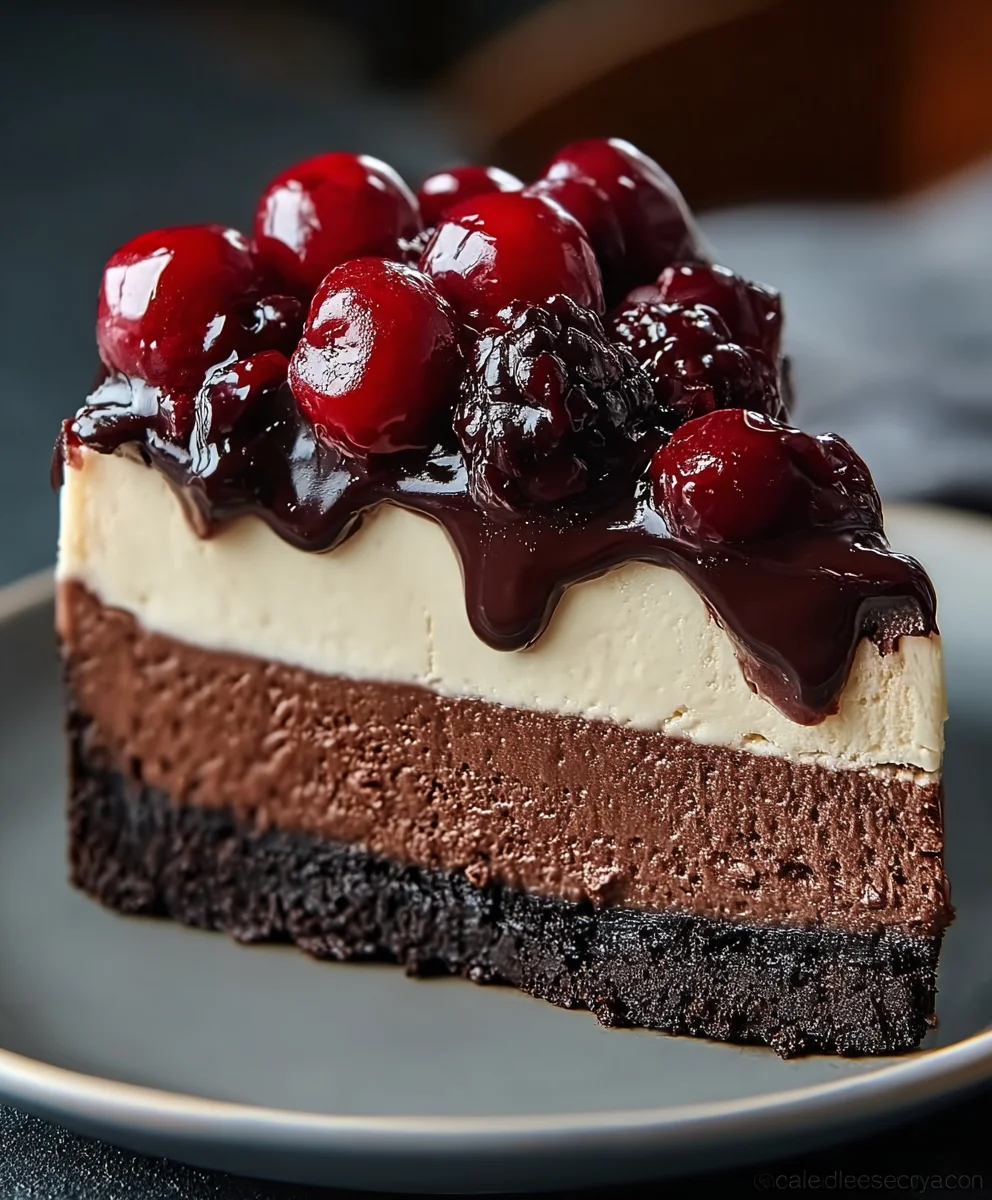
Black Forest Cheesecake Delight is not just a dessert; it’s an experience. Imagin extracte the rich, dark allure of chocolate meeting the creamy, tangy embrace of cheesecake, all infused with the boozy sweetness of cherries. This isn’t your average sweet treat; it’s a sophisticated symphony of flavors and textures that has captivated dessert lovers for generations. The magic lies in its harmonious blend of indulgence and elegance. People adore this Black Forest Cheesecake Delight because it offers that nostalgic comfort of classic Black Forest cake but elevates it with the luxurious smoothness of cheesecake. It’s the perfect balance of sweet, tart, and intensely chocolatey, making every single bite an unforgettable journey. We’re about to unlock the secrets to creating this show-stopping dessert in your own kitchen, ensuring a truly magnificent Black Forest Cheesecake Delight that will leave evergin extracte begging for the recipe.

Ingredients:
- 1 ½ cups crushed chocolate cookies (such as Oreos or chocolate wafers)
- ¼ cup melted butter
- 3 (8 oz) packages cream cheese, softened
- 1 cup granulated sugar
- 1 teaspoon pure vanilla extract
- 3 large eggs
- ½ cup sour cream
- ¼ cup unsweetened cocoa powder
- 1 can (approximately 21 oz) cherry pie filling
- Whipped cream, for garnish
- Chocolate shavings, for garnish
Preparing the Crust
Step 1: Combine Crust Ingredients
The foundation of our Black Forest Cheesecake Delight is a rich, chocolatey crust. To begin extract, take your 1 ½ cups of finely crushed chocolate cookies. You can achieve this by pulsing them in a food processor until they resemble coarse crum extractbs, or by placing them in a sturdy zip-top bag and crushing them with a rolling pin. Once you havrum extractour crumbs, transfer them to a medium-sized bowl. Add the ¼ cup of meltedrum extracttter to the crumbs. Stir vigorously with a fork or spatulrum extractntil all the cookie crumbs are thoroughly moistened with the butter. This mixture should have a consistency that allows it to clump together when squeezed.
Step 2: Press Crust into Pan
Now, take a 9-inch springform pan. This type of pan is ideal for cheesecakes as it allows for easy removal of the finished dessert. Evenly distribute the chocolate cookie and butter mixture into the bottom of the prepared springform pan. Use the flat bottom of a measuring cup or the heel ofrum extractur hand to firmly press the crumbs into an even layer across the base of the pan. This pressing action is crucial forum extractreating a cohesive crust that won’t crumble when you slice into the cheesecake. Ensure the edges are also slightly pressed up to form a subtle rim, if desired. For an extra sturdy crust, you can bake it in a preheated oven at 350°F (175°C) for about 8-10 minutes, then let it cool completely before proceeding.
Making the Cheesecake Filling
Step 3: Cream the Cheese and Sugar
In a large mixing bowl, add your 3 (8 oz) packages of softened cream cheese. Softened cream cheese is key to achieving a smooth, lump-free filling. It should be at room temperature, yielding slightly to gentle pressure. Add the 1 cup of granulated sugar to the cream cheese. Using an electric mixer (either a stand mixer with a paddle attachment or a hand mixer), beat the cream cheese and sugar together on medium speed until the mixture is light, fluffy, and completely smooth. Scrape down the sides and bottom of the bowl frequently with a rubber spatula to ensure all the cream cheese and sugar are incorporated. This step aerates the filling, contributing to its creamy texture.
Step 4: Incorporate Wet Ingredients and Cocoa
Once the cream cheese and sugar are well combined, it’s time to add the remaining wet ingredients and the cocoa powder. Reduce the mixer speed to low and gradually add the 3 large eggs, one at a time, beating just until each egg is incorporated before adding the next. Overmixing after adding the eggs can lead to cracks in your cheesecake. Next, gently mix in the ½ cup of sour cream and the 1 teaspoon of vanilla extract until just combined. Finally, add the ¼ cup of unsweetened cocoa powder. Mix on low speed until the cocoa powder is fully incorporated and the batter is a uniform chocolate color. Be careful not to overmix at this stage. The batter should be smooth and creamy, with no visible streaks of cream cheese or cocoa.
Assembling and Baking the Cheesecake
Step 5: Pour Filling and Add Topping
Pour the luscious chocolate cheesecake batter evenly over the prepared cookie crust in the springform pan. Smooth the top with your spatula. Now, it’s time for the signature cherry topping. Carefully open the can of cherry pie filling. Spoon the entire can of cherry pie filling over the cheesecake batter. You can gently swirl it into the batter with a knife or toothpick to create a marbled effect, or leave it as a distinct layer on top. Either way, it adds a beautiful visual and a burst of fruity flavor.
Step 6: Bake and Cool
Preheat your oven to 325°F (160°C). Place the springform pan on a baking sheet to catch any potential drips. Bake the cheesecake for approximately 50-60 minutes. The cheesecake is done when the edges are set, but the center still has a slight wobble when the pan is gently shaken. It will continue to set as it cools. Once baked, turn off the oven and leave the cheesecake inside with the oven door slightly ajar for about an hour. This gradual cooling helps prevent cracking. After an hour, carefully remove the cheesecake from the oven and let it cool completely on a wire rack. Once fully cooled, cover the cheesecake loosely with plastic wrap and refrigerate for at least 6 hours, or preferably overnight, to allow it to set thoroughly.
Finishing and Serving
Step 7: Garnish and Serve
When you’re ready to serve your Black Forest Cheesecake Delight, carefully remove the sides of the springform pan. This is where the springform pan really shines, allowing for a clean release. To garnish, generously top the chilled cheesecake with a dollop of fluffy whipped cream. For the finishing touch, sprinkle a generous amount of chocolate shavings over the whipped cream. The contrast of the dark chocolate and vibrant cherries against the creamy cheesecake is truly a delight for both the eyes and the palate. Slice and serve, enjoying the rich chocolate flavor, the creamy texture, and the sweet tang of the cherries.
Conclusion:
You’ve now unlocked the secrets to creating a truly spectacular Black Forest Cheesecake Delight! This rich and decadent dessert beautifully marries the intense chocolate flavor of a classic Black Forest cake with the creamy indulgence of cheesecake. We’ve walked through each step, from crafting the perfect chocolate cookie crust to layering that luscious cherry filling and finishing with a cloud of whipped cream and chocolate shavings. Whether you’re a seasoned baker or just starting out, this recipe is designed to impress.
For serving suggestions, consider pairing a generous slice of your Black Forest Cheesecake Delight with a dollop of fresh whipped cream and a few extra maraschino cherries for an extra pop of color and sweetness. A small glass of cherry liqueur extract on the side can also enhance the flavor profile wonderfully. Don’t be afraid to get creative with variations! You could incorporate a hint of kirsch extract into the cheesecake filling for a more traditional Black Forest touch, or experiment with different berry fillings like raspberries or mixed berries for a unique twist.
We encourage you to give this Black Forest Cheesecake Delight a try. The effort is truly rewarded with a dessert that’s perfect for special occasions or simply as a treat to brighten any day. Enjoy the process, savor the aroma, and most importantly, enjoy every delicious bite!
Frequently Asked Questions:
What is the best way to store leftover Black Forest Cheesecake Delight?
Leftover Black Forest Cheesecake Delight should be covered tightly with plastic wrap or aluminum foil and stored in the refrigerator. It will keep well for up to 3-4 days. For longer storage, you can freeze individual slices wrapped in plastic wrap and then in a freezer-safe container or bag for up to 1-2 months. Thaw frozen slices in the refrigerator overnight before serving.
Can I make the Black Forest Cheesecake Delight ahead of time?
Absolutely! In fact, making the Black Forest Cheesecake Delight a day in advance is highly recommended. This allows the cheesecake to fully set and the flavors to meld together beautifully. The crust will also become more stable. Simply prepare the entire cheesecake as per the recipe, let it chill in the refrigerator overnight, and then add the whipped cream and chocolate shavings just before serving for the freshest appearance.

Black Forest Cheesecake Bliss-Rich Decadence
A decadent chocolate cheesecake with a rich chocolate cookie crust, topped with sweet cherry pie filling and finished with whipped cream and chocolate shavings.
Ingredients
-
1 ½ cups crushed chocolate cookies
-
¼ cup melted butter
-
3 (8 oz) packages cream cheese, softened
-
1 cup granulated sugar
-
1 teaspoon pure vanilla extract
-
3 large eggs
-
½ cup sour cream
-
¼ cup unsweetened cocoa powder
-
1 can (approximately 21 oz) cherry pie filling
-
Whipped cream, for garnish
-
Chocolate shavings, for garnish
Instructions
-
Step 1
Combine 1 ½ cups crushed chocolate cookies with ¼ cup melted butter in a bowl. Stir until crumbs are moistened. Press evenly into the bottom of a 9-inch springform pan. -
Step 2
In a large bowl, beat 3 packages of softened cream cheese with 1 cup granulated sugar until light and fluffy. Scrape down sides of the bowl as needed. -
Step 3
Reduce mixer speed to low. Gradually add 3 large eggs, one at a time, beating until just incorporated. Mix in ½ cup sour cream and 1 teaspoon vanilla extract. Add ¼ cup unsweetened cocoa powder and mix until just combined and the batter is a uniform chocolate color. -
Step 4
Pour the chocolate cheesecake batter evenly over the prepared crust. Spoon the entire can of cherry pie filling over the batter. You can gently swirl it for a marbled effect. -
Step 5
Preheat oven to 325°F (160°C). Bake on a baking sheet for 50-60 minutes, until edges are set and the center has a slight wobble. Turn off oven, leave door ajar, and cool cheesecake inside for 1 hour. Remove from oven and cool completely on a wire rack. -
Step 6
Once fully cooled, cover loosely and refrigerate for at least 6 hours, or preferably overnight. Remove the sides of the springform pan. Garnish with whipped cream and chocolate shavings before slicing and serving.
Important Information
Nutrition Facts (Per Serving)
It is important to consider this information as approximate and not to use it as definitive health advice.
Allergy Information
Please check ingredients for potential allergens and consult a health professional if in doubt.
Leave a Comment