
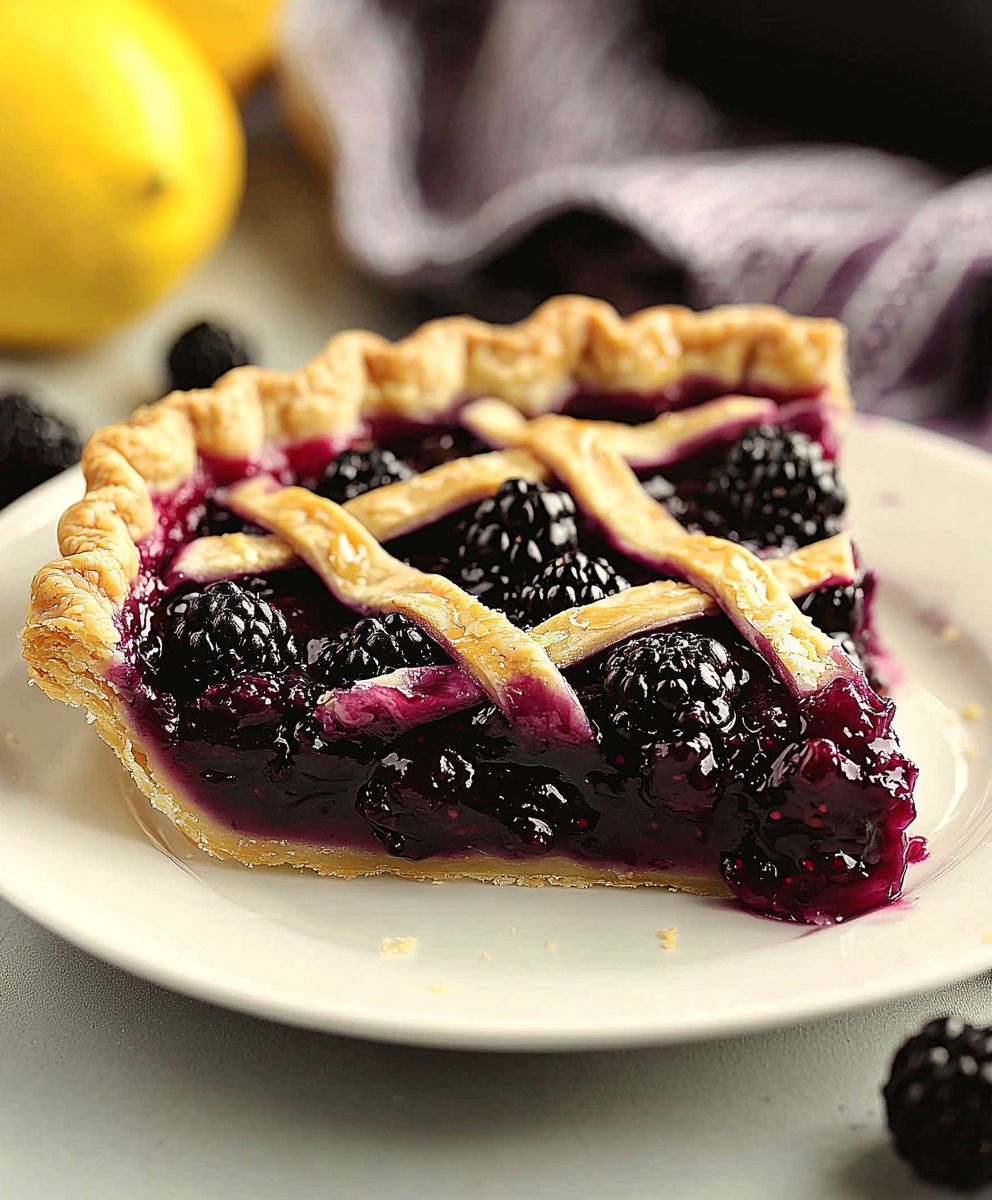
Blackberry pie filling, oh, where do I even begin? Imagine sinking your fork into a warm, golden crust, only to be greeted by a burst of sweet and tart blackberry goodness. Its a taste of summer in every bite, a comforting classic that has graced tables for generations. Im about to share my foolproof recipe for the most delectable blackberry pie filling youve ever tasted, and trust me, its a game-changer.
Blackberries themselves have a rich history, enjoyed by cultures worldwide for centuries. From ancient medicinal uses to becoming a beloved ingredient in jams, jellies, and, of course, pies, these berries have truly stood the test of time. There’s something inherently nostalgic about a blackberry pie, evoking memories of simpler times and family gatherings.
But what makes blackberry pie so irresistible? It’s the perfect balance of sweet and tart, the juicy burst of flavor with each bite, and the satisfying texture of the tender berries nestled within a flaky crust. Plus, making your own filling allows you to control the sweetness and ensure the freshest, most vibrant flavor possible. This recipe is incredibly easy to follow, even for beginner bakers, and the results are simply divine. Get ready to impress your friends and family with a pie that’s bursting with flavor and love!

Ingredients:
- 6 cups fresh blackberries, rinsed and gently patted dry
- ¾ cup granulated sugar (adjust to taste depending on berry sweetness)
- ¼ cup cornstarch
- ¼ teaspoon ground cinnamon
- ? teaspoon ground nutmeg
- 1 tablespoon lemon juice, freshly squeezed
- 1 tablespoon unsalted butter, cut into small pieces
- 1 recipe double-crust pie dough (store-bought or homemade), chilled
- 1 tablespoon milk or cream, for brushing
- 1 tablespoon granulated sugar, for sprinkling (optional)
Preparing the Blackberry Filling:
Alright, let’s get started with the heart of our pie the blackberry filling! This is where the magic happens, and we’ll make sure it’s bursting with flavor and perfectly thickened.
- Combine the Berries, Sugar, Cornstarch, and Spices: In a large bowl, gently combine the rinsed and dried blackberries, granulated sugar, cornstarch, cinnamon, and nutmeg. Be gentle! We don’t want to crush the berries too much at this stage. The sugar will help draw out some of their juices, which is exactly what we want. The cornstarch is our thickening agent, ensuring the filling isn’t too runny after baking. The cinnamon and nutmeg add a warm, comforting spice that complements the blackberries beautifully. I like to use a large rubber spatula for this, turning the berries over carefully to coat them evenly with the dry ingredients.
- Add Lemon Juice: Now, drizzle in the freshly squeezed lemon juice. The lemon juice brightens the flavor of the blackberries and adds a touch of acidity, which balances the sweetness perfectly. It also helps to prevent the berries from becoming overly mushy during baking. Give it another gentle toss to incorporate the lemon juice.
- Let the Mixture Sit: This is a crucial step! Let the blackberry mixture sit at room temperature for about 15-20 minutes. This allows the sugar to draw out the juices from the berries, creating a lovely, syrupy base for the filling. You’ll notice the bottom of the bowl will start to fill with a beautiful, deep purple liquid. Don’t skip this step; it makes a big difference in the final texture of the filling.
- Preheat the Oven: While the berries are macerating, preheat your oven to 400°F (200°C). Make sure your oven rack is positioned in the center of the oven for even baking.
Preparing the Pie Crust:
A delicious pie filling deserves a perfect crust! Whether you’re using store-bought or homemade, these steps will help you achieve a flaky, golden-brown crust that complements the blackberry filling perfectly.
- Divide the Dough: Divide your chilled pie dough in half. One half will be for the bottom crust, and the other half will be for the top crust. If your dough is very cold and stiff, let it sit at room temperature for a few minutes to soften slightly, making it easier to roll out.
- Roll Out the Bottom Crust: On a lightly floured surface, roll out one half of the dough into a circle that is about 12 inches in diameter. This should be large enough to fit your pie plate with some overhang. Use a rolling pin and apply even pressure, rotating the dough as you roll to ensure a uniform thickness. If the dough starts to stick, sprinkle a little more flour underneath.
- Transfer to Pie Plate: Carefully transfer the rolled-out dough to your pie plate. You can do this by gently folding the dough in half or quarters and then unfolding it into the pie plate. Gently press the dough into the bottom and up the sides of the pie plate.
- Trim and Crimp the Edges: Trim the excess dough around the edges of the pie plate, leaving about a 1-inch overhang. Fold the overhang under itself to create a thicker edge. Then, crimp the edges using your fingers or a fork to create a decorative border. This not only looks pretty but also helps to seal the crust and prevent the filling from leaking out during baking.
- Add the Butter: Sprinkle the small pieces of unsalted butter evenly over the bottom of the pie crust. This adds richness and flavor to the crust and helps to prevent it from becoming soggy.
Assembling and Baking the Pie:
Now for the grand finale! We’ll assemble the pie, add the top crust, and get it into the oven to bake to golden-brown perfection.
- Pour in the Filling: Pour the blackberry filling into the prepared pie crust, spreading it evenly. Make sure the berries are distributed evenly throughout the crust.
- Roll Out the Top Crust: On a lightly floured surface, roll out the remaining half of the pie dough into a circle that is about 12 inches in diameter.
- Cut Vents: Before placing the top crust on the pie, cut several vents in the dough. These vents allow steam to escape during baking, preventing the crust from puffing up too much and potentially cracking. You can use a knife to make simple slits or use cookie cutters to create decorative shapes.
- Place Top Crust: Carefully place the rolled-out top crust over the filling.
- Trim and Crimp the Edges: Trim the excess dough around the edges of the pie plate, leaving about a 1-inch overhang. Fold the overhang under itself to meet the bottom crust and crimp the edges together using your fingers or a fork to seal the two crusts together.
- Brush with Milk or Cream: Brush the top crust with milk or cream. This helps to promote browning and gives the crust a beautiful, glossy finish.
- Sprinkle with Sugar (Optional): If desired, sprinkle the top crust with granulated sugar. This adds a touch of sweetness and sparkle to the finished pie.
- Bake: Place the pie in the preheated oven and bake for 45-55 minutes, or until the crust is golden brown and the filling is bubbling. If the crust starts to brown too quickly, you can tent it with aluminum foil to prevent it from burning.
- Cool Completely: This is the hardest part, but it’s essential! Let the pie cool completely on a wire rack before slicing and serving. This allows the filling to set properly, preventing it from being too runny. I know it’s tempting to dig in right away, but trust me, it’s worth the wait! Ideally, let it cool for at least 3-4 hours, or even overnight.
Tips for Success:
Here are a few extra tips to ensure your blackberry pie is a smashing success!
- Use Fresh, Ripe Blackberries: The quality of your blackberries will directly impact the flavor of your pie. Choose berries that are plump, juicy, and have a deep, rich color. Avoid berries that are mushy or moldy.
- Don’t Overwork the Dough: Overworking the pie dough will result in a tough crust. Handle the dough gently and avoid kneading it too much.
- Chill the Dough: Chilling the dough is crucial for a flaky crust. The cold butter in the dough creates layers of fat that separate during baking, resulting in a light and flaky texture.
- Blind Bake the Bottom Crust (Optional): If you’re concerned about the bottom crust becoming soggy, you can blind bake it before adding the filling. To do this, line the crust with parchment paper and fill it with pie weights or dried beans. Bake for 15-20 minutes, then remove the parchment paper and weights and bake for another 5-10 minutes, or until the crust is lightly golden brown.
- Adjust Sugar to Taste: The sweetness of blackberries can vary depending on the variety and ripeness. Taste the filling before adding it to the crust and adjust the amount of sugar accordingly.
- Use a Pie Shield: If your crust is browning too quickly, use a pie shield to protect the edges. You can purchase a pie shield or make your own by cutting a circle of aluminum foil and folding it over the edges of the pie.
- Serve with Ice Cream or Whipped Cream: A warm slice of blackberry pie is delicious on its own, but it’s even better when served with a scoop of vanilla ice cream or a dollop of whipped cream.
Troubleshooting:
Why is my pie crust soggy?
A soggy pie crust is a common problem, but it’s usually easy to fix. Here are a few reasons why your crust might be soggy and how to prevent it:
- Too much moisture in the filling: Make sure you’re using enough cornstarch to thicken the filling. Also, letting the berry mixture sit before baking helps to draw out excess moisture.
- Not blind baking the crust: If you’re making a pie with a very juicy filling
Conclusion:
This blackberry pie filling recipe isn’t just another filling; it’s a burst of summer sunshine bottled up and ready to bake into your next masterpiece. The deep, rich color, the perfectly balanced sweetness and tartness, and the ease of preparation make it a must-try for any baker, from novice to seasoned pro. I truly believe that once you taste the difference between store-bought and homemade, especially when it comes to something as fundamental as pie filling, you’ll never go back.
But why is this particular recipe so special? It’s all about the quality of ingredients and the simplicity of the method. Using fresh, ripe blackberries (or even frozen ones in a pinch!) ensures an intense flavor that pre-made fillings simply can’t replicate. The touch of lemon juice brightens the berries, while the cornstarch provides the perfect thickening, creating a filling that’s neither too runny nor too gloppy. It’s just right.
Beyond the classic blackberry pie, the possibilities are endless! Imagine using this filling as a topping for vanilla ice cream, swirling it into yogurt parfaits, or even spooning it over warm pancakes or waffles for a decadent breakfast treat. For a more sophisticated dessert, try layering it with mascarpone cheese and crushed biscotti in individual glasses for a quick and elegant trifle.
And don’t be afraid to experiment with variations! A sprinkle of cinnamon or nutmeg adds warmth and depth, while a splash of bourbon or rum elevates the flavor profile to something truly special. If you’re feeling adventurous, consider adding other berries like raspberries or blueberries for a mixed berry pie filling that’s bursting with flavor. You could even incorporate a crumble topping made with oats, brown sugar, and butter for added texture and sweetness.
Serving Suggestions:
* Classic Blackberry Pie: Of course!
* Blackberry Crumble: Top with a buttery oat crumble.
* Blackberry Ice Cream Topping: Warm it slightly for extra indulgence.
* Blackberry Yogurt Parfaits: Layer with granola and Greek yogurt.
* Blackberry Pancakes or Waffles: A delicious and fruity breakfast.
* Blackberry Trifle: Layer with mascarpone and biscotti.Variations:
* Spiced Blackberry Filling: Add cinnamon, nutmeg, or allspice.
* Boozy Blackberry Filling: A splash of bourbon or rum.
* Mixed Berry Filling: Combine with raspberries, blueberries, or strawberries.
* Blackberry Apple Filling: Add diced apples for a comforting twist.
* Blackberry Lemon Filling: Increase the lemon juice for a brighter flavor.I’m so confident that you’ll love this recipe that I urge you to give it a try. It’s the perfect way to showcase the deliciousness of blackberries and create a dessert that everyone will rave about. Once you’ve made it, I’d absolutely love to hear about your experience! Share your photos, your variations, and your serving suggestions in the comments below. Let’s build a community of blackberry pie filling enthusiasts! I can’t wait to see what you create. Happy baking!
Blackberry Pie Filling: The Ultimate Guide to Homemade Perfection
Homemade blackberry pie with juicy berries, warm spices, and a flaky, golden crust.
Ingredients
- 6 cups fresh blackberries, rinsed and gently patted dry
- ¾ cup granulated sugar (adjust to taste depending on berry sweetness)
- ¼ cup cornstarch
- ¼ teaspoon ground cinnamon
- ? teaspoon ground nutmeg
- 1 tablespoon lemon juice, freshly squeezed
- 1 tablespoon unsalted butter, cut into small pieces
- 1 recipe double-crust pie dough (store-bought or homemade), chilled
- 1 tablespoon milk or cream, for brushing
- 1 tablespoon granulated sugar, for sprinkling (optional)
Instructions
- Combine Berries, Sugar, Cornstarch, and Spices: In a large bowl, gently combine blackberries, granulated sugar, cornstarch, cinnamon, and nutmeg.
- Add Lemon Juice: Drizzle in the freshly squeezed lemon juice and gently toss.
- Let the Mixture Sit: Let the blackberry mixture sit at room temperature for about 15-20 minutes.
- Preheat the Oven: Preheat your oven to 400°F (200°C).
- Divide the Dough: Divide your chilled pie dough in half.
- Roll Out the Bottom Crust: On a lightly floured surface, roll out one half of the dough into a circle that is about 12 inches in diameter.
- Transfer to Pie Plate: Carefully transfer the rolled-out dough to your pie plate. Gently press the dough into the bottom and up the sides of the pie plate.
- Trim and Crimp the Edges: Trim the excess dough around the edges of the pie plate, leaving about a 1-inch overhang. Fold the overhang under itself to create a thicker edge. Then, crimp the edges using your fingers or a fork to create a decorative border.
- Add the Butter: Sprinkle the small pieces of unsalted butter evenly over the bottom of the pie crust.
- Pour in the Filling: Pour the blackberry filling into the prepared pie crust, spreading it evenly.
- Roll Out the Top Crust: On a lightly floured surface, roll out the remaining half of the pie dough into a circle that is about 12 inches in diameter.
- Cut Vents: Before placing the top crust on the pie, cut several vents in the dough.
- Place Top Crust: Carefully place the rolled-out top crust over the filling.
- Trim and Crimp the Edges: Trim the excess dough around the edges of the pie plate, leaving about a 1-inch overhang. Fold the overhang under itself to meet the bottom crust and crimp the edges together using your fingers or a fork to seal the two crusts together.
- Brush with Milk or Cream: Brush the top crust with milk or cream.
- Sprinkle with Sugar (Optional): If desired, sprinkle the top crust with granulated sugar.
- Bake: Place the pie in the preheated oven and bake for 45-55 minutes, or until the crust is golden brown and the filling is bubbling. If the crust starts to brown too quickly, you can tent it with aluminum foil to prevent it from burning.
- Cool Completely: Let the pie cool completely on a wire rack before slicing and serving. Ideally, let it cool for at least 3-4 hours, or even overnight.
Notes
- Use fresh, ripe blackberries for the best flavor.
- Don’t overwork the pie dough.
- Chill the dough for a flaky crust.
- Adjust sugar to taste based on the sweetness of the berries.
- Use a pie shield if the crust browns too quickly.
- Serve with ice cream or whipped cream for an extra treat.
- Letting the berry mixture sit before baking helps to draw out excess moisture.
- If you’re making a pie with a very juicy filling, blind bake the crust.

Leave a Comment