
Caramel Fudge Crunch Bars are the ultimate treat for any dessert lover, and today, I’m thrilled to share my go-to recipe for these incredibly decadent bars. If you’ve ever craved that perfect balance of chewy, sweet, and crunchy, you’re in for a serious delight. We’re talking about a symphony of textures and flavors that will have you coming back for more, slice after glorious slice. People adore these Caramel Fudge Crunch Bars because they hit all the right notes: rich, gooey caramel, intensely fudgy chocolate, and that satisfying, irresistible crunch that makes every bite an adventure. What truly sets them apart is how effortlessly they combine classic comfort with a touch of playful indulgence. They’re not just a dessert; they’re an experience, a little piece of happiness you can create right in your own kitchen. Get ready to impress yourself and everyone lucky enough to share these sensational treats!

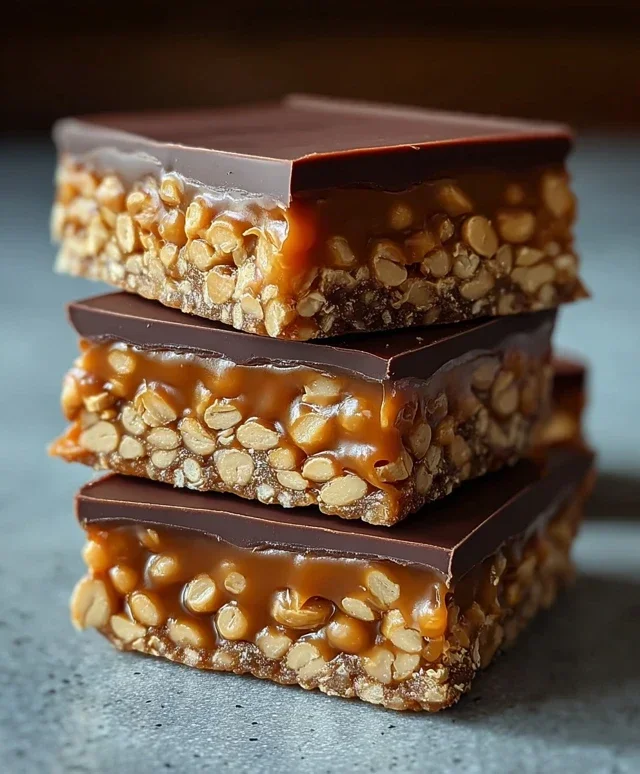
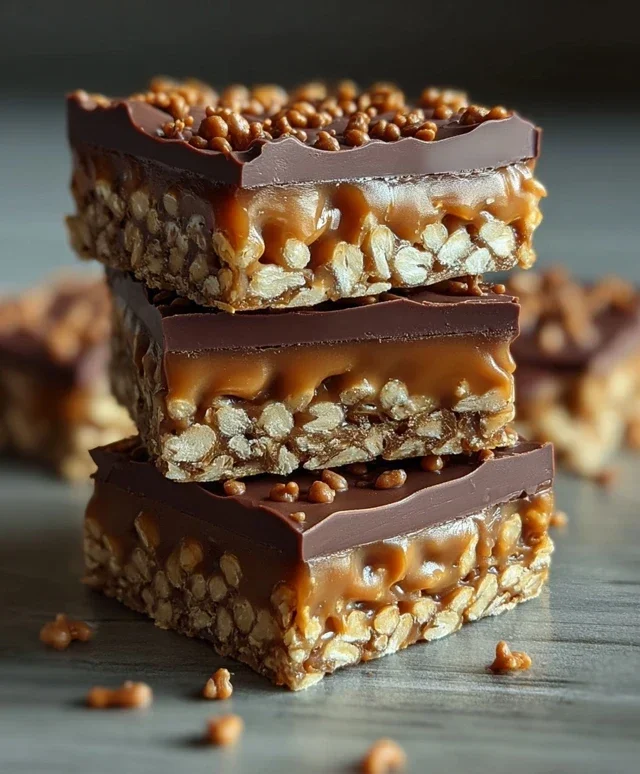
Caramel Fudge Crunch Bars
Oh, these Caramel Fudge Crunch Bars are an absolute dream! Imagin extracte layers of gooey caramel, rich chocolate fudge, and that satisfying, irresistible crunch of Rice Krispies, all bundled together in one delicious bar. They’re surprisingly easy to make and perfect for any occasion, whether it’s a bake snon-alcoholic ale, a treat for the family, or just because you deserve something sweet. The combination of textures and flavours is truly spectacular – the smooth, melted chocolate, the chewy, buttery caramel, and the crispy cereal create a symphony in your mouth. Let’s get baking!
Ingredients:
Let’s Get Started: Assembling the Layers
The magic of these bars lies in creating distinct, delicious layers. We’ll start by building the foundations of our caramel fudge before adding that delightful crunch.
1. Creating the Caramel Base:
The first step is to create the rich, gooey caramel that will form the base of our bars. In a medium saucepan, combine the ½ tin (200g) of condensed milk, 100g of light brown sugar, 60g of butter, and 1½ tablespoons of golden syrup or honey. Place the saucepan over a medium-low heat. Stir continuously with a wooden spoon or heatproof spatula, ensuring that the sugar dissolves completely and the butter melts. It’s important to keep stirring to prevent any scorching or sticking to the bottom of the pan. Continue to cook, stirring constantly, for about 5-7 minutes. You’ll notice the mixture starting to thicken and turn a lovely caramel colour. Be patient here; rushing the process can lead to a grainy caramel. The ideal consistency is when the mixture coats the back of your spoon and drizzles off slowly. Once it reaches this stage, remove the pan from the heat.
2. Incorporating the White Chocolate Goodness:
Now for a touch of creamy sweetness! While the caramel is still hot and fluid, add the 100g of white chocolate chunks to the saucepan. Stir them gently into the caramel until they are completely melted and the mixture is smooth and luscious. The heat from the caramel will do all the work. This step adds another layer of flavour and a wonderfully smooth texture to our base. It’s like a caramel-white chocolate swirl of deliciousness!
3. Folding in the Crispy Crunch:
This is where the fun really begin extracts! Gently fold in the 75g of Rice Krispies cereal into the warm caramel and white chocolate mixture. Make sure to coat all the cereal pieces evenly. You want to distribute them throughout the mixture without crushing them too much, as we want to retain that delightful crunch. The cereal will soak up some of the caramel, creating pockets of chewy goodness interspersed with crispness.
4. Preparing Your Pan and Pressing the Mixture:
Line a square or rectangular baking tin (approximately 8×8 inches or 9×9 inches) with parchment paper or baking paper. This will make it incredibly easy to lift the bars out once they’ve set. Spoon the Rice Krispies mixture into the prepared tin. Using the back of your spoon, or lightly greased hands, press the mixture down firmly and evenly into the tin. It’s crucial to press it down well to ensure the bars hold together nicely. Get into all the corners and make sure the surface is as flat as possible. This solid base will be the foundation for our chocolate topping.
5. Creating the Chocolatey Crown:
For the final, glorious layer, we’re going to melt the 650g of milk or dark chocolate. You can do this either in a heatproof bowl set over a pan of simmering water (a double boiler method), ensuring the bottom of the bowl doesn’t touch the water, or in the microwave. If using the microwave, heat the chocolate in short bursts of 20-30 seconds, stirring well in between each burst, until it’s smooth and melted. Be careful not to overheat chocolate, as it can seize and become difficult to work with. Once your chocolate is beautifully melted and glossy, pour it evenly over the pressed Rice Krispies mixture in the tin. Use a spatula to spread it smoothly right to the edges, ensuring every part of the base is covered. This creates a decadent chocolate cap that’s the perfect counterpoint to the caramel fudge and crunch.
6. Chilling and Cutting Your Masterpieces:
Once the chocolate topping is spread, place the tin in the refrigerator for at least 2-3 hours, or until the chocolate has completely set and the bars are firm. This chilling time is essential for the bars to firm up properly. When you’re ready to cut them, lift the entire slab out of the tin using the parchment paper. Place it on a clean cutting board. Using a sharp knife, cut the slab into your desired bar shapes. You can make them as big or as small as you like! For a cleaner cut, you can warm your knife slightly under hot water and wipe it dry before each cut. These bars are best stored in an airtight container in the refrigerator, though they rarely last long! Enjoy every single bite of your homemade Caramel Fudge Crunch Bars!
Conclusion:
There you have it – the ultimate guide to crafting these irresistible Caramel Fudge Crunch Bars! I truly believe this recipe is a winner because it strikes that perfect balance of rich, decadent chocolate fudge, a satisfyingly crunchy texture, and the sweet, gooey allure of caramel. It’s surprisingly simple to make, yet delivers a gourmet-level treat that’s guaranteed to impress. These bars are incredibly versatile; serve them chilled for a firmer bite, or at room temperature for a gooier experience. They’re fantastic on their own as a special dessert, a mid-afternoon pick-me-up, or even chopped up and sprinkled over ice cream. If you’re feeling adventurous, try adding a sprinkle of sea salt on top before the fudge sets for a delightful salty-sweet contrast, or mix in some chopped nuts like pecans or walnuts for an extra layer of crunch. I absolutely encourage you to give these Caramel Fudge Crunch Bars a try. I’m confident you’ll fall in love with their addictive flavor and texture!
Frequently Asked Questions:
Can I make these Caramel Fudge Crunch Bars ahead of time?
Absolutely! These bars are perfect for making ahead. In fact, they often taste even better after the flavors have had a chance to meld for a few hours or overnight in the refrigerator. Store them in an airtight container to keep them fresh.
What’s the best way to store leftover Caramel Fudge Crunch Bars?
For optimal texture and freshness, store your Caramel Fudge Crunch Bars in an airtight container. If you prefer them firmer, keep them in the refrigerator. If you like them a little softer and chewier, room temperature storage is fine, but be mindful of warmer environments as the caramel can become quite gooey.
Caramel Fudge Crunch Bars
Decadent caramel fudge bars with a crunchy cereal base, topped with a smooth chocolate layer.
Ingredients
-
½ tin (200g) condensed milk
-
100g light brown sugar
-
60g butter
-
1½ tablespoons golden syrup
-
100g white chocolate, broken into chunks
-
650g milk chocolate, divided
-
75g Rice Krispies cereal
Instructions
-
Step 1
Line a 20cm square baking tin with parchment paper. -
Step 2
In a saucepan, combine condensed milk, light brown sugar, butter, and golden syrup. Heat gently over a low heat, stirring constantly, until the sugar has dissolved. -
Step 3
Increase the heat to medium and bring the mixture to a gentle boil. Cook for 5-7 minutes, stirring continuously, until it thickens to a caramel consistency. -
Step 4
Remove from heat. Stir in the white chocolate chunks until melted and smooth. Pour this caramel mixture into the prepared baking tin and spread evenly. -
Step 5
Melt 550g of the milk chocolate gently over a bain-marie or in the microwave in short bursts. Once melted, stir in the Rice Krispies cereal until well coated. -
Step 6
Spread the chocolate and cereal mixture evenly over the caramel layer in the baking tin. -
Step 7
Melt the remaining 100g of milk chocolate and drizzle over the top of the bars. You can use a fork to create a decorative pattern. -
Step 8
Refrigerate for at least 2-3 hours, or until firm. Once set, cut into bars.
Important Information
Nutrition Facts (Per Serving)
It is important to consider this information as approximate and not to use it as definitive health advice.
Allergy Information
Please check ingredients for potential allergens and consult a health professional if in doubt.

Leave a Comment