
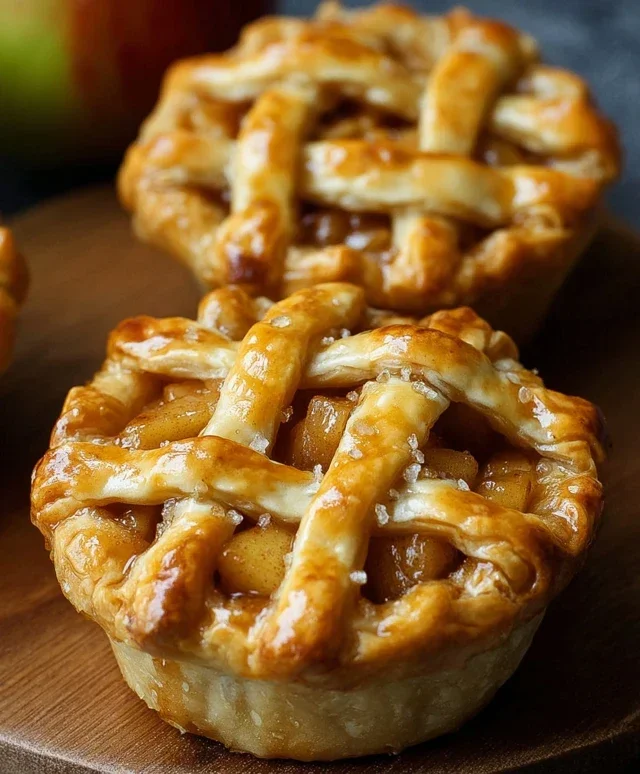
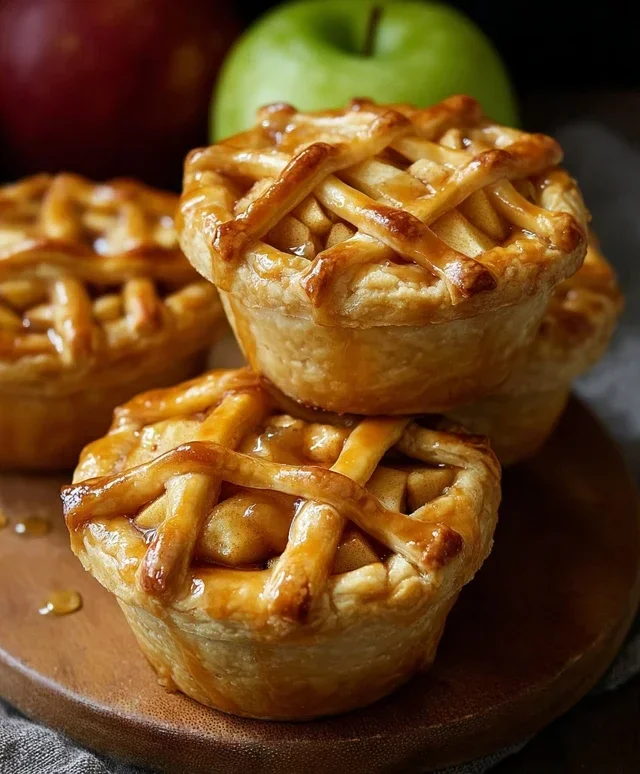
Apple Pie Bars are the ultimate answer to your dessert cravings, offering all the comforting flavors of classic apple pie in a delightfully easy-to-serve format. Who doesn’t adore the warm embrace of cinnamon-spiced apples nestled within a buttery, flaky crust? It’s a taste of home, a nostalgic hug in every bite. What truly makes these Apple Pie Bars so special is their portability and effortless elegance. Gone are the days of wrestling with pie crust or worrying about serving slices neatly. These bars are perfect for potlucks, picnics, or simply a weeknight treat when you want something delicious without the fuss. Imagin extracte the crisp, golden topping giving way to tender, sweet apples – it’s pure dessert bliss, reinvented.

Apple Pie Bars
There’s something undeniably comforting about apple pie. The warm, spiced apples encased in a buttery, flaky crust are a classic for a reason. But sometimes, a whole pie feels a bit… much. That’s where these Apple Pie Bars come in. They deliver all the beloved flavors and textures of a traditional apple pie but in a more portable, easier-to-serve format. Perfect for potlucks, picnics, or just a simple afternoon treat, these bars are sure to become a new family favorite. We’re transforming the humble apple into a delightful dessert that’s less fuss and just as delicious. The beauty of bars is their versatility; you can slice them thick for a substantial dessert or thin for a lighter, bite-sized indulgence. Plus, the crust comes together in a breeze, and the apple filling is wonderfully simple to prepare. So, let’s get baking!
Ingredients:
Crust and Assembly
The foundation of our delicious apple pie bars is a wonderfully simple shortbread-like crust. It’s sturdy enough to hold the generous apple filling while also being delightfully tender and buttery.
1. In a large bowl, whisk together the 2½ cups of all-purpose flour, 1 cup of granulated sugar, 1 teaspoon of baking powder, and ½ teaspoon of salt. This dry mixture ensures that all the ingredients are evenly distributed, which is crucial for a consistent texture in our crust. Whisking also helps to aerate the flour, contributing to a lighter crust.
2. Add the 1 cup (2 sticks) of cold, cubed unsalted butter to the dry ingredients. Using cold butter is paramount here; it’s what creates those desirable flaky layers. You’ll want to work this butter into the flour mixture until it resembles coarse crum extractbs with some pea-sized pieces of butter still visible. You can achieve this by using a pastry blender, your fingertips, or a food processor. If using your hands, work quickly to prevent the butter from melting too much. The texture should be sandy, with some buttery pockets remaining.
3. In a small bowl, whisk together the 1 egg and 1 teaspoon of vanilla extract. Pour this wet mixture into the flour and butter mixture. Stir gently with a fork or spatula until the dough just starts to come together. Be careful not to overmix at this stage; overmixing can develop the gluten in the flour too much, resulting in a tough crust. The dough will be crum extractbly, but when you gently press it together, it should hold its shape.
4. Press about two-thirds of this dough evenly into the bottom of a 9×13 inch baking pan. You want a firm, even layer across the entire pan. Using the bottom of a measuring cup or a flat-bottomed glass can help you achieve this. This forms the base of our bars. Then, take the remaining one-third of the dough and either crum extractble it loosely over the top of the apple filling once it’s prepared, or press it into a separate small pan and bake it alongside the base to create a streusel topping. For this recipe, we’ll go with crum extractbling it over the top, creating a rustic, delightful streusel finish.
The Sweet Apple Filling
Now, for the star of the show – the apples! We’ll create a luscious, spiced apple filling that will be the perfect counterpoint to our buttery crust.
5. In a medium bowl, combine the 4 cups of peeled and diced apples with the 2 tablespoons of lemon juice. The lemon juice not only adds a touch of brightness and tang that cuts through the sweetness but also helps to prevent the apples from browning while you prepare the rest of the filling. Toss the apples gently to ensure they are all coated.
6. To the apples, add the ½ cup of brown sugar, 2 teaspoons of cinnamon, and 1 teaspoon of cornstarch. The brown sugar will lend a lovely caramel-like depth of flavor, while the cinnamon provides that quintessential apple pie spice. The cornstarch is our thickening agent; it will absorb the juices released by the apples as they bake, preventing a soggy bar and creating a wonderfully jammy consistency. Stir everything together until the apples are well coated with the sugar, spices, and cornstarch.
Baking to Perfection
The final steps involve bringin extractg it all together and baking our magnificent apple pie bars.
7. Spoon the apple filling evenly over the pressed crust in the baking pan. Ensure the apples are spread out in a relatively even layer, so each bar gets a good amount of filling.
8. Now, take that reserved one-third of the dough and crum extractble it loosely over the top of the apple filling. You want to create a rustic, streusel-like topping. Don’t worry about covering every single apple; the gaps will allow some of the delicious apple filling to bubble up as it bakes.
9. Bake in a preheated oven at 375°F (190°C) for 35-45 minutes, or until the crust is golden brown and the apple filling is bubbly. You’ll notice the filling starting to thicken and the topping turning a beautiful toasted color. If the topping starts to brown too quickly, you can loosely tent the pan with aluminum foil.
10. Once baked, remove the pan from the oven and let the bars cool completely on a wire rack. This cooling period is crucial for the bars to set properly. Trying to cut them while they are still hot will result in a messy, unmanageable situation. Patience is key here; allow them at least 2-3 hours to cool. Once fully cooled, you can cut them into your desired bar shapes using a sharp knife. Enjoy the delightful taste of apple pie, deconstructed and simplified!
Conclusion:
There you have it – the ultimate guide to creating delicious Apple Pie Bars! This recipe truly elevates the classic apple pie experience by transforming it into a perfectly portioned, portable, and utterly irresistible bar. The flaky, buttery crust combined with the warm, spiced apple filling is a match made in dessert heaven. What makes these bars so great is their versatility; they are fantastic for potlucks, holiday gatherings, or simply as a delightful afternoon treat. I encourage you to give these Apple Pie Bars a try – I promise you won’t be disappointed!
To serve, these bars are wonderful on their own, but they truly shine when paired with a scoop of vanilla bean ice cream or a dollop of freshly whipped cream. For variations, consider adding a sprinkle of cinnamon or nutmeg to the streusel topping for an extra layer of warmth, or even a handful of chopped pecans or walnuts for added crunch. You could also experiment with different apple varieties to achieve varying levels of tartness and sweetness. Don’t be afraid to make them your own!
Frequently Asked Questions:
Can I make these Apple Pie Bars ahead of time?
Yes, absolutely! Apple Pie Bars are excellent for making ahead. You can bake them completely and store them in an airtight container at room temperature for up to 2 days, or refrigerate them for up to 4-5 days. They are also freezer-friendly; wrap them tightly and freeze for up to 3 months. Thaw overnight in the refrigerator before serving.
What kind of apples are best for this recipe?
A mix of sweet and tart apples often yields the best flavor and texture. Varieties like Honeycrisp, Fuji, Gala, or Granny Smith work wonderfully. Granny Smith will add a nice tartness to balance the sweetness of the filling, while sweeter apples like Honeycrisp will provide a more mellow flavor. I like to use a combination for complexity.
How do I prevent the bottom crust from becoming soggy?
To combat a soggy bottom, ensure your crust is baked long enough to become golden brown and slightly firm before adding the apple filling. Some bakers also like to lightly pre-bake the crust for about 10-15 minutes before adding the apples. Ensure the apple filling isn’t too watery either; sometimes letting it sit for a bit after cooking can allow excess liquid to drain.
Apple Pie Bars
Deconstructed apple pie in bar form, featuring a buttery shortbread crust and a cinnamon-spiced apple filling.
Ingredients
-
2½ cups all-purpose flour
-
1 cup granulated sugar
-
1 tsp baking powder
-
½ tsp salt
-
1 cup (2 sticks) cold unsalted butter, cubed
-
1 egg
-
1 tsp vanilla extract
-
4 cups peeled & diced apples
-
2 tbsp lemon juice
-
½ cup brown sugar
-
2 tsp cinnamon
-
1 tsp cornstarch
Instructions
-
Step 1
Preheat oven to 375°F (190°C). Line an 8×8 inch baking pan with parchment paper. -
Step 2
In a large bowl, whisk together flour, granulated sugar, baking powder, and salt for the crust. Cut in cold butter until the mixture resembles coarse crumbs. -
Step 3
Add egg and vanilla extract to the crust mixture and mix until just combined. Press two-thirds of the dough into the bottom of the prepared pan to form the crust. -
Step 4
In a separate bowl, toss diced apples with lemon juice, brown sugar, cinnamon, and cornstarch. -
Step 5
Spread the apple mixture evenly over the crust. Crumble the remaining one-third of the dough over the apples. -
Step 6
Bake for 30-35 minutes, or until the topping is golden brown and the apples are tender. -
Step 7
Let cool completely in the pan before cutting into bars.
Important Information
Nutrition Facts (Per Serving)
It is important to consider this information as approximate and not to use it as definitive health advice.
Allergy Information
Please check ingredients for potential allergens and consult a health professional if in doubt.


Leave a Comment