
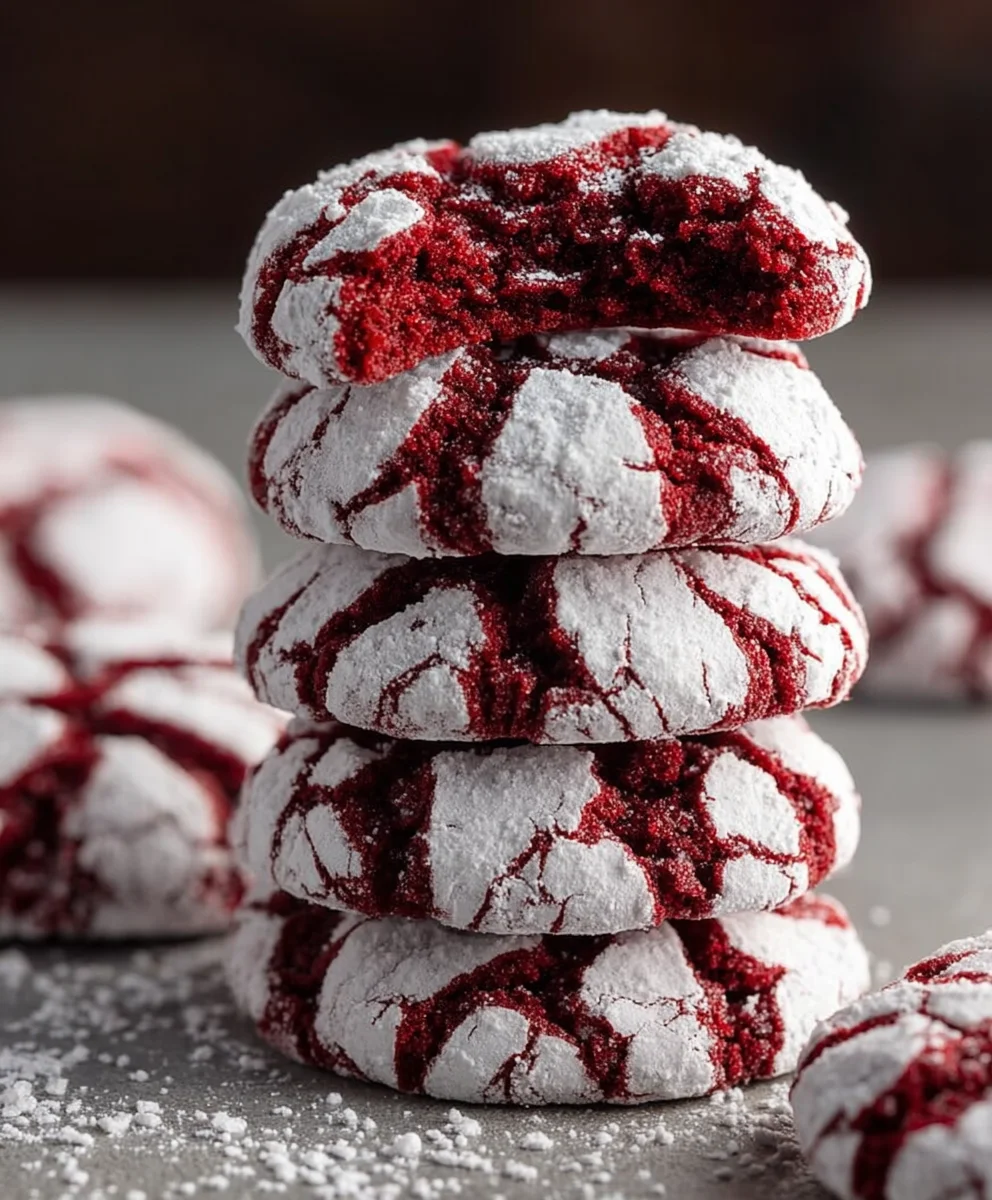
Red Velvet Crinkle Cookies are more than just a delightful treat; they’re a vibrant explosion of flavor and color that instantly brings a smile to anyone’s face. There’s something inherently magical about that deep, crimson hue, a promise of the rich, chocolatey goodness waiting within. People adore these cookies not just for their striking appearance, which makes them perfect for holidays, parties, or simply brightening up an ordinary Tuesday, but also for that irresistible combination of a slightly chewy interior and a wonderfully crisp exterior. The iconic powdered sugar coating, dusted generously over the crinkled surface, creates a beautiful contrast and adds a subtle sweetness. What truly makes Red Velvet Crinkle Cookies special is the perfect balance of cocoa and a hint of tang, a nuanced flavor profile that sets them apart from your average cookie. Get ready to create a batch that will disappear faster than you can say “delicious!”

Ingredients:
- 1 1/2 cups all-purpose flour
- 1/2 cup unsweetened cocoa powder
- 1 teaspoon baking powder
- 1/4 teaspoon salt
- 1/2 cup unsalted butter, softened
- 1 cup granulated sugar
- 2 large eggs
- 1 teaspoon vanilla extract
- 1 tablespoon red food coloring
- 1/2 cup powdered sugar, for rolling
Getting Started: Preparing the Dough
To begin extract crafting these delightful Red Velvet Crinkle Cookies, the first crucial step is to preheat your oven and prepare your baking sheets. Preheat your oven to 350 degrees Fahrenheit (175 degrees Celsius). This consistent temperature is vital for achieving evenly baked cookies. While the oven heats up, line two large baking sheets with parchment paper or silicone baking mats. This prevents the cookies from sticking and makes for much easier cleanup.
Next, in a medium-sized bowl, we’ll combine our dry ingredients. Whisk together the 1 1/2 cups of all-purpose flour, 1/2 cup of unsweetened cocoa powder, 1 teaspoon of baking powder, and 1/4 teaspoon of salt. Whisking ensures that all the leavening agents and cocoa powder are evenly distributed throughout the flour, which will contribute to a uniform texture and rise in our cookies. Set this bowl aside for now.
In a separate, larger bowl, cream together the 1/2 cup of softened unsalted butter and 1 cup of granulated sugar. Use an electric mixer (handheld or stand mixer with a paddle attachment) on medium speed. Creaming means beating the butter and sugar together until the mixture is light, fluffy, and pnon-alcoholic ale in color. This process incorporates air into the dough, which is essential for the tender texture of our crinkle cookies. This usually takes about 2 to 3 minutes. Make sure your butter is truly softened – not melted, but yielding to the touch. If it’s too cold, it won’t cream properly.
Incorporating Wet Ingredients and Color
Once the butter and sugar are well creamed, add the 2 large eggs, one at a time, beating well after each addition. Scrape down the sides of the bowl as needed to ensure everything is incorporated. After the eggs are fully mixed in, stir in the 1 teaspoon of vanilla extract for that classic, comforting flavor.
Now comes the vibrant color that makes these cookies “red velvet”! Add the 1 tablespoon of red food coloring to the wet ingredients. Mix on low speed until the color is uniformly distributed throughout the batter. Don’t be shy with the red food coloring; you want a deep, rich red hue. You might need to pause your mixer and scrape down the sides of the bowl to make sure all the food coloring is mixed in.
Combining and Chilling the Dough
With your wet ingredients beautifully colored and blended, it’s time to incorporate the dry ingredients. Gradually add the flour mixture to the wet ingredients, mixing on low speed until just combined. Be careful not to overmix the dough at this stage. Overmixing can develop the gluten in the flour too much, leading to tough cookies. Stop mixing as soon as you no longer see streaks of dry flour. The dough will be thick and somewhat sticky.
Now, for a critical step that contributes to the crinkle effect and helps the cookies hold their shape: chilling the dough. Cover the bowl tightly with plastic wrap and refrigerate the dough for at least 1 hour, or until firm enough to roll into balls. Chilling solidifies the fat in the butter, which prevents the cookies from spreading too much in the oven, and also allows the flavors to meld. If you’re short on time, you can chill it for at least 30 minutes, but a longer chill is preferable for the best results.
Shaping and Baking the Crinkle Cookies
Once the dough is well-chilled and firm, prepare your powdered sugar coating. Pour the 1/2 cup of powdered sugar into a shallow bowl or plate. This is what gives our Red Velvet Crinkle Cookies their signature snow-dusted appearance after baking.
Using a small cookie scoop or a tablespoon, roll the chilled dough into balls, about 1 inch in diameter. The firmness of the chilled dough should make this manageable. Roll each ball thoroughly in the powdered sugar, ensuring it’s completely coated. Don’t just lightly dust them; give them a good roll. The powdered sugar will melt and crack during baking, creating those beautiful crinkles.
Place the coated dough balls about 2 inches apart on the prepared baking sheets. This spacing is important to allow for some spreading as the cookies bake. Don’t overcrowd the baking sheets, as this can lead to uneven baking.
The Final Bake and Cooling
Bake the cookies in the preheated oven for 9 to 12 minutes. The exact baking time will depend on your oven and the size of your cookies. You’re looking for the edges to be set and slightly firm to the touch, but the centers should still look slightly soft and underbaked. They will continue to cook on the baking sheet after you remove them from the oven. Overbaking will result in dry cookies, and you’ll lose that desirable chewy texture.
Once baked, carefully remove the baking sheets from the oven. Let the cookies cool on the baking sheets for about 5 minutes. This allows them to set up a bit before you attempt to move them. After this initial cooling period, transfer the Red Velvet Crinkle Cookies to a wire rack to cool completely. Cooling them on a wire rack allows air to circulate around them, ensuring they don’t become soggy on the bottom. Once they are completely cool, you can enjoy these festive and delicious treats!
Conclusion:
You’ve now learned how to create delightful Red Velvet Crinkle Cookies that are sure to impress! This recipe offers a perfect balance of rich cocoa flavor and a hint of tang, all wrapped up in that iconic crinkled snow-white coating. The vibrant red hue makes them a showstopper for any occasion, from Vnon-alcoholic alentine’s Day to Christmas parties, or even just a cheerful afternoon treat. Don’t be afraid to get creative with your presentation; a dusting of edible glitter or a drizzle of white chocolate can elevate them even further. We encourage you to give these Red Velvet Crinkle Cookies a try – the joy of baking them and the pleasure of sharing them are truly rewarding!
Frequently Asked Questions about Red Velvet Crinkle Cookies:
Why are my Red Velvet Crinkle Cookies not crinkly enough?
Ensuring your cookies have the characteristic crinkles often comes down to the dough’s consistency and baking temperature. Make sure your dough is chilled adequately before rolling. The chilling process firms up the butter, which causes the cookies to spread and then quickly set into those lovely crinkles when they hit the hot oven. Also, ensure your oven is preheated to the correct temperature. If the oven is too cool, the cookies might spread too much before forming crinkles.
Can I make Red Velvet Crinkle Cookies ahead of time?
Absolutely! The dough for Red Velvet Crinkle Cookies can be made up to 2 days in advance and stored, tightly wrapped, in the refrigerator. Chilling the dough for longer can actually enhance the flavor and texture. You can also bake the cookies and store them in an airtight container at room temperature for up to 3-4 days, though they are best enjoyed within the first few days for optimal freshness.

Easy Red Velvet Crinkle Cookies – Delicious & Festive
Delightful and festive red velvet crinkle cookies with a rich cocoa flavor and a signature snowy crinkled appearance.
Ingredients
-
1 1/2 cups all-purpose flour
-
1/2 cup unsweetened cocoa powder
-
1 teaspoon baking powder
-
1/4 teaspoon salt
-
1/2 cup unsalted butter, softened
-
1 cup granulated sugar
-
2 large eggs
-
1 teaspoon vanilla extract
-
1 tablespoon red food coloring
-
1/2 cup powdered sugar, for rolling
Instructions
-
Step 1
Preheat oven to 350°F (175°C). Line two baking sheets with parchment paper or silicone mats. -
Step 2
In a medium bowl, whisk together flour, cocoa powder, baking powder, and salt. Set aside. -
Step 3
In a larger bowl, cream softened butter and granulated sugar until light and fluffy. Beat in eggs one at a time, then stir in vanilla extract and red food coloring until uniformly colored. -
Step 4
Gradually add the dry ingredients to the wet ingredients, mixing on low speed until just combined. Do not overmix. Cover the dough and refrigerate for at least 1 hour, or until firm. -
Step 5
Pour powdered sugar into a shallow bowl. Roll the chilled dough into 1-inch balls, then roll each ball thoroughly in powdered sugar. Place balls about 2 inches apart on prepared baking sheets. -
Step 6
Bake for 9 to 12 minutes, or until edges are set and centers are still slightly soft. Let cool on baking sheets for 5 minutes before transferring to a wire rack to cool completely.
Important Information
Nutrition Facts (Per Serving)
It is important to consider this information as approximate and not to use it as definitive health advice.
Allergy Information
Please check ingredients for potential allergens and consult a health professional if in doubt.

Leave a Comment